Cookshack Pellet Fired Charbroiler Models: CB012 CB024 CB036 CB048 Installation and Operation Instructions Rev. 10.
Dear Cookshack Customer: Your Cookshack Charbroiler will last for years producing great grilled products, if you follow the installation and operating instructions in this manual. If you have a question or problem not covered in this manual, call us at (800)423-0698 Monday through Friday, 9am to 4pm or email us at info@cookshack.com. We also recommend joining the Cookshack Barbeque Forum on our website at www.cookshack.com.
SPECIFICATIONS CB012 Type: Pellet Fired 1 Controller, Radiant, 3 pounds of Pellets per hour Approximate Weight: Installed—75 lbs. (34 kb), Shipping—100 lbs. (45.3 kg) Dimensions: 14.5”W X 34.5”D X 18”T—Cooking Area 240 sq in Electrical Requirements: 120v, 3 amps CB024 Type: Pellet Fired 2 Controllers, Radiant, 6 pounds of Pellets per hour Approximate Weight: Installed—100 lbs. (45.3 kb), Shipping—125 lbs. (56.7 kg) Dimensions: 26.5”W X 34.
GENERAL INSTALLATION DATA This equipment is designed and sold for commercial use only by personnel trained and experienced in its operation and is not sold for consumer use in and around the home nor for use directly by the general public in food service locations. IMPORTANT INSTALL IN NON‐COMBUSTIBLE LOCATIONS ONLY! Clearance from non‐combustible construction must be 6” from back and sides.
BURNER OPERATION: Burners are controlled with an electronic controller with “Hi”, “Med” and “Low” settings. In order to light the burners press the on/off button and adjust the controller to “Hi”. Once the unit lights, you will see smoke coming from the unit. When this smoke clears and you see that each burner is lit, then adjust the controller to the cooking temperature you desire. For searing set the burner to “Hi” for cooking and finishing set to “Med” and during slow times adjust the unit to “low”.
SEASONING THE COOKING GRATES: Set the heat control switch to the “low” position and preheat for 15 to 20 minutes. Using a cloth spread a thin film of cooking oil over the top of the grate surface. Allow the film to re‐ main on the grate for about 5 minutes. Wipe the surface clean and apply another film of cooking oil. Wipe the surface clean again. The broiler is now ready for use. The oil may tend to smoke—this is normal. BROILING: Turn the unit to “Hi” and pre‐heat before attempting to broil.
LIMITED WARRANTY POLICY Cookshack Smoker Ovens are guaranteed to be free from defects in material and workmanship under normal use and when installed in accordance with factory recommendations. This limited warranty includes parts and labor for the first 90 days. Following the 90 day period, the two (2) year limited warranty is for parts only. Cookshack, Inc.’s obligation under this warranty shall be to repair or replace at its option any part deemed defective upon examination by Cookshack, Inc.
RETURN MERCHANDISE POLICY If you have merchandise that you believe is defective and requires repair or replacement: 1. Call Cookshack, Inc. at (580)765-3669. Ask to speak to a Customer Service Representative. Have your Smoker Oven model number and serial number ready. If you are advised to return the merchandise to the factory for repair or replacement, please observe the following procedures. 2. You will be issued a return number.
5. Repair or replacement of merchandise under warranty. Replacement or repairing defective merchandise is at Cookshack, Inc.'s option. If repair of merchandise is deemed necessary by Cookshack, Inc. you will be instructed as to the necessary arrangements in order to affect the repair of the merchandise. If replacement merchandise is deemed necessary by Cookshack, Inc. you will be invoiced for the replacement merchandise upon shipment.
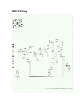
CB012 Wiring
CB024 Wiring
CB036 Wiring
CB048 Wiring
Charbroiler Illustration Cooking Grates CB600 CB012 (2) CB024 (4) CB036 (6) CB048 (8) Control Board CB500 Auger Motor PV514 Combustion Fan PV516 Relay PV682 Relay PV631 Igniter PV310 Hopper Switch PV366 Power Cord PV461 Water pan/drip tray Caster PV175