
Instructions / Assembly


4
Ventamatic, Ltd. | 100 Washington Ave, Mineral Wells, TX 76068 ▪ Phone: (800) 433-1626 ▪ www.bvc.com
IMPORTANT: Ensure that the distance between the ceiling joists members is at least 14-½ inches. Also ensure there is
an acceptable fan mounting location 10 feet or less from the location where the wire is being used to mark the location of
the damper assembly box installation.
If there are obstructions to the installation, the distance between the joists is less than the minimum of 14-½” or the closest
fan mounting location is further than 10 feet you will need to choose a different location to install the damper assembly
box.
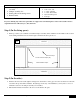
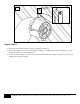
Mark a 14-½” x 22-½” rectangle on the back side of the ceiling material. Center this rectangle around the wire
that has been used to mark the center of the hallway.
Drill a small hole in each corner of the rectangle to use as guides for cutting the ceiling material from the living
space below as shown in Figure A.
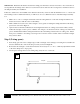
Optional, but recommended: Measure the exact length between the two ceiling joists between which you have
marked the rectangle. Cut two pieces of lumber, 2x4 or larger, to fit in between the two ceiling joists. Place these
pieces of lumber flush with the ceiling material in the attic and running in between the two ceiling joists. Fasten
these pieces of lumber to the ceiling joists using screws or nails to create a wooden “frame” around the rectangle
that you have drawn.
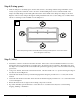
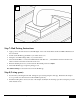
Step 3 (Living space):
In the living space below use a straight edge to mark a rectangle on the ceiling by connecting the four small holes
that were drilled at the corners in the attic previously as shown in Figure B.
Re-measure this rectangle to ensure that it measures the necessary 14-½” x 22-½”. Make any adjustments needed
to allow the damper box to fit properly.
Cut along the rectangle drawn on the ceiling using a keyhole saw or saber saw.
B
22-1/2”
14-1/2”