
Instructions / Assembly

Ventamatic, Ltd. | 100 Washington Ave, Mineral Wells, TX 76068 ▪ Phone: (800) 433-1626 ▪ www.bvc.com
3
Parts Included
•
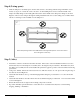
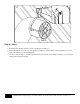
Fan, hanging bracket, duct and transition
assembly
• Damper assembly box
• Intake grille and mounting screws
• Rafter bracket
•
5/16" x 2-1/2" bolt
• 5/16" x 3/4" bolt
• 2 - 5/16" locknuts
• 4 - 5/16" flat washers
• Nylon bracket spacer
• Foil tape
If you are missing any of the above parts that are supposed to be included please contact our Customer Service
department and we will assist you. (800) 433-1626
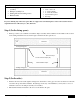
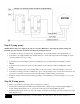
Step 1 (In the living space):
• Find a spot where you would like to install the damper assembly, drill a small hole in the middle of this location
in the ceiling material and feed a wire through to mark it in the attic space above.
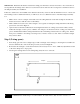
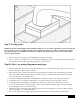
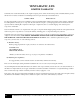
Step 2 (In the attic):
• Find the wire that was fed through the ceiling below and check for wires, pipes and other obstructions around the
area where the product will be installed. If anything is in the way of the installation you may have to choose a
different location for the damper assembly to be installed.
• Pull back the insulation material to allow for a well visible work space.
Insulation
Existing ceiling joist
Insulation
Blocks added in step 2
Hole from step 1
Existing ceiling joist
Corner hole from step 2 (x4)
A