
Instructions / Assembly


Ventamatic, Ltd. | 100 Washington Ave, Mineral Wells, TX 76068 ▪ Phone: (800) 433-1626 ▪ www.bvc.com
3
Deciding on a Joist-In or Joist-Out Installation
Joist-In Installation
The ceiling joists will be left intact for this
method. You will need another attic access, as the
fan will not fit through the shutter opening with
the joist(s) in place.
Joist-Out Installation
This method involves removing one or more
ceiling joists. This is the preferred method, as the
best location does not necessarily coincide with
the position of the joists.
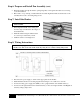
Step 1: Prepare the Shutter Opening
Find a spot in the center of the hallway, drill a hole
and feed a wire through to mark it.
Mark space around the wire equal to the area of the
rough shutter opening in the chart below in the joist-
in or joist-out option below.
Remove all insulation above the installation site.
Joist-In Installation
Align shutter vein with ceiling joist in the
center of the shutter opening.
Draw a line on the ceiling marking the rough
opening size of the shutter frame.
Double-check the accuracy of the dimensions
you have marked and that all the corners are
square.
TIP: Use the shutter as a template to outline the
opening by drawing the cutout line around the
inside edges.
Joist-Out Installation
Drill two ¼” holes (from attic floor
through the ceiling) at the two corners that are
aligned with one of the ceiling joists.
On ceiling side, draw a straight line between
the two drilled holes. Use this line as a guide
to mark the other three sides of the shutter
opening, using rough opening dimensions
chart above.
From ceiling side, drill two more ¼” holes at
the remaining corners.
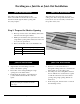
Fan Size
Shutter Rough Opening (L X W)
24-in.
28” X 26”
30-in.
32 1/4” X 29 1/2”
36-in.
34” X 37 1/2”