
Instructions / Assembly


Ventamatic, Ltd. | 100 Washington Ave, Mineral Wells, TX 76068 ▪ Phone: (800) 433-1626 ▪ www.bvc.com
5
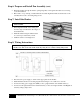
Step 5: Facing Installation
Use 2 X 6 boards to create a square with the inside dimensions being the same distance as the shortest
dimension of the shutter rough opening (i.e. 26” for a 24-in model, etc.).
Nail or screw in the facing to the framed opening.
TIP: If doing a joist-out installation, use lumber from the support pieces as the long cuts and the removed joists as the
short cuts.
TIP: For a quieter fan, build a second box frame the same size as the fan frame and install it between the frame and
facing. Ensure that there is still a minimum of 36” clearance between the fan blades and attic roof.
Step 6: Prepare and Install Fan Assembly
Belt Drive Models
Remove hardware and remount the motor on
the top side of the struts.
Position fan belt on the pulleys and adjust it to
fit snugly with about 1/2” deflection. DO NOT
OVERTIGHTEN THE BELT!
Tighten fan blade set screw and make sure the
hub of the fan blade assembly is facing up
towards the roof.
Direct Drive Models
Remove fan blade and wire the motor first.
Replace and secure the blade so it is about
half-in and half-out of the hub.
Tighten fan blade set screw before operating
and make sure the hub of the fan blade
assembly is facing up towards the roof.
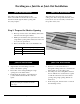
Joist-In Installation
Joist-Out Installation