
Instructions / Assembly


6
Ventamatic, Ltd. | 100 Washington Ave, Mineral Wells, TX 76068 ▪ Phone: (800) 433-1626 ▪ www.bvc.com
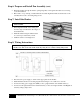
Step 6: Prepare and Install Fan Assembly (cont.)
Push fan assembly through the shutter opening diagonally or through another attic access if doing
a joist-in installation.
Place frame on top of facing or additional frame and draw alignment marks around the base of the
assembly then secure to the facing using screws.
Step 7: Install the Shutter
_*Note* Never operate the fan without the
shutter installed
Draw alignment marks on the ceiling 7/8”
from the edges to indicate the outer edges of
the shutter frame.
Install the shutter using the white-headed
wood screws provided with your fan.
Caulk the seams for an airtight seal.
Step 8: Wiring Instructions
*Note* All wiring supplies and installations must meet or exceed the requirements of local electrical
_and fire codes. Wire to 120 Volt, 60 Hz circuit only, using 14-3 two-conductor wiring with ground.
Disconnect the power supply or switch off the appropriate circuit breaker.
Install included switches in a double gang UL listed wiring box, in a wall close to the fan.
Connect incoming power supply wire (BLK) to the top right terminal of the On/Off switch (1).
Connect bottom right terminal of the On/Off switch (2) to the bottom right terminal of the High/Low
switch (3) using a jumper wire.