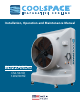
Installation, Operation and Maintenance Manual BLIZZARD50 CS6-50-VD 120V/60HZ
CS6-50-VD Operation & Maintenance Manual Table of Contents: 1.0 Introduction 1 2.0 Unpacking your COOL- SPACE® 1 3.0 Set-up of COOL-SPACE® unit 3.1 Connecting the water supply 3.2 Connecting the electrical supply 1 1 2 4.0 Operating procedures 4.1 Filling the unit with water 4.2 Starting the fan 4.3 Starting the pump and adjusting the water flow 3 3 4 4 5.0 Maintenance and storage 5.1 Removing the cooling media & accessing the inside of the unit 5.2 Daily maintenance 5.3 Periodic maintenance 5.
Due to continuous product innovations, we reserve the right to change product specification without due notice. Signal Word Definitions DANGER indicates an imminently hazardous situation which, if not avoided, WILL result in death or serious injury. WARNING indicates a potentially hazardous situation which, if not avoided, COULD result in death or serious injury. CAUTION indicates a potentially hazardous situation which, if not avoided, MAY result in minor or moderate injury.
3.2 Connecting the electrical supply The COOL-SPACE® unit should be plugged into a fused or circuit breaker protected 20 amp, 120 volt, and 60 Hz circuit. All models utilize standard 120-volt power supply. The unit should be plugged into a fused or circuit breaker protected 20 amp, 120 volt, 60 Hz circuit. Table 1 shows the amperage requirements for the specific models. If an extension cord is required, refer to Table 2 for the proper 3-conductor heavy-duty cord required.
4.0 Operating procedures There are 3 factors to consider when determining where to place the COOL-SPACE® unit. 1. Fresh air supply: The inlet side of the unit (pad side) requires a constant, uninterrupted supply of fresh air for maximum performance. A distance of 3 feet clear space to any obstructions at the rear or inlet side of the unit is recommended. 2.
4.3 Starting the pump and adjusting the water flow DO NOT flood the pads with water, keep them moist. New pads will take a few days before they become completely saturated. It is normal to have several dry streaks on the face of the pads about 1 to 2 inches wide. If the streaks are larger adjust the flow control knob to allow more water to flow onto the pads. NOTE: New pads may also emanate an odor under initial operating conditions from the resin used to construct the media.
5.2 Daily maintenance When shutting down the COOL-SPACE® unit at the end of each workday, the pump should be turned off approximately 15 minutes before the fan is turned off. This will allow the pads to drain and dry out. This simple guideline will ensure long and efficient pad life as well as help to control mildew and bacteria growth. 5.3 Periodic maintenance ELECTRICAL SHOCK HAZARD Disconnect the power supply before performing any service or maintenance on the unit.
6.0 Troubleshooting/Repair 6.1 Troubleshooting ELECTRICAL SHOCK HAZARD Disconnect the power supply before performing any service or maintenance on the unit. Failure to do so may result in serious injury or death. The COOL-SPACE® unit consists of three systems: the fan, water distribution and pump. It is important to determine which system of the COOL-SPACE® unit the problem is associated with. This may not always be obvious, in that certain problems may be associated with more than one system.
6.1 Troubleshooting (continued) Please use caution when troubleshooting or repairing all electrical components. Be certain that all power is disconnected from the COOL-SPACE® unit before the cooling pads are removed to gain access to the fan.
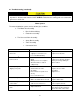
6.1 Troubleshooting (continued) Pump Problem Check Solution Pump motor will not run when switch is turned on. Turn fan on to check for power. Is water level high enough to make the low- water cut-off circuit? If fan doesn’t start; check breaker and cord plug-in. If fan does start; check for power to and through pump switch (when turned on). Fill water reservoir. Pump motor hums when switch is turned on, but does not pump water. Obstruction in impellor. Pump motor failure. Remove object(s).
6.2 Repair procedures Repairs should be performed by a qualified technician! ELECTRICAL SHOCK HAZARD Disconnect the power supply before performing any service or maintenance on the unit. Failure to do so may result in serious injury or death. BLIZZARD (CS6-50-VD) Fan Motor Replacement 1. Remove cap from bottom of motor. Disconnect wires. Clip wire ties. 2. Remove (4) fan mounting bolts from the front. (Support fan to ensure it doesn’t fall.) 3. Pull the fan out of the unit. 4.
7.0 Warranty Under normal use, the warranty covers the unit and its components for twenty-four (24) months from date of invoice. Refer to the manufacturer’s Warranty Policy for details. 7.1 Warranty Form You must register your COOL-SPACE® Portable Evaporative Cooler within fifteen (15) days of initial purchase to validate your cooler’s warranty. You may fill out the warranty form supplied with your unit and fax it to 1-317-485-0118 or register online at www.cool-space.com. 7.
Notes
315 N Madison Street Fortville, IN 46040 1-800-557-5716 sales@cool-space.com www.COOL-SPACE.