
Service manual


Replacing the Compressor
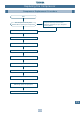
Compressor Replacement Procedure
138
19
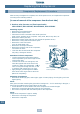
2. Outdoor unit
MM-A0160HX
Removing of parts
• Remove the front painted panel.
• Remove electrical parts cover.
• Disconnect all wires connected to the electric parts box, temp. sensor, pressure sensor,
complete, 2-way valve, PMV, 4-way valve, etc..
• Remove the electric parts box.
• Remove the rear painted panel.
• Remove the crank case heater.
• Remove the sound-proof blanket.
• Remove the terminal cover of the compressor, and remove all wires.
• Remove two temp. sensors for oil detection from the pipe.
• Fully close the valve located under the compressor fully using a hexagonal wrench.
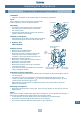
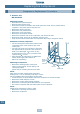
Extraction of oil from compressor
• Cut the case bypass located at the bottom of the
compressor by the same height as that of the
suction pipe.
• Connect hose to the cut case bypass, and insert
the opposite side of the hose in the container in
which oil is discharged. 2 or more oil may
flow through the hose, so use a container with
capacity of 2.5 or more.
• Apply nitrogen gas with approx. 0.02MPa from
service valve at gas side to extract oil.
(Extract oil completely.)
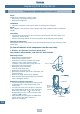
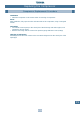
Removing of compressor
• Remove the discharge pipe, suction pipe,
upper oil return piping, oil tank piping, and
case bypass piping.
(Same case for removing from the front side)
NOTE:
Take great care when removing the pipes with a
brazing torch – if oil is remaining in the pipe, a flame
may be emitted at the moment when the flux melts.
• Loosen the flare nut at the bottom side of the compressor to remove the pipe.
• Remove the metal fixing the oil tank.
• Remove the oil tank. (Two brazing positions)
• Remove the screws fixing the bottom plate for the compressor.
• Pull out the compressor with the bottom plate for the compressor.
NOTE:
Weight of the compressor is approx. 45kg.
• Remove the nuts fixing the compressor.
• Remove the compressor.
Brazed
positions
to be
removed
Oil tank
Fixing metal