
Camcorder User Manual
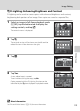


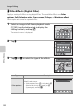
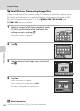
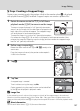
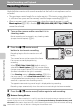
Table Of Contents
- For Your Safety
- Notices
- Introduction
- First Steps
- Basic Photography and Playback: Auto Mode
- More on Shooting
- More on Playback
- Operations in Full-frame Playback Mode
- Viewing Multiple Images: Thumbnail Playback
- Taking a Closer Look: Playback Zoom
- Selecting Playback Mode
- Sorting Favorite Pictures (Favorite Pictures Mode)
- Image Searching in Auto Sort Mode
- Selecting Images Captured on a Specific Day (List by Date Mode)
- Playback Options
- Setting the Image Rating
- Enjoying Slide Show
- Protecting Important Images (Protect)
- Creating a DPOF Print Order
- Rotate Image
- Voice Memo: Recording and Playback
- Editing Images
- Movie Recording and Playback
- Connecting to Televisions, Computers and Printers
- Basic Camera Setup
- Setup Menu
- Welcome Screen
- Time Zone and Date
- Monitor Settings
- Print Date (Imprinting Date and Time)
- Vibration Reduction
- Motion Detection
- AF Assist
- Digital Zoom
- Sound Settings
- Auto Off
- Format Memory/Format Card
- Language
- TV Settings
- Charge by Computer
- Blink Warning
- Reset All
- Copy (Copy Between Internal Memory and Memory Card)
- Firmware Version
- Setup Menu
- Caring for the Camera
- Technical Notes and Index

128
Movie Recording and Playback
Movie Recording and Playback
Recording Movies
High-definition movies with sound recorded via the built-in microphone can be
recorded.
• The maximum movie length for a single movie is 29 minutes, even when there
is sufficient free space on the memory card for longer recording (A 131).
• When a memory card is not inserted (i.e., when the internal memory is used),
Movie options (A 130) is fixed at y VGA (640×480). HD 720p (1280×720)
cannot be selected.
1 Turn on the camera and be sure that it is in
shooting mode.
Movie recording can be started in any shooting mode
(except the draw option) (A 41).
2 Press the b (e movie-record)
button to start movie recording.
Recording begins after the monitor turns off
briefly.
The camera focuses at the center of the frame.
Focus areas are not displayed during
recording.
When N HD 720p (1280×720) (default setting) is
selected for Movie options (A 130), monitor display
changes to an aspect ratio of 16:9 with movie recording
(the area indicated on the right is recorded).
If the Shooting setting in Monitor settings (A 155) in
the setup menu is set to View/hide movie frm, a frame
is displayed before recording begins that represents the
area that is captured when recording movies.
The approximate remaining movie length is displayed during recording.
Recording stops automatically when the maximum movie length has been recorded.
3 Press the b (e movie-record) button again to end recording.
23
23
23
10s
10s
10s
B Note on Saving Movies
After a movie has been recorded, it is not fully saved to the internal memory or memory card until
monitor display returns to the shooting display. Do not open the battery-chamber/memory card
s
lot cover before movies have been fully saved. Removing the memory card while movies are being
saved could result in loss of data or in damage to the camera or card.