
Camcorder User Manual
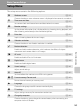
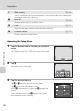
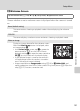

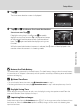
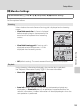
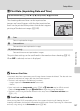
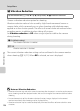
Table Of Contents
- For Your Safety
- Notices
- Introduction
- First Steps
- Basic Photography and Playback: Auto Mode
- More on Shooting
- More on Playback
- Operations in Full-frame Playback Mode
- Viewing Multiple Images: Thumbnail Playback
- Taking a Closer Look: Playback Zoom
- Selecting Playback Mode
- Sorting Favorite Pictures (Favorite Pictures Mode)
- Image Searching in Auto Sort Mode
- Selecting Images Captured on a Specific Day (List by Date Mode)
- Playback Options
- Setting the Image Rating
- Enjoying Slide Show
- Protecting Important Images (Protect)
- Creating a DPOF Print Order
- Rotate Image
- Voice Memo: Recording and Playback
- Editing Images
- Movie Recording and Playback
- Connecting to Televisions, Computers and Printers
- Basic Camera Setup
- Setup Menu
- Welcome Screen
- Time Zone and Date
- Monitor Settings
- Print Date (Imprinting Date and Time)
- Vibration Reduction
- Motion Detection
- AF Assist
- Digital Zoom
- Sound Settings
- Auto Off
- Format Memory/Format Card
- Language
- TV Settings
- Charge by Computer
- Blink Warning
- Reset All
- Copy (Copy Between Internal Memory and Memory Card)
- Firmware Version
- Setup Menu
- Caring for the Camera
- Technical Notes and Index

153
Setup Menu
Basic Camera Setup
3 Tap o.
The time zone selection screen is displayed.
4 Tap E or F to choose the travel destination
time zone and tap I.
If daylight saving time is in effect, tap p to enable
daylight saving time function. W is displayed at the top
of the monitor and the camera clock is advanced one
hour. Tap p again to disable the daylight saving time
function.
While the travel destination time zone is selected, the Z icon will be displayed in the
monitor when the camera is in shooting mode.
Time zone
London, Casablanca
15/05/2011 06 30
:
Home time
zone
Travel
destination
Moscow
Nairobi
Riyadh
Kuwait
Manama
Travel destination
10 30
:
–
05
00
:
B Note on the Clock Battery
T
he camera clock is powered by the clock battery. The clock battery charges when the main battery
is inserted or an AC adapter is connected, and can provide several days of backup power after about
ten hours of charging.
C w Home Time Zone
• To switch to the home time zone, tap w Home time zone in step 2.
• To change the home time zone, tap w Home time zone in step 2 and complete steps 3 and 4.
C Daylight Saving Time
When daylight saving time starts or ends, turn the daylight saving time option on or off from the
time zone selection screen displayed in step 4.
D Imprinting Date on Images
Enable date imprint from the Print date option (A 157) in the setup menu after the date and time
have been set. When the Print date option is enabled, images will be saved with shooting date
imprinted on them.