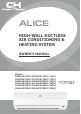
ALICE HIGH-WALL DUCTLESS AIR CONDITIONING & HEATING SYSTEM OWNER'S MANUAL Models: CH09ACE115VI/CH09ACE115VO (115V) CH12ACE115VI/CH12ACE115VO (115V) CH09ACE230VI/CH09ACE230VO (230V) CH12ACE230VI/CH12ACE230VO (230V) CH18ACE230VI/CH18ACE230VO (230V) CH24ACE230VI/CH24ACE230VO (230V)
CH09ACE115VI/CH09ACE115VO System Includes: CH09ACE115VI, CH09ACE115VO CH12ACE115VI/CH12ACE115VO System Includes: CH12ACE115VI, CH12ACE115VO CH09ACE230VI/CH09ACE230VO System Includes: CH09ACE230VI, CH09ACE230VO CH12ACE230VI/CH12ACE230VO System Includes: CH12ACE230VI, CH12ACE230VO CH18ACE230VI/CH18ACE230VO System Includes: CH18ACE230VI, CH18ACE230VO CH24ACE230VI/CH24ACE230VO System Includes: CH24ACE230VI, CH24ACE230VO
Operation Notices Content Precautions. ...........................................................................................................1 Parts name . ...........................................................................................................6 Screen Operation Guide Buttons on remote controller . ................................................................................7 Introduction for icons on display screen . ...........................................................
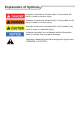
Explanation of Symbols Indicates a hazardous situation that, if not avoided, will result in death or serious injury. Indicates a hazardous situation that, if not avoided, could result in death or serious injury. Indicates a hazardous situation that, if not avoided, may result in minor or moderate injury. Indicates important but not hazard-related information, used to indicate risk of property damage. Indicates a hazard that would be assigned a signal word WARNING or CAUTION.
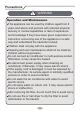
Precautions WARNING Operation and Maintenance This appliance can be used by children aged from 8 years and above and persons with reduced physical, sensory or mental capabilities or lack of experience and knowledge if they have been given supervision or instruction concerning use of the appliance in a safe way and understand the hazards involved. Children shall not play with the appliance. Cleaning and user maintenance shall not be made by children without supervision.
Precautions WARNING Maintenance must be performed by qualified professionals. Otherwise, it may cause personal injury or damage. Do not repair air conditioner by yourself. It may cause electric shock or damage. Please contact dealer when you need to repair air conditioner. Do not extend fingers or objects into air inlet or air outlet. It may cause personal injury or damage. Do not block air outlet or air inlet. It may cause malfunction.
Precautions WARNING Attachment Installation must be performed by qualified professionals. Otherwise, it may cause personal injury or damage. Must follow the electric safety regulations when installing the unit. According to the local safety regulations, use qualified power supply circuit and circuit break. Do install the circuit break. If not, it may cause malfunction. An all-pole disconnection switch having a contact separation of at least 1/8(3mm) in all poles should be connected in fixed wiring.
Precautions WARNING Do not put through the power before finishing installation. If the supply cord is damaged, it must be replaced by the manufacturer, its service agent or similarly qualified persons in order to avoid a hazard. The temperature of refrigerant circuit will be high, please keep the interconnection cable away from the copper tube. The appliance shall be installed in accordance with national wiring regulations.
Precautions WARNING For the air conditioner with plug, the plug should be reachable after finishing installation. For the air conditioner without plug, an circuit break must be installed in the line. If you need to relocate the air conditioner to another place, only the qualified person can perform the work. Otherwise, it may cause personal injury or damage. Select a location which is out of reach for children and far away from animals or plants.If it is unavoidable, please add the fence for safety purpose.
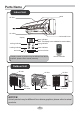
Parts Name Indoor Unit panel air inlet air outlet horizontal louver display temp. indicator (Note: This dispaly is not available for some models.) cooling indicator drying indicator heating indicator power indicator receiver window aux.
Buttons on remote controller 1 ON/OFF button 2 MODE button 3 FAN button 4 SWING button 2 4 3 5 TURBO button 5 6 ▲/ 6 7 11 button 7 SLEEP button 8 9 ▲ 1 8 TEMP button 10 9 I FEEL button 12 10 LIGHT button 11 CLOCK button 12 TIMER ON/TIMER OFF button Introduction for icons on display screen health function I feel Set fan speed Send signal Operation mode Turbo mode Auto mode Cool mode 46°F(8°C) heating function Set temperature Dry mode Fan mode Set time TIMER ON/ TIMER OFF Child loc
Introduction for buttons on remote controller Note: ● This is a general use remote controller, it could be used for the air conditioners with multifunction; For some function, which the model doesn't have, if press the corresponding button on the remote controller that the unit will keep the original running status. ● After putting through the power, the air conditioner will give out a sound. Operation indictor " " is ON (red indicator).
Introduction for buttons on remote controller temperature. Press "FAN" button to adjust fan speed. Press "SWING" button to adjust fan blowing angle. (Cooling only unit won’t receive heating mode signal. If setting heat mode with remote controller, press ON/OFF button can’t start up the unit). Note: ● For preventing cold air, after starting up heating mode, indoor unit will delay 1~5 minutes to blow air (actual delay time is depend on indoor ambient temperature).
Introduction for buttons on remote controller 5 TURBO button Under COOL or HEAT mode, press this button to turn to quick COOL or quick HEAT mode. " " icon is displayed on remote controller. Press this button again to exit turbo function and " " icon will disappear. ▲/ ▲ 6 button ▲ ▲ ● Press "▲" or " " button once increase or decrease set temperature 33.8°F(1°C). Holding "▲" or " " button, 2s later, set temperature on remote controller will change quickly.
Introduction for buttons on remote controller ● It’s defaulted to display set temperature when turning on the unit. There is no display in the remote controller. ● Only for the models whose indoor unit has dual-8 display. ● When selecting displaying of indoor or outdoor ambient temperature, indoor temperature indicator displays corresponding temperature and automatically turn to display set temperature after three or five seconds.
Introduction for buttons on remote controller ▲ TIMER ON setting will increase or decrease 1min. Hold "▲" or " " button, 2s later, the time will change quickly until reaching your required time. Press "TIMER ON" to confirm it. The word "ON" will stop blinking. " " icon resumes displaying. Cancel TIMER ON: Under the condition that TIMER ON is started up, press "TIMER ON" button to cancel it. ● TIMER OFF button "TIMER OFF" button can set the time for timer off.
Function introduction for combination buttons 8℃ heating function Under heating mode, press “TEMP” and “CLOCK” buttons simultaneously to start up or turn off 46°F(8°C) heating function. When this function is started up, “ ” and “46°F(8°C)” will be shown on remote controller, and the air conditioner keep the heating status at 46°F(8°C). Press “TEMP” and “CLOCK” buttons simultaneously again to exit 46°F(8°C) heating function.
Operation guide 1. After putting through the power, press "ON/OFF" button on remote controller to turn on the air conditioner. 2. Press "MODE" button to select your required mode: AUTO, COOL, DRY, FAN, HEAT. 3. Press "▲" or " " button to set your required temperature. (Temperature can’t be adjusted under auto mode). 4. Press "FAN" button to set your required fan speed: auto, low, medium and high speed. 5. Press "SWING" button to select fan blowing angle. ▲ Replacement of batteries in remote controller 1.
Emergency operation If remote controller is lost or damaged, please use auxiliary button to turn on or turn off the air conditioner. The operation in details are as below: conditioner. When the air conditioner is turned on, it will operate under auto mode. panel aux. button WARNING: Use insulated object to press the auto button Clean and maintenance WARNING ■ Turn off the air conditioner and disconnect the power before cleaning the air conditioner to avoid electric shock.
Clean and maintenance 1 Open panel 3 Pull out the panel to a certain Use dust catcher or water to clean the filter. When the filter is very dirty use the water (below 113°F(45°C)) to clean it, and then put it in a shady and cool place to dry. 2 4 panel cover tightly. WARNING operation environment, clean frequency can be increased.
Clean and maintenance NOTICE: Checking before use-season 1. Check whether air inlets and air outlets are blocked. 2. Check whether circuit break, plug and socket are in good condition. 4. Check whether mounting bracket for outdoor unit is damaged or corroded. If yes, please contact dealer. 5. Check whether drainage pipe is damaged. NOTICE: Checking after use-season 1. Disconnect power supply. 3. Check whether mounting bracket for outdoor unit is damaged or corroded. If yes, please contact dealer.
Malfunction analysis General phenomenon analysis Please check below items before asking for maintenance. If the malfunction still can’t be eliminated, please contact local dealer or qualified professionals. Phenomenon Check items Solution ● Whether it's interfered severely ● Pull out the plug. Reinsert (such as static electricity, stable the plug after about 3min, and voltage)? then turn on the unit again. Indoor unit can’t receive remote controller’s signal or remote controller has no action.
Malfunction analysis Phenomenon Air conditioner can’t operate Mist is emitted from indoor unit’s air outlet Set temperature can’t be adjusted Cooling (heating) effect is not good. Check items Solution ● Power failure? ● Wait until power recovery. ● Is plug loose? ● Reinsert the plug. ● Circuit break trips off or fuse is burnt out? ● Ask professional to replace circuit break or fuse. ● Wiring has malfunction? ● Ask professional to replace it.
Malfunction analysis Phenomenon Odours are emitted Check items Solution ● Whether there’s odour source, ● Eliminate the odour source. such as furniture and cigarette, ● Clean the filter. etc. Air conditioner ● Whether there’s interference, such as thunder, wireless operates normally suddenly devices, etc. ● Disconnect power, put back power, and then turn on the unit again.
Malfunction analysis Error Code ● When air conditioner status is abnormal, temperature indictor on indoor unit will ation of error code. Error code Above indicator diagram is only for reference. Please refer to actual product for the actual indicator and position. Indoor display Below listed error codes are only part error codes. Please refero to error code list in serive manual for more information. Troubleshooting Error code Heating indicator ON 10s OFF 0.5s E5 E6 E8 U8 H6 Means defrosting status.
SYSTEM OPERATION COOLING OPERATION How it works: In cooling mode, your alice indoor unit will absorb heat from the room, then the alice outdoor unit will discharge the heat to the outdoors. The alice cooling capacity decreases as the outdoor temperature increases. This causes the alice to work harder and longer to hold the selected room temperature. Indoor Coil Freeze Protection: Frost may form on the indoor coil during cooling operations when the outdoor temperature below 50°F (10°C).
ENERGY SAVING TIPS 1. Relaxing room temperature at night is OK: During the nighttime hours you don’t require the same level of conscious cooling or heating. Try using Sleep Mode to gradually relax room temperature and allow the unit to run less and save energy. 2. Curtains and shades: In the summer, you need to block the effects of the sun. Close window curtains and shades on the south and west side of your home to help block solar heat. In winter, the sun is your friend.
www.cooperandhunter.us LIMITED WARRANTY STATEMENT Ductless Heat Pump Split System This warranty should be registered on our web-site www.cooperandhunter.us The warranty is only valid when installed by a Licensed HVAC Technician FOR WARRANTY SERVICE OR REPAIR: Contact your installing contractor. You may find the installer’s name on the equipment or in your Owner’s packet. Complete product registration below and send back by e-mail at PRODUCT REGISTRATION: Model No.
LIMITATIONS OF WARRANTIES: ALL IMPLIED WARRANTIES AND/OR CONDITIONS (INCLUDING IMPLIED WARRANTIES OR CONDITIONS OF MERCHANTABILITY AND FITNESS FOR A PARTICULAR USE OR PURPOSE) ARE LIMITED TO THE DURATION OF THIS LIMITED WARRANTY, SOME STATES OR PROVINCES DO NOT ALLOW LIMITATIONS ON HOW LONG AN IMPLIED WARRANTY OR CONDITION LASTS, SO THE ABOVE MAY NOT APPLY TO YOU.