
Installation Sheet
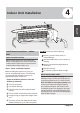

Page 18
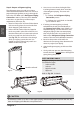
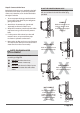
6. Feed the signal wire through this slot, from
the back of the unit to the front.
7. Facing the front of the unit, match the wire
colors with the labels on the terminal block,
connect the u-lug and and rmly screw each
wire to its corresp onding terminal.
CAUTION
DO NOT MIX UP LIVE AND NULL WIRES
This is dangerous, and can cause the air
conditioning unit to malfunction.
8. After checking to make sure every conn ection
is secure, use the cable clamp to fasten the
signal cable to the unit. Screw the cable clamp
down tightly.
9. Replace the wire cover on the front of the
unit, and the plastic panel on the back.
NOTE ABOUT WIRING
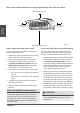
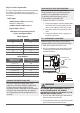
Step 7: Wrap piping and cables
Before passing the piping, drain hose, and the
signal cable through the wall hole, you must
bundle them together to save space, protect
them, and insulate them.
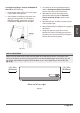
1. Bundle the drain hose, refrigerant pipes, and
signal cable according to Fig. 3.12.
Indoor Unit
Space behind unit
Refrigerant piping
Drain hose
Signal wire
Insulation tape
DRAIN HOSE MUST BE ON BOTTOM
Make sure that the drain hose is at the bottom
of the bundle. Putting the drain hose at the
top of the bundle can cause the drain pan
to overflow, which can lead to fire or water
damage.
DO NOT INTERTWINE SIGNAL CABLE WITH
OTHER WIRES
While bundling these items together, do not
intertwine or cross the signal cable with any
other wiring.
2. Using adhesive vinyl tape, attach the drain
hose to the underside of the refrigerant pipes.
3. Using insulation tape, wrap the signal wire,
refrigerant pipes, and drain hose tightly
together. Double-check that all items are
bundled in accordance with Fig. 3.12.
DO NOT WRAP ENDS OF PIPING
When wrapping the bundle, keep the ends
of the piping unwrapped. You need to access
them to test for leaks at the end of the
installation process (refer to Electrical Checks
and Leak Checks section of this manual).
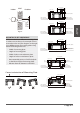
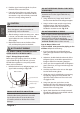
Step 8: Mount indoor unit
If you installed new connective piping to the
outdoor unit, do the following:
1. If you have already passed the refrigerant
piping through the hole in the wall, proceed
to Step 4.
2. Otherwise, double-check that the ends of the
refrigerant pipes are sealed to prevent dirt or
foreign materials from entering the pipes.
3. Slowly pass the wrapped bundle of refrigerant
pipes, drain hose, and signal wire through the
hole in the wall.
4. Hook the top of the indoor unit on the upper
hook of the mounting plate.
5. Check that unit is hooked rmly on mounting
by applying slight pressure to the left and
right-hand sides of the unit. The unit should
not jiggle or shift.
6. Using even pressure, push down on the
bottom half of the unit. Keep pushing down
until the unit snaps onto the hooks along the
bottom of the mounting plate.
7. Again, check that the unit is firmly mounted
by applying slight pressure to the left and the
right-hand sides of the unit.
Fig. 3.12
Indoor Unit
Installation
THE WIRING CONNECTION PROCESS MAY
DIFFER SLIGHTLY BETWEEN UNITS.