DFI INFINITY CS STRAIN METER/CONTROLLER USER’S GUIDE www.cooperinstruments.
CONTENTS PREFACE ....................................................................................................................................1 1.0 INTRODUCTION ....................................................................................................................2 1.1 Unpacking........................................................................................................................................ 2 1.2 Safety Considerations ................................................
4.12 Using Lock Out Configuration ....................................................................................... 23 4.12.1 Enabling or Disabling the RESET button in the Run Mode.............................................. 23 4.12.2 Enabling or Disabling the SETPOINT Changes................................................................. 23 4.12.3 SETPOINT Display Function: Firmware version or Setpoint value ................................ 23 4.13 Using Display Brightness Configuration .........
PREFACE Manual Objectives This manual shows you how to set up and use the Programmable Digital Meter.
NOTE: provides you with information that is important to successfully setup and use the Programmable Digital Meter. CAUTION or WARNING: tells you about the risk of electric shock. CAUTION, WARNING or IMPORTANT: tells you of circumstances or practices that can affect the meter’s functionality and must refer to accompanying documents. TIP: provides you helpful hints. 1.0 INTRODUCTION 1.1 Unpacking Remove the Packing List and verify that all equipment has been received.
• Use electrical wires with adequate size to handle mechanical strain and power requirements. Install without exposing bare wire outside the connector to minimize electrical shock hazards. EMC Considerations • Whenever EMC is an issue, always use shielded cables. • Never run signal and power wires in the same conduit. • Use signal wire connections with twisted-pair cables. • Install Ferrite Bead (s) on signal wires close to the instrument if EMC problems persist.
RP38 19-in. Rack Panel for three (3) 1/8 DIN instruments 2.4 Front of the Meter Figure 2-1 shows each part of the front of the three-color programmable “Big” LED display Meter (Version B). Digital LED Display: -1.9.9.9 or 9.9.9.9 4-digit three color programmable, 21 mm (0.83”) high LED display with programmable decimal point. Figure 2-1 Front-Panel with Big Display Figure 2-2 shows each part of the front of the standard LED display meter. Digital LED Display: -1.9.9.9 or 9.9.9.9 14 segment, 13.8 mm (0.
MENU Button In the Run Mode, press the MENU button to terminate the current measuring strain and enter you into the Configuration Mode. Only if you have not installed the lock out jumpers on the main board. In the Configuration Mode, press the MENU button to store changes in the nonvolatile memory and then advance you to the next menu item. RESET Button If you hard reset (press the MENU button followed by the RESET button) or power off/on the meter, it shows followed by .
Table 2-2 Connector Description Connector TB1-1 TB1-2 TB1-3 TB1-4 TB1-5 TB1-6 TB1-7 TB1-8 TB1-9 TB1-10 TB1-11 TB1-12 TB2-1 TB2-2 TB2-3 TB2-4 TB2-5 TB2-6 TB2-7 TB2-8 TB5-1 TB5-2 TB5-3 J1 (1-2) Description Setpoint 1: Normally open (N.O.1) connection Setpoint 1: Normally closed (N.C.1) connection Setpoint 1: Common (COM1) connection Setpoint 2: Normally open (N.O.2) connection Setpoint 2: Normally closed (N.C.
• To check or change the 115 or 230 Vac power jumpers. • To install or remove jumpers on the main board. Disconnect the power supply before proceeding. To remove and access the main board, follow these steps: • Disconnect main power from the meter. • Remove the back case cover. • Lift the back of the main board upwards and let it slide out of the case. 3.0 GETTING STARTED Caution: The meter has no power-on switch, so it will be in operation as soon as you apply power.
Figure 3-2 Main Board Jumper Positions Figure 3-3 Upper Isolated Analog Output Option Board Installation S2 jumpers are used for testing purposes. Do not use as reading errors may result. S3 jumpers are used for the following (refer to Figure 3-2): • To enable or disable the front panel push-buttons • To allow for an extremely low resistance load button for analog output • To disable the MENU button • To perform factory calibration procedure Test pins TP1 – TP11 are for testing purposes.
Table 3-1 S3 Jumper Functions Jumper S3-A S3-B S3-C S3-D S3-E Description Install to enable front panel push buttons. Remove to disable all front panel push-buttons Removed. For factory calibration only. Removed. Not Used Installed for external ratiometric. If installed without S3-B, the MENU button locks out. If you . press the MENU button, the meter shows 3.3 Panel Mounting Figure 3-4 Meter – Exploded View 1. Cut a hole in your panel, as shown in Figure 3-4.
Connections with ”typical wire colors” +E = Positive Excitation (red) -E = Negative Excitation (black) +S = Positive Signal Input (green) -S = Negative Signal Input (white) Figure 3-6 Meter-powered Bridge Input Figure 3-7 shows the connections required for an externally-powered bridge input: the external supply is brought to the meter’s buffer circuits to permit ratiometric readings. Set S1 DIP switch for external excitation for Figure 3-7 and 3-8.
Figure 3-9 Current Input Connections with Internal Excitation Figure 3-10 Current Input Connections with External Excitation 3.5 Connecting Main Power Connect the AC main power connections as shown in Figure 3-11. WARNING: Do not connect AC power to your device until you have completed all input and output connections. This device must only be installed by a specially trained electrician with corresponding qualifications.
Table 3-2 AC-Power Connections TB1 7 8 9 WIRE COLORS EUROPE USA Brown Black Blue White Green/Yellow Green AC POWER AC Line AC Neutral AC Earth Connect the DC main power connections as shown in Figure 3-12. When using DC power, refer to Table 8-1 Color Chart in the Specifications Section for Display Color, Intensity, Excitation Voltage and Current, and Analog Output Isolated Option. Failure to use proper ratings may result in damaging the unit. Figure 3-12 Main Power Connections DC 3.
Figure 3-14 Analog Output Connections Figure 3-15 Relay Output Connections Figure 3-16 Isolated Analog Output Connections DFI INFINITY CS (V- M3598/N/0906) 13 CF 70
4.0 CONFIGURING THE METER Refer to Table 6-1 for a summary list of menu configuration. For first-time users: Refer to the QuickStart Manual for basic operation and set-up instructions. 4.1 Selecting the Input Type To select your appropriate input type signal, follow these steps: Before proceeding, set the input DIP switch settings at the back of your meter. (Refer to Table 2-3). 1. Press the MENU button. The meter shows . 2. Press the X/TARE button.
• ‘C’ switch should be closed or down. • ‘X’ switch is used to control excitation (refer to Table 2-3 to determine correct position of these switches). Once DIP switches have been positioned correctly, apply power. Proceed to the and set R2 equal to the value in the right hand column of the chart. (Reading Configuration) Table 4-1 Range Selection DIP Switch Positions for Regular Voltage Input 12345678 XCOOOXXC 0 – 10 V 0–5V 0–3V 0–2V 0–1V 12345678 XCOOCXXC ±5 V ±5 V ±3 V ±2 V ±1 V RD.
4.3.2 Scaling without Known Loads To scale without known inputs, calculate input values based on transducer specifications and manually enter them via the front-panel push buttons. The following example assumes load cells with these specifications: Maximum Load: 100.0 lbs Output: 3.1 mV/V Sensor Excitation: 10 Vdc Output: 31 mV = (3.1 mV/V) x (10 V) 1. Determine the correct values for and , based on the load cell specifications.
You may use Reading Configuration to configure your meter for the following: • To select ratiometric or non-ratiometric operation • To set the input resolution of your meter • To display the filtered/unfiltered signal input value • To select gross/net vs. peak reading 4.4.1 Selecting Ratiometric/Non-Ratiometric Operation 1. Press the MENU button until displays. 2. Press the X/TARE button.
4.5 Selecting a Display Color Refer to Table 6-1 for a summary list of menu configuration. Selecting Display Color is not active unless your meter is a Version “B”. To select a display color, follow these steps: . 1. Press the MENU button until the meter shows 2. Press the X/TARE button. The meter shows one of the following: • • • 3. Press the S/NT/GRS button to scroll between available choices. , followed by the next menu Press the MENU button to store your choice.
• = Setpoint 1 assigned to net reading (Default) = Setpoint 1 assigned to gross reading • 2. Press the S/NT/GRS button to toggle between available choices. 3. Press the MENU button to store your selection(s). The meter momentarily shows (Setpoint 2 Configuration). , followed by 4.7 Using Setpoint 2 Configuration Refer to Table 6-1 for a summary list of menu configuration. Setpoint 2 Configuration is not active unless your meter has dual relay output capabilities. The LED’s will is active or not.
1. Press the MENU button until the meter shows . 2. Press the X/TARE button. The meter shows the last previously stored 4-digit number (0000 through 9999) with flashing 4th digit. 3. Press the S/NT/GRS button to change the value of the flashing digit. If you continue to press the S/NT/GRS button, the flashing digit’s value continues to change. 4. Press the X/TARE button to scroll to the next digit. , followed by 5. Press the MENU button to store the selection.
To reset latched alarms you must: 1. Input a signal OUT of the alarm zone 2. Then press SETPTS and then, RESET button 4.10 Using Output Configuration Refer to Table 6-1 for a summary list of menu configuration. is not active unless your meter has analog output capabilities. The menu will display Output Configuration whether analog output is present or not. Analog output must be ordered at time of purchase.
equal to the meter’s display and/or any engineering units you require. You may scale the output for direct (4-20 mA, 0-10 V, etc) or reverse acting (20-4 mA, 10-0 V, etc). 1. Press the MENU button until 2. Press the X/TARE button. displays. (Read 1) displays. This is your first point of display reading. 3. Press the X/TARE button again. The meter shows the last previously stored 4-digit number (-1999 through 9999) with flashing 4th digit. 4. Press the S/NT/GRS button to change the digits. 5.
9. 10. 11. 12. 13. 14. Press the X/TARE button to show the existing value. Change the value of Read 2 to 100.0 by pressing the S/NT/GRS and X/TARE buttons. (Output 2). Press the MENU button to store your selection. The meter shows Press the X/TARE button to show the existing value. Change the value of Output 2 to 20.0 by pressing the S/NT/GRS and X/TARE buttons. (Lock Out Configuration). Press the MENU button to store your selection. The meter shows 4.
• = Medium Brightness = Low Brightness • • = High Brightness(Default) 3. Press the S/NT/GRS button to toggle between available choices. 4. Press the MENU button to store your selection. The meter momentarily shows , , and then measured value. followed by , 5.
6.0 MENU CONFIGURATION DISPLAYS Not all items display on standard meters. Table 6-1 Menu Configuration Displays (Defaults in Bold and Italics) X/TARE MENU S/NT/GRS (Default) Show input choices: (Default) Show current decimal point position (Reading Scale & Offset) 1 Show Shows prior value entered and flashing digit. Scrolls to the next digit • If X/TARE is pressed, actual input is shown and cannot be changed with S/NT/GRS. • If S/NT/GRS is pressed, unit can scroll through digits with X/TARE.
MENU X/TARE S/NT/GRS Reading Configuration R.1= (Ratiometric Reading) (Non-ratiometric reading) R.2= (1µV resolution for unipolar & 5µV resolution for bipolar) (2µ V resolution for unipolar & 10µV resolution for bipolar) (3µ V resolution for unipolar & 15µV resolution for bipolar) (5µ V resolution for unipolar & 25µV resolution for bipolar) (10µ V resolution for unipolar & 25µV resolution for bipolar) Note: 3 µV resolution means if your input is 0-30mV, at 30mV the display shows 9999. R.
MENU X/TARE S/NT/GRS Output Configuration 0.1 = (Analog output is enabled) (Analog output is disabled) 0.2 = (Analog output is current) (Analog output is voltage) 0.3 = (Net Reading) (Gross Reading) Output Scale & Offset 1 Show Shows prior value entered and flashing digit. Scrolls to the next digit (Shown if in Output ) Configuration Menu Changes the value of the flashing digit. 2 Enter new value and show . 3 Shows prior value entered and flashing digit. Scrolls to the next digit.
Table 6-2 Run Mode Displays X/TARE Display S/NT/GRS RESET Description Peak Reading / Displays NET or GROSS reading. Once reading shows, respective value shows. Press to activate Toggle between Net and Gross values. Will reset your tare when viewing this function Tare Reset Reset Latched Alarms Pressing the RESET button resets your latched alarm 7.
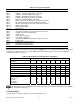
ACCURACY AT 25oC Max Error Strain: Span Tempco: Step Response: Warm Up to Rated Accuracy: Excitation Voltage: Load Regulation: Line Regulation: ±0.03% of reading, ± 1 count 50 ppm/°C 1 sec 30 min AC power units DC power units 24 V @ 25 mA, Refer to Table 8-1 12 V @ 50 mA, Color chart for DC Output 10 V @ 120 mA, Excitation 5 V @ 60 mA 1.1% 0.02% per Vac ALARM OUTPUTS (if applicable) 2 Form “C” on/off relays. Configurable for latched and unlatched by software.
ENVIRONMENT Operating Temperature: Storage Temperature: Relative humidity: 0° to 50°C (32° to 122°F) -40° to 85°C (-40° to 185° F) 90% at 40°C (non-condensing) MECHANICAL Panel cutout: Weight: Case material: Protection: 1/8” DIN 3.62 x 1.78” (45 x 92mm) 1.
9.
• Power to Input/Output: • Power to Input/Output: • • • • 2300 Vac (3250 Vdc) 500 Vac (720 Vdc) (Low Voltage dc Power Option*) Power to Relays Output: Relay 1 to Relay 2: Isolated Analog to Inputs: Analog to Inputs: 2300 Vac (3250 Vdc) 2300 Vac (3250 Vdc) 1000 Vac (1420 Vdc) No Isolation Measurement Category I Category I are measurements performed on circuits not directly connected to the Mains Supply (power). Maximum Line-to-Neutral working voltage is 50 Vac/dc.
* Technical description of the defect: In order to properly repair a product, it is absolutely necessary for Cooper to receive information specifying the reason the product is being returned. Specific test data, written observations on the failure and the specific corrective action you require are needed.