
Owner manual


DFI INFINITY CS (V- M3598/N/0906) 15 CF 70
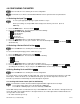
• ‘C’ switch should be closed or down.
• ‘X’ switch is used to control excitation (refer to Table 2-3 to determine correct position of these switches).
Once DIP switches have been positioned correctly, apply power. Proceed to the
(Reading Configuration)
and set R2 equal to the value in the right hand column of the chart.
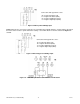
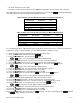
Table 4-1 Range Selection DIP Switch Positions for Regular Voltage Input
12345678
XCOOOXXC
12345678
XCOOCXXC
RD.CF*
R2=
0 – 10 V ±5 V 4
0 – 5 V ±5 V 3
0 – 3 V ±3 V 2
0 – 2 V ±2 V 1
0 – 1 V ±1 V 0
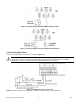
Table 4-2 Range Selection DIP Switch Positions for Millivolt/Milliamp Input
12345678
XOCOOXX0
12345678
XOCOCXX0
12345678
XOCCOXX0
RD.CF*
R2=
0 – 100 mV ±50 mV 0 – 20 mA 4
0 – 50 mV ±50 mV 0 – 10 mA 3
0 – 30 mV ±30 mV 0 – 6 mA 2
0 – 20 mV ±20 mV 0 - 4 mA 1
0 – 10 mV ±10 mV 0 – 2 mA 0
* Reading Configuration
To scale with known inputs: apply known loads to a transducer connected to a meter, or simulate the transducer
output with a voltage or current simulator. To scale with known inputs, follow these steps:
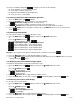
1. Apply a known load equal to approximately 0% of the transducer range.
2. Press the MENU button until the meter shows
.
3. Press the X/TARE button. The meter shows (Input 1).
(Input 1) is the unscaled display reading at minimum input.
4. Press the X/TARE button again. The meter shows the last stored value for Input 1.
5. Press the X/TARE button once more. The meter shows the actual signal being received.
6. Press the MENU button to store this value as
(Input 1). The meter shows (Read 1).
(Read 1) is the desired display reading at Input 1.
7. Press the X/TARE button. The meter shows the last stored value for Read 1.
8. Press the S/NT/GRS button to change the value of your digits.
9. Press the X/TARE button to scroll horizontally to the next digit.
10. Press the MENU button to store this value as
. The meter shows (Input 2).
(Input 2) is the unscaled display reading at maximum input.
11. Apply a known load equal to approximately 100% of the transducer range.
12. Press the X/TARE button again. The meter shows the last stored value Input 2.
13. Press the X/TARE button once more. The meter shows the actual signal being received.
14. Press the MENU button to store Input 2 value. The meter shows
(Read 2).
(Read 2) is the desired display reading at Input 2.
15. Press the X/TARE button. The meter shows the last stored value for Read 2.
16. Press the S/NT/GRS button to change the value of your digits.
17. Press the X/TARE button to scroll horizontally to the next digit.
18. Press the MENU button to store this value as
(Read 2). The meter momentarily shows , followed
by
. Meter scaling is now complete.