
Instruction Manual


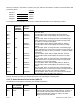

decimal point location within the “F’s”
‘MENU’ “CNT BY” Press the ‘MENU’ button to store your decimal point selection
and the meter will momentarily display “STORED” only if you
have made a change and then “CNT BY”.
‘RESET’ ‘RESET’ “RESET2” then the
Measured Value
Press the ‘RESET’ button two times. The display will
momentarily show “RESET2” and then will display the
currently measured values.
Your meter is now calibrated. If you need to offset your zero reading on your meter after calibration, you must
proceed with the following steps:
8.3.4 Entering Zero Offset Numbers
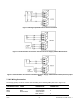
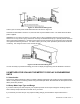
You have two (2) ways to enter a zero offset. The first and easiest is using the TARE function. This is accomplished
by connecting a momentary contact to the rear P2 connector at P2-1 and P2-4. Each time this momentary contact
is activated, the display will automatically display zero.
The second method for entering a zero offset number is Reading Offset (“RDG OF”).
The RDG OF (Reading Offset) menu item should be used if the meter shows a nonzero reading with zero input.
The offset value zeroes the display by canceling out the nonzero reading.
If your meter displays a positive reading at zero input, you must enter a negative offset value. If your meter displays
a negative reading at zero input, you must enter a positive offset value.
If you are using an active decimal point (RDG.2=0), your offset value will be the negative of the display reading at
zero point.
If you are using the more common independent decimal point (the factory setting, RDG.2=1), follow these
instructions to convert the display reading to the appropriate offset value:
1. Note the display reading at zero input, ignoring the decimal point. This reading represents the count value - the
number of whole counts that need to be offset.
2. Shift the count value to the left side of the decimal point.
3. If the count value is positive, make it negative by replacing the leading digit (the left-most digit) with a minus
sign. If the count value is negative, make it positive by replacing the negative sign with a zero.
Example 1: Your meter displays 000.003 when the input is zero. The count value is 000003. Shift this value to the
left side of the decimal point: 003.000. Change the leading zero to a minus sign: -03.000. This is the “converted
offset value” you will use for configuring RDG OF.
Example 2: Your meter displays -00.003 when the input is zero. The count value is -00003. Shift this value to the
left side of the decimal point: -03.000. Change the leading minus sign to a zero: 003.000. This is the “converted
offset value” you will use for configuring RDG OF.
If the nonzero reading is fluctuating between two numbers, convert the smaller count value to the offset value, then
add a 5 just right of the decimal point. This adds half a count to the offset. For example, the display is fluctuating
between 00.0001 and 00.0002. Calculate the offset using the 000001 count value. The converted offset value is -
1.0000. Add a 5 to the right of the decimal point: the final offset value is -1.5000.
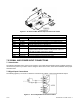
PRESS THEN PRESS
(TO CHANGE
IF REQUIRED)
UNTIL
DISPLAY
SHOWS
COMMENTS
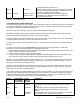
‘MENU’ “RDG OF” Press the ‘MENU’ button until the display shows “RDG OF”.
‘MIN’ “000000.” Press the ‘MIN’ button and the display will show the last offset
entered.
‘MIN’ ‘MAX’ “XXXXXX” Use the ‘MIN’ to move to each digit and the ‘MAX’ button to
change the flashing digits value and enter your zero offset
number.
‘MENU’ “STORED”
“IN CNF”
Press the ‘MENU’ then button to store your selection. The display
will momentarily show “STORED” then “IN CNF”.
CF 67 25 M1291/N/0403 11279ML-02 Rev. A