
Instruction Manual
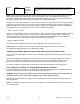
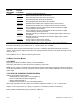

‘MAX’ ‘MIN’ “000000.” Using the ‘MAX’ button to change the value of the flashing digit
and the ‘MIN’ button to scroll to the next digit to the right, enter the
engineering value that you want your “INPUT 1” number to display
on the meter.
‘MENU’ “INPUT2” Press the ‘MENU’ button and the display will show “INPUT2”.
‘MIN’ “XXXXXX” Press the ‘MIN’ button and the display will show some 6-digit
number.
‘MAX’ ‘MIN’ “050000.” Using the ‘MAX’ button to change the value of the flashing digit
and the ‘MIN’ button to scroll to the
next digit to the right, enter your “INPUT 2” number on the display.
‘MENU’ “READ 2” Press the ‘MENU’ button and the display will show “READ 2”.
‘MIN’ “XXXXXX” Press the ‘MIN’ button and the display will show some 6-digit
number.
‘MAX’ ‘MIN’ “025000.” Using the ‘MAX’ button to change the value of the flashing digit
and the ‘MIN’ button to scroll to the
next digit to the right, enter the engineering value you want your
“INPUT 2” to display.
‘MENU’ “STORED” Press the ‘MENU’ button to store your selection and the display
will momentarily show “STORED” then “DEC PT”.
Now you are ready to position your decimal point position by completing the following steps:
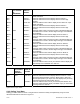
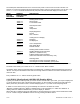
8.4.3 To Select Decimal Point Position
The following is the procedure for selecting your decimal point position.
PRESS THEN PRESS
(TO CHANGE
IF REQUIRED)
UNTIL
DISPLAY
SHOWS
COMMENTS
‘MENU’ “DEC PT” Press the ‘MENU’ button until the display shows “DEC PT”.
‘MIN’ ‘MAX’ “FFFFF.F” Press the ‘MIN’ button and the display will show “FFFFFF.” or the
previously selected position. Press the ‘MAX’ button to select the
decimal point position you require, the meter displays the
previously selected decimal point location within the “F’s”.
‘MENU’ “CNT BY” Press the ‘MENU’ button to store your decimal point selection and
the meter will momentarily display “STORED” only if you have
made a change and then “CNT BY”.
‘RESET’ ‘RESET’ “RESET2” then
the Measured
Value
Press the ‘RESET’ button two times. The display will momentarily
show “RESET2”
then will display the currently measured values.
Your meter is now calibrated.
You may need to enter a zero offset after scaling your meter. There are two (2) ways to enter a zero offset. The
first and easiest is using the TARE function. This is accomplished by connecting a momentary contact to the rear
P2 connector at P2-1 and P2-4. Each time this momentary contact is activated, the display will automatically
display zero.
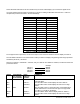
The second method for entering a zero offset number is Reading Offset (“RDG OF”) which the following procedure
explains:
PRESS THEN PRESS
(TO CHANGE
IF REQUIRED)
UNTIL
DISPLAY
SHOWS
COMMENTS
‘MENU’ “RDG OF” Press the ‘MENU’ button until the display shows “RDG OF”.
‘MIN’
“000000.” Press the ‘MIN’ button and the display will show the last offset
entered.
If your meter displays an offset which is a positive number, you must enter a negative “–” offset number into
Reading Offset (“RDG OF”). An example would be if your zero input shows “20” on your meter display, you would
CF 67 29 M1291/N/0403 11279ML-02 Rev. A