
Programming Manual


9
WaveLinx User Manual
www.eaton.com/wavelinx
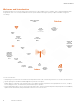
Bringing the System Online
The WaveLinx Wireless Connected Lighting System configures quickly to allow immediate energy savings. Use the steps in this section to:
• Step 1: Confirm that installed devices are ready for configuration
• Step 2: Complete initial construction grouping to prepare for mobile application use
• Step 3: Initiate communications with the WaveLinx Mobile Application
• Step 4: Organize devices into controlled areas and zones for automatic code commissioning operation
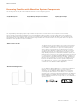
Step 1: Confirming Device Installation
Before configuring devices, ensure that they are ready by verifying installed operation.
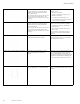
Device Default LED Functionality Operational Functionality Out-of-the-Box
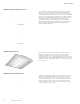
Wireless Area Controller
WAN LED
LAN LED
Wi-Fi LED
not used
802.15.4 LED
Eaton LED
After a 1 minute power up period:
• EATON logo LED: Blue LED should illuminate the
Eaton logo and remain ON.
• 802.15.4 LED: Blue LED should illuminate and
remain ON.
Note: The green LAN LED may also be illuminated if
the controller is connected to a building LAN with a
DHCP server. Other LEDs should be OFF.
Not Applicable for this device.
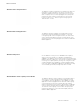
WaveLinx Wireless Dimming Switchpack
(WSP-MV-010: 120-277VAC model)
The white LED on this wireless Dimming Switchpack
model illuminates to indicate the load is ON. If the
onboard commissioning push button is pressed for less
than 4 seconds, the LED and attached load will toggle
state.
• Connected loads will turn ON and 0-10V dimmable
loads will go to 75% once power is applied.
• Load remains ON at 75% unless commissioning
push button is used for manual override.
WaveLinx Wireless Dimming Switchpack
(WSP-CA-010: 120-347VAC model)
Not applicable. This wireless Dimming Switchpack
model has no onboard LED indicators.
Connected loads will turn ON and remain ON with
dimmable loads at a 100% level.
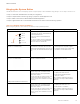
WaveLinx Integrated Sensor
(including standard and Bluetooth enabled models)
LED in sensor window should blink green with motion
detection. The green LED color indicates that the
integrated sensor has not yet been paired with a
Wireless Area Controller.
(If the LED blinks white, this indicates that the sensor
has been previously paired with a Wireless Area
Controller. See page 135 for information on resetting
the pairing.)
Fixture operates via the onboard occupancy sensor.
• Occupancy turns fixture ON to 75%.
• Fixture will turn OFF within 20 minutes
when space is vacant.
Note: Daylighting is disabled until the fixture is
assigned to an area using the WaveLinx Mobile
Application.
WaveLinx Industrial Integrated Sensor
LED in sensor window should blink green with motion
detection. The green LED color indicates that the
integrated sensor has not yet been paired with a
Wireless Area Controller.
(If the LED blinks white, this indicates that the sensor
has been previously paired with a Wireless Area
Controller. See page 135 for information on resetting
the pairing.)
Fixture operates via the onboard occupancy sensor.
• Occupancy turns fixture ON to 100%
• Fixture will dim to 10% within 20
Note: Daylighting is disabled until the fixture is
assigned to an area using the WaveLinx Mobile
Application.