
Installation Instructions
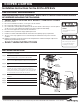

WALL MOUNT INSTALLATION
Step 1. De-energize the circuit at the junction box (J-box) where the
exit sign is to be installed.
Step 2. Remove the exit sign stencil from the EXIT frame. Remove
and discard the plastic canopy from inside the EXIT.
Step 3. Knock out the appropriate mounting pattern and the wire
pass hole in the EXIT backplate to fit the J-box being used.
Step 4. Feed the orange, black, and white wires through the center
hole.
Step 5. Connect the J-box wires to the EXIT power supply wires
using the wire nuts provided. Connect the white wire to
neutral. If using 120V, connect the black wire to the hot lead.
If using 277V, connect the orange wire to the hot lead. Cap
the unused lead. Press the wires into the J-box.
Step 6. Secure the EXIT to the backplate using installer supplied
hardware.
Step 7. For self powered units, attach battery leads to PCB.
Step 8. Snap the EXIT stencil onto the frame.
Step 9. Energize AC supply, LED display will come on.
COOPER LIGHTING
Installation Instructions for the All Pro APX Exits
IMPORTANT SAFEGUARDS
WHEN USING ELECTRICAL EQUIPMENT, BASIC SAFETY PRECAUTIONS SHOULD ALWAYS
BE OBSERVED INCLUDING THE FOLLOWING:
1. READ AND FOLLOW ALL SAFETY INSTRUCTIONS
2. Do not use outdoors.
3. Do not use in hazardous locations, or near gas or electric heaters.
4
. Do not let power supply cords touch hot surfaces.
5. Use caution when servicing batteries. Battery acid can cause burns to skin and eyes. If acid is spilled
on skin or in eyes, flush acid with fresh water and contact a physician immediately.
6. Do not use this equipment for other than the intended use.
7. Installation is to be performed only by qualified personnel.
8. Install in accordance with National Electric Code and local regulatory agency requirements.
9. The use of accessory equipment not recommended by the manufacturer may cause an unsafe
condition.
10. Equipment should be mounted in locations and at heights where it will not readily be subjected to
tampering by unauthorized personnel.
11.
SAVE THESE INSTRUCTIONS
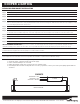
HOLE PLUG -
REMOVE FOR
CEILING MOUNT
CANOPY
MOUNTING PLATE
MOUNTING PLATE
CANOPY
HOLE PLUG -
REMOVE FOR
WALL MOUNT
Risk of Electric Shock
Disconnect power at fuse
or circuit breaker before
installing or servicing.
Risk of Fire/Electric
Shock
If not qualified, consult an
electrician.
Customer First Center 1121 Highway 74 South Peachtree City, GA 30269 770.486.4800 FAX 770.486.4801 1/3/11 049-205