
Specifications


Owners Manual, Monaco 6000A, 6000N, 6002A, 6002N
LAMP ANGLE ADJUSTMENT – FOR MODELS 6000A AND
6002A ONLY.
(FOR MODELS 6000N AND 6002N, GO TO STEP 12)
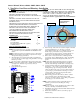
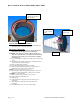
17) Adjust angle of lamp by inserting a hex wrench into the
adjustment screw, as shown in Figure 2, and turning screw
clockwise or counter-clockwise until lamp is at desired angle.
Maximum tilt is 15 degrees from vertical.
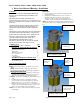
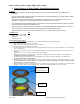
18) After desired angle has been reached, the light may be
rotated 360 degrees to orient the light. When orientation
has been achieved, tighten slotted set screw on lens collar as
shown in Figure 3.
INSTALL TRIM RING/LENS ASSEMBLY
Install trim ring/lens assembly by aligning the four threaded
holes and attaching the four socket head cap screws. DO NOT
OVERTIGHTEN CAPTIVE SCREWS ON OUTER LENS!
SET POWER DRIVERS TO LOWEST SETTING. THIS IS
IMPORTANT TO AVOID PART DAMAGE.
RELAMPING PROCEDURE
WARNING! TURN OFF ALL POWER TO FIXTURE BEFORE,
RELAMPING, MAINTENANCE AND SERVICING.
WARNING! RELAMP ONLY WITH SAME WATTAGE AND
TYPE OF LAMP ORIGINALLY SUPPLIED WITH FIXTURE.
SEE LABEL ON SIDE OF BALLAST BOX FOR CORRECT
INFORMATION.
WARNING! DO NOT OVERTIGHTEN CAPTIVE SCREWS ON
OUTER LENS! SET POWER DRIVERS TO LOWEST
SETTING. THIS IS IMPORTANT TO AVOID PART
DAMAGE.
Lamp angle
adjust screw
Slotted screw
locks/unlocks
orientation lamp
adjustment
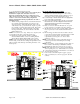
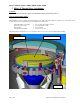
Align notches in
lamp module
hanging frame over
these pins
Figure 2
Figure 3
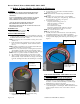
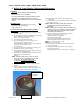
19) Loosen trim ring/lens assembly by loosening the four socket head
cap screws.
20) Pry trim ring/lens assembly off housing by inserting a flat head
screwdriver in side slots and turning.
Page 11 of 12 9700 B Owners Manual Monaco 6000.doc