M800, M800iD Plus™, M1000 and M3000 User's Guide
© Cooper Security Limited 2005 Every effort has been made to ensure that the contents of this book are correct. However, neither the authors nor Cooper Security Limited accept any liability for loss or damage caused or alleged to be caused directly or indirectly by this book. The contents of this book are subject to change without notice. iD Plus is a trademark of Novar ED&S. All trademarks acknowledged. Printed and published in the UK.
Contents Chapter 1: Introduction ................................................................ ..................................................................... ..................................... 2 About the Alarm System.............................................................................................. 2 About Zones and Wards.............................................................................................. 3 Zones .............................................................
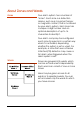
Chapter 1: Introduction About the Alarm System The M800, M800iD Plus™, M1000 and M3000 are advanced alarm systems that use state-of-the-art electronics to provide comprehensive but flexible protection for large domestic and commercial premises. Each system comprises components linked to a central control panel that is concealed but accessible for maintenance. This guide describes how to set, unset and reset your alarm system. The alarm system has two user menus, each of which contain several options.
About Zones and Wards Zones Your alarm system has a number of “zones”. Each zone is a detection device, such as a movement sensor or magnetic contact, that is monitored by your alarm system. Each zone has a unique 4-digit number and an optional description of up to 16 characters to identify it. Your alarm company has configured each zone to respond in a certain way when it is activated, depending whether the system is set or unset.
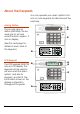
About the Keypads You can operate your alarm system from one or more keypads located around the premises. Arming Station The remote arming station (NETARM) can be used only to set and unset the alarm system. It has no display. (See the next page for details of each area of the keypad.) # 1 2 3 4 5 6 7 8 9 0 ESC ENT LCD Keypad The LCD keypad (NETLCD) has an LCD display. The keypad can be used to set and unset the alarm system, and also to program and test it.
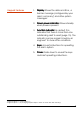
Keypad Features 1. Display: Shows the date and time, a banner message (configured by your alarm company1) and other system messages. 2. Green power indicator: Glows steadily when power is present. 3. Function Function indicator: By default, this indicates that there is more than one outstanding alert to reset (page 15). The indicator can be programmed by an engineer2 to show other conditions. 4. Keys: Accept instructions for operating the alarm system. 5.
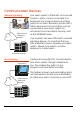
Communication Devices Remote Signalling ARC Public Service Telephone Network Your alarm system is fitted with an on-board modem, which can be connected to a telephone line to signal alarms and other events to an Alarm Receiving Centre (ARC). Other advanced communicators can be connected to your alarm system for enhanced communications security, such as the ETHER800 series.
Chapter 2: Operating your Alarm System Getting Started Accessing the System Before you can set, unset or select other options, you must enter your unique user code or present your proximity tag (if used). The user code may be 4 or 6 digits, depending on how your system is set up1. You have a user code or a proximity tag, not both. Selecting Options After entering your user code or presenting your proximity tag, the Set/Unset menu is displayed if there are no alerts to reset (page 15).
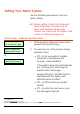
Setting Your Alarm System Use the following procedure to set your alarm system. Before setting, check that all relevant areas have been vacated and all doors and windows are securely closed. You cannot set the system while a zone is active (see page 23). The First Step – Entering Your User Code BANNER TEXT 17:30 Sun 01 JAN 1. At the keypad, enter your user code or present your proximity tag. 0=Set Selection [Ent]=User Level 2. You will see one of the screens shown opposite.
• • r – to set a ward group. See Selecting the Ward Groups to Set. | or ¬ – to display the next/previous option. The setting procedure continues automatically if you do not press a key within a specified period1. Selecting the Wards to Set (Part Setting) Set Selection :Ward > **...... Your user code settings2 determine the wards you can set and whether they set automatically. If you see the screen shown opposite, use the numeric keys to select the wards to set, then press [.
Alternatively, press a ward group hot key1. Viewing Group 1 Press ENT To Set 2. Select the ward group you want to set by pressing a number key (or scrolling), then [. For example, press 2 then [ to set ward group 2. The top line of the display shows the group description2. 3. Leave the protected area (see below). Leaving the Protected Area When leaving the protected area: Exit Now Arming Wards 1. Leave via the designated exit route. The internal sounder will sound if you have not set silently. 2.
Unsetting Your Alarm System Use the following procedure to unset your alarm system. The First Step – Entering Your User Code 1. Go directly to the keypad. 17:31 Sun 01 JAN 2. Enter your user code or present your proximity tag. Now go to one of the following two sections, depending on whether the internal sounder is making a sound. If the internal sounder is making a sound: The internal sounder will sound if you have started the entry timer1 (e.g.
If there is no sound (you have not started the entry timer): 0=Unset System [Ent]=User Level If you have not started the entry timer, you will see one of the screen shown opposite. You can now do one of the following: 0=Set Selection [Ent]=User Level • • • If necessary, scroll (| or ¬) to display "0=Unset System", then press 0. If the system does not unset automatically, continue from Selecting the Wards to Unset (next heading). Press 0 at "0=Set Selection" – to set wards that are not currently set.
and “.” Indicates that you have no access to the ward.) Selecting the Ward Groups to Unset If wards have been allocated to groups1, you can unset all wards in a group with one operation. To unset a ward group: 0=Unset System [Ent]=User Level 1. At the screen shown opposite (displayed only if you have not started the entry timer), press r. Alternatively, press a ward group hot key2. Viewing Group 1 Press ENT To Set 2. Select the ward group you want to unset by pressing a number key (or scrolling), then [.
Silencing an Alarm If an alarm has occurred and you want to silence the sounders: 1. Enter your user code or present your proximity tag. This silences both the internal and external sounders. If your user code has no access to the ward that is in alarm, entering your user code or proximity tag silences external and internal sounders, but does not reset the strobe or outputs. Unset wards :Ward > .2...... 2. If your system has more than one ward, press [ at this prompt. ALARM 0002 03:14:47 01/01 3.
Resetting the System Resetting the system enables you to review the alerts that have taken place and clears the ALERTS message on the main screen. In some cases, you may not be able to set your alarm system until you have reset it. Any user can silence the sounders and review the message, but some alarms may require an engineer or remote reset code (page 16) to reset the system. The keypad sounder may emit a warning chime every minute if the system needs to be reset.
Press ENT To Reset 4. You will see the message shown opposite once you have reviewed each message. Press [ to reset the system. The ALERTS message should not appear again, unless: • • • The condition still remains (e.g. a mains failure). You need to call an engineer. A remote reset code is required (see below). Obtaining a Remote Reset Code RING A.R.C. FOR REM. RESET CODE You will see the screen shown opposite if an arrangement to obtain a remote reset code from an Alarm Receiving Centre (ARC)1.
3. Contact your ARC and quote the code. The ARC will ask you for details of the alarm. If there is no need for an engineer to visit, the ARC will give you a remote reset code. 4. Press | to display the screen shown opposite, enter the remote reset code, then press [. - REMOTE RESET – Reply > 0000 Other Operations Depending on how your system is set up1, several other operations may be available.
Chapter 3: Troubleshooting Alert Messages This section gives the meaning of each message that can be displayed when resetting the system (page 15). ALARM 0005 08:13:45 01/01 A zone alarm has occurred. The zone number is displayed, together with the time and date. PSTN LINE FAULT 12:00 Sun 01 JAN The remote signalling device fitted to your alarm system is reporting a fault on the telephone line. You may not be able to set your system until you clear the fault. If it persists, contact your alarm company.
AUXILIARY X TAMP 12:00 Sun 01 JAN The control unit has auxiliary tamper zones for monitoring auxiliary devices. The lid of a device has been removed. You may not be able to set your system until the fault is cleared. Contact your alarm company. BELL TAMPER 12:00 Sun 01 JAN The lid of the external sounder has been removed. You may not be able to set your system until the fault is cleared. Contact your alarm company.
Other Messages 1 SERVICE REQUIRED 12:00 Sun 01 JAN The alarm system requires a routine maintenance visit. You can still set and unset your system but you should contact your alarm company. RELEARN REQUIRED 12:00 Sun 01 JAN The hardware configuration of your alarm system has changed. You may not be able to set your system. Contact your alarm company. HI SECURE UNSET 12:00 Sun 01 JAN The alarm system has a high-security feature that can be applied to any ward.
entering your user code and selecting the "Defer Setting" option. Engineer on Site 12:00 Sun 01 JAN An engineer from your alarm company is on site and logged into the alarm system. If required, you can operate the system as normal. The message is automatically cleared when the engineer logs off. SYSTEM IS BUSY PLEASE WAIT Another user is accessing the alarm system. You cannot use your keypad until this message has cleared.
Sorry,cannot set Mains Power off Cannot set because there is no mains power at the control unit. Clear the fault; if it persists, contact your alarm company. Sorry,cannot set Phone line fault Cannot set because of a line fault from the remote signalling device. Clear the fault; if it persists, contact the alarm company. Sorry,cannot set Payment required Cannot set because the payment timer has expired. Contact your alarm company to arrange the appropriate payment.
Setting the System with Zones Active Overview If you try to set the system while one or more zones are active, the system’s response depends on whether the engineer has selected1 View exit errors or Ignore errors, errors as described next. Setting with View Errors If View exit errors is used, the procedure after attempting to set the system is: Following Zones Are In Error :- 1. The system gives a fault tone and suspends the exit procedure. Office window 2002 Active 2.
Setting with Ignore Errors If Ignore errors is used, the procedure after attempting to set the system is as follows: Office window 2002 Active 1. The system gives a fault tone and the display shows all active zones in turn. Office door 2001 Active 2. Investigate why the zones are active and rectify the cause. To abandon the setting procedure without rectifying the active zones, enter your user code again and select the unset option. 3. When all zones are healthy, continue with the exit procedure.
Index Alarm Alert Messages .................................18 Resetting ..........................................15 Setting ................................................8 Silencing...........................................14 Unsetting ..........................................11 Alarm Receiving Centre ...................6, 16 Alert Messages......................................18 Buttons ....................................................7 Chime...................................................
497061 Issue 2