
User guide


Quick Setup with CME 2 Xenus XTL User Guide
104 Copley Controls Corp.
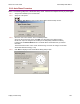
5.8.2.5 Activate the Enable Input.
5.8.2.6 Click Start to begin the motor wiring setup.
The software displays messages: Configuring Initial Settings, Microstepping, Test
Complete, Motor Wiring has been configured.
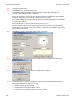
During microstepping, a current vector is applied to the motor windings and microstepped
through an electrical cycle at a set rate, causing the motor to move.
If you chose to Skip the motor direction setup step, Auto Phase will prompt for confirmation
of correct motor direction.
If the step fails see Trouble Shoot Motor Wiring Setup (p. 107).
NOTE: If incorrect values were entered for inductance and resistance, the calculated Cp
and Ci values may produce current loop oscillation, evidenced by an audible high frequency
squeal during auto phasing.
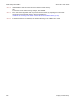
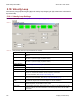
5.8.2.7 Click Next to open the Auto Phase Phase Count Test screen.
5.8.2.8 Click Start to begin the Phase Count Test. Observe status messages. See the prompt:
5.8.2.9 When you are ready to observe motion, click OK. See the prompt:
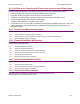
5.8.2.10 If motor did not turn 1 full turn, click No and verify that in the Motor/Feedback screen the
following parameters have been set correctly:
Number of Poles for rotary motors.
Magnetic Pole Pair Length for linear motors
Encoder Lines or Fundamental Lines for rotary encoders.