
Installation Sheet


®
ASSA ABLOY
FM533 (07/12)
Copyright © 2012 Corbin Russwin Inc., an ASSA ABLOY Group company.
All rights reserved. Reproduction in whole or in part without the express written
Permission of Corbin Russwin, Inc. is prohibited.
3 of 4
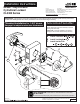
A. Install Tailpiece
To Install Interchangeable Core
(With lever already installed on lock)
Tailpiece
Other product brand names may be trademarks or registered trademarks of their respective owners and are mentioned for reference only.
C. Insert core into lever and return
key to its original horizontal
position locking core in place.
See Figure 3.
D. Withdraw key.
Test lockset for
correct function
with operating key.
E. Control key has no
further use in lockset
installation and must
be safeguarded for
return to Security personnel
when installation is complete.
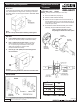
A. Insert key marked
CONTROL and turn
clockwise approximately
1
5 degrees. See Figure 4.
B. Pull core and tailpiece
completely out of lever.
Make sure lock is unlocked.
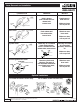
A. Make sure cylinder tailpiece is aligned in same direction as
cylinder bible. Slide cylinder all the way into lever.
• For 6-pin cylinder: Fold retainer at hinge and press fit
retainer halves together as shown.
• For 7-pin cylinder: Break retainer at hinge and discard
spacer section. Also remove black cylinder spacer from
inside of chassis rollback for clearance.
7/8"
(22)
11/16"
(17)
Standard Cylinder Tailpieces
6 PIN
7 PIN
ACTUAL
SIZE
SHOWN
Tailpiece
Corbin Russwin
Core
B. Insert key marked
CONTROL and turn
clockwise approximately
15 degrees.
See Figure 2.
Schlage
®
Core
Tailpiece
Set for
Primus
Tailpiece set
for all Schlage
cores except
Primus
Corbin Russwin conversion kit for Schlage
®
cylinders with CL3300 lockset.
1. Remove threaded collar and Schlage
®
tailpiece.
2. Install CL3300 tailpiece
with threaded collar.
(adjust collar for proper
end play of plug.)
Figure 4
Figure 2
Figure 3
To Remove
Interchangeable Core
Install Standard Cylinder
CORRECT
WRONG
Cam
Lever Catch
6
3
9
12
6
3
9
12
CL3355 Classroom or CL3352 Intruder (outside cylinder)
Function Timing
Before installing cylinder:
• Turn Cam so points are up and down, 6 o’clock and 12 o’clock
(See Below)
After installing
cylinder, test
operation:
• Key should rotate
180° both ways
• If cylinder rotates 360°,
remove cylinder and check cam orientation.
Cylinder Installation
Spacer
(Used with 6 Pin
Cylinder Only)
Security Disc**
** Verify that security disc
is installed for either 6 or
7 pin Corbin Russwin or
small format cores.