
User's Manual


4
4. Keyboard: Use the keyboard for typing.
5. Indicators:
1 - The rst light from the left indicates that the Power is on.
2 - The middle light indicates that Caps Lock is on.
3 - The third is the Num Lock indicator. When this light is on, you may
use the secondary keys on your keyboard.
6. Microphone: Transmits audio signals.
7. Charging Indicator: Red light illuminates when connected to a power
adapter.
8. Charging Port: 12V/2A charger.
9. USB 3.0 Port: Provides a faster transfer rate to USB devices.
10. Mini-HDMI Port: Connect your laptop to a monitor or TV.
11. USB 2.0 Port: Connect external USB devices.
12. Headphone Jack: Transmit audio signals to speakers or headphones.
13. Micro SD Card Slot: Built-in memory card reader slot that supports
Micro SD format up to 64GB.
14. Speakers: Built-in 2x1W speakers allow you to playback sound without
connecting external devices.
Unit at a Glance (Continued)
Fully charge your laptop for at least six hours before initial use. Use the
included wall charger. The battery indicator will conrm that your device is
charging.
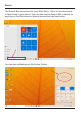
Turn your laptop on by pressing and holding the power key for two seconds.
Once the screen is loaded, connect to your Wi-Fi network. To wake the
screen from sleep, press the power key and the lock screen should appear.
Next, press the upwards arrow key () and log in. Sign in if your laptop
requires a password to log in.
Getting Started
Use your information to create a user account. You can use this
account to create, modify or remove other accounts on this
device.