
Instruction manual


18
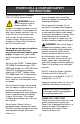
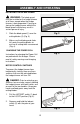
INSTALLING THE DRIVE UNIT ON
THE HEDGE TRIMMER
ATTACHMENT
WARNING: Remove the Power
Cell from the drive unit before installing
the drive unit on the trimmer
attachment.
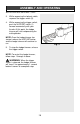
1. Pull the locking lever (1) outward
from the locking collar (2). Align the
groove (3) in the locking collar with
the matching key (4) on the end of
the trimmer attachment shaft (5)
(Fig. 1).
2. Insert the trimmer attachment shaft
into the locking collar until the
installation mark (6) meets the
locking collar.
NOTE: Make sure the trimmer
attachment shaft is fully inserted into
the locking collar. If it is not fully
inserted, the electrical connection will
not be made and the trimmer
attachment will not function properly.
3. When the trimmer attachment shaft
is fully inserted into the locking
collar, push the locking lever back
toward the locking collar to lock the
assembly together (Fig 2).
NOTE: Make sure the locking lever is
fully pressed toward the locking collar.
This is important to ensure the
assembly is properly locked together.
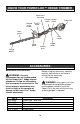
ASSEMBLY AND OPERATING
NOTE: The Power Lok™ Drive
Unit must be installed on the
Hedge Trimmer Attachment. If the
unit you purchased does NOT
include the drive unit, one must be
purchased separately. See
"AVAILABLE ACCESSORIES" on
Page 16.
!
Fig. 1
Fig. 2