
User's Manual


C orec es s 3213 Insta lla tion G uide
8
Windows 2000/NT
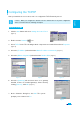
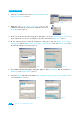
1. Click the
Start button and select Settings ¼ Network and
Dial-up Connections. (
Figure 1
)
2. Right-click the
Local Area Connection icon at the
<Network and Dial-up Connections> windows and select
Properties menu. (
Figure 2
)
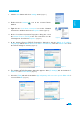
3. At the <Local Area Connection Properties> dialog box, select the
Internet Protocol (TCP/IP) in
the ‘Components checks are used by this connection’ list and click
Properties.
(Figure 3)
4. At the <Internet Protocol (TCP/IP Properties)> dialog box, click the
Obtain an IP address
automatically and the Obtain DNS server address automatically. Then click Advanced to check
the TCP/IP settings for accuracy. (
Figure 4
)
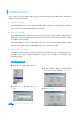
5. The <Advanced TCP/IP Settings> dialog box appears. At the
[IP Settings] tab, check that the IP
Address
is set to Enable DHCP. (
Figure 5
)
6. Select the
[DNS] tab and check that the Append primary and connection specific DNS suffix is
selected. Click
OK. (
Figure 6)
Figure
3
Figure
4
Figure
1
Figure 2
Figure
5
Figure
6