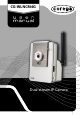
CG-WLNCM4G Dual-stream IP Camera
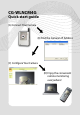
CG-WLNCM4G Quick start guide (A) Connect Your Camera (B) Find the Camera’s IP Address (C) Configure Your Camera (D) Enjoy the convenient remote monitoring everywhere!
Table of Contents Before Use 1. Introduction 6 1.1 Package Contents .........................................................................................06 1.2 System Requirement ...................................................................................06 1.3 Product Features ................................................................................................07 1.4 Product Overview ..............................................................................................08 1.
3.7 Tools .........................................................................................................................39 3.8 USB ...........................................................................................................................40 3.9 Information ............................................................................................................41 3.10 Advanced Configuration When the Camera Is behind a NAT Router 42 NC Monitor 4. About NC Monitor 46 4.
CG-WLNCM4G Before Use
Before Use 1. Introduction Thank you for purchasing corega WLNCM4G, a high-performance network camera that can be operated wirelessly. This multifunctional surveillance system not only supports high-quality video and twoway audio, but also adjusts its light mode automatically according to the environmental lighting conditions.
CG-WLNCM4G User Manual RAM: 512MB Resolution: 800x600 or above Web Browser: Microsoft® Internet Explorer 6.0 or above, Firefox and Safari Networking: LAN: 10Base-T Ethernet or 100Base-TX Fast Ethernet. Wireless LAN: IEEE 802.11b/g 1.3 Product Features • 1/4” CMOS Image Sensor • 802.
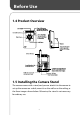
Before Use 1.4 Product Overview 1.5 Installing the Camera Stand The camera comes with a stand, and you can attach it to the camera to set up the camera on a desk, mount it on the wall or on the ceiling, as the three images shown below. Otherwise, the stand is not necessary for ordinary use.
CG-WLNCM4G User Manual On the desk On the wall On the ceiling 9
CG-WLNCM4G Basic Settings
Basic Settings 2. Setting Up the Camera 2.1 Connecting Your Product to a Local Area Network (LAN) Step 1: Use the provided Ethernet cable to connect the camera to your local area network while plugging the power adapter in to a power outlet. Step 2: The “Power” LED will show a steady amber light, meaning the camera has been automatically powered on. Step 3: The “Link” LED light will start flashing in green and the camera is ready for use now.
CG-WLNCM4G User Manual 2.2 Installing the Software Step 1: Insert the installation CD into your computer’s CD-ROM drive. The corega welcome page will launch automatically. Step 2: Click [Install Software] and you will see the following page with two programs: NC Finder and NC Monitor. Step 3: Click [NC Finder] button and the installation program will show up as below. Please complete the installation step by step.
Basic Settings Step 4: Then you can go to “Start” --> “Programs” --> “corega” --> “NCFinder” to access the program in the future without using the included CD-ROM. You can also install NC Monitor at this moment. Just click on [NC Monitor] button to start the installation. Please follow the steps shown on the screen to complete the installation. It is a convenient application that helps you enjoy the camera even more. We will talk about NC Monitor further in Chapter 4.
CG-WLNCM4G User Manual 2.3 Accessing the Live View Page Step 1: Insert the installation CD into your computer’s CD-ROM drive. (If you have installed NC Finder in your computer, you do not have to use the installation CD) Step 2: Click [NC Finder] to locate the current IP address of the camera. The default IP address is 192.168.1.245. Search for your camera’s IP address Step 3: Once you get the correct IP address of the camera, please double click the IP address shown on the screen again.
Basic Settings type “root” leave it blank (default setting) NOTE: Some web browsers require installing “ActiveX Control” addon. Please click [OK] to install it to access the Live View page. NOTE: If the camera’s IP address exists in a different subnet from that in your router, please double click the IP address shown on the screen or click [Change IP] to modify your camera’s IP address accordingly. When changing your camera’s IP address, you are required to enter the administrator’s ID and password.
CG-WLNCM4G User Manual 2.4 Using the Live View Page The live image is now displayed on the right side and some configuration buttons are shown on the left side. This page provides you with many useful viewing and management functions, including: • Camera Information - Display the camera’s location, date and time. The information can be modified in the Setup section. • Live View Image - Display the real-time image of the connected camera. • Live View Button – Click here to switch to the Live View mode.
Basic Settings - Browse: To assign the destination folder to captured video clips and still images. - Talk: To allow the person at the camera’s location to hear sounds and voices from your location. (You need to connect an external speaker to the camera when using this function, as the camera has no built-in speaker. Only one user is allowed to use this function at a time). - Listen: To receive sounds and voices from the camera’s location.
CG-WLNCM4G User Manual 2.5 Quick Setup For first time network camera users who are not familiar with this product, we provide a very simple setup tool called “Smart Wizard.” It consists of detailed instructions that will help you set up your network as well as some basic functions. Please follow those steps below to set up your camera: Step 1: To access this tool, click [Setup] [Smart Wizard].
Basic Settings Step 3: IP Settings Step 4: Email Settings 20
CG-WLNCM4G User Manual Step 5: Wireless Networking Step 6: This step shows the new configuration of your camera. Please confirm all the information and click [Apply] if they are correct. Otherwise, click [Prev] to go back to previous step(s) to make corrections. Click [Cancel] to end the wizard and discard you changes. For more setting options, please refer to the next Chapter.
CG-WLNCM4G Advanced Settings
Advanced Settings 3. Advanced Settings In the previous chapter, we learned the camera’s basic functions and used “Smart Wizard” to set up some simple configurations. In this chapter, you will further configure the camera to meet your personal preference. Please first click [Setup] on the live view page, and you will see many configuration options below. 3.1 Basic 3.1.1 System Indicate your camera’s name and location. You can also disable the LED light to make the camera unnoticeable to your target. 3.1.
CG-WLNCM4G User Manual The camera has a built-in backup battery, but after the camera is unplugged for too long and the battery runs out, the date & time settings may go back to factory default. 3.1.3 User There are three different management levels for the camera, including: Administrator: Only one administrator is allowed for this camera. An administrator can modify all the settings. It is strongly recommend that your change the default administrator’s password to prevent unauthorized use.
Advanced Settings 3.2 Network 3.2.1 Network If you have set up your network in Smart Wizard, here you can change more detailed settings. If you did not use Smart Wizard previously, it is okay to set up the network completely here. IP Setting: • DHCP: Select this option when your network uses the DHCP server, such as a NAT router. When the camera starts up, it will be assigned an IP address from the DHCP server automatically.
CG-WLNCM4G User Manual service provider. Please also enter the user name and password here. The camera will get an IP address from the ISP as starting up. Please note that once the camera gets an IP address from the ISP as starting up, it automatically sends a notification email to you. Therefore, you have to set up the email or DDNS configuration in advance when using PPPoE. DDNS Setting: With the Dynamic DNS feature, you can assign a fixed host name and domain name to a dynamic Internet IP address.
Advanced Settings example, HTTP port:81. When you use web browser to access the second camera, you may type http://camera’s IP address:81 to get the live view page. • RTSP Port: Configure the transmission of streaming data within the network. The default RTSP (Real Time Streaming Protocol) port is 554. 3.2.2 IP Filter The IP Filter setting allows the camera administrator to block computers that use a certain range of IP addresses.
CG-WLNCM4G User Manual Please first select [Enable] to enable the wirelss function. • Network ID (SSID): Click [Site Survey] to display the available wireless networks. Please double click the ESSID which you would like to connect from the Site Survey list. • Wireless Mode: Select the type of wireless communication for the camera, either Infrastructure or Ad-Hoc. (Please select Infrastructure if you connect this camera to an Access Point or a wireless router.
Advanced Settings To include date and time information on your image, select [Includes Date & Time] option. The information will show in white color. You can add a black background behind the displayed date and time by selecting [Enable Opaque]. Date & Time here Enable date & time overlay here 3.3.2 Video The camera supports both MPEG4 and MJPEG compression. MJPEG captures the images in JPEG format, which requires higher bandwidth to view smooth videos.
CG-WLNCM4G User Manual Since the camera supports 3GPP format, you can also choose if you would like to have audio enabled while using 3GPP-supported mobile devices. To view the real-time streaming images captured by the camera, please enter the RTSP link: rtsp://(IP address of the camera)/ 3gp on your mobile device. (For information about how to use 3GPP-supported mobile devices, please contact your service provider.) 3.3.
Advanced Settings 3.4 Event Server The camera allows you to have your captured images uploaded to a FTP server, sent to assigned email addresses, or stored to your network storage server. Here you can set up your preferred destinations step by step. Please note that only still images can be captured when those below methods are used. To save videos, please use “Manual Record” button on Live View page or NC Monitor software.
CG-WLNCM4G User Manual 3.4.2 Email The email settings here are very similar to those in Smart Wizard. If you are satisfied with your current settings, you do not have to change anything here. Otherwise, please configure your email server here. • SMTP Server Address: Enter the mail server address, such as “hotmail.com”. • Sender Email Address: Enter the email address of the user who will send the email, such as aloha@hotmail.com.
Advanced Settings to users. • Path: Assign a path on the network storage server that you would like to upload files to. • User Name: Enter the username to login to the server. • Password: Enter the password to login to the server. • Split By: When a file is too large to be uploaded smoothly, use this option to split it by file size or recording time. • When Disk Full: Select [Stop Recording] or [Recycle – Delete Oldest Folder] when your storage space is full.
CG-WLNCM4G User Manual Move the “Threshold” slide bar to adjust the sensitivity level of motion detecting. When the level is set low, even slight motions can be detected (A). When the level is set high, only big and obvious motions can be detected (B). (A) (B) Make sure to click [Save] to save the settings when you are done. An image will be taken when a motion within the detection areas is big enough to affect the horizontal sensitivity line.
Advanced Settings 3.6 Event Config 3.6.1 General Setting • Snapshot/Recording Subfolder: Please name the subfolder for captured files. Otherwise, leave this option blank to use the default setting. • Network Storage Recording Time Per Event: Specify the recording time when you use a network storage server. Click [Apply] to accept your settings or [Cancel] to discard the settings. 3.6.
CG-WLNCM4G User Manual Double click the profile you just added, a new window will show up with detailed settings: • Profile Name: Here displays the profile name selected in the list. • Weekdays: Select the weekday(s) that you are going to assign time periods in the schedule profile. The weekday that has been assigned with a time period will be displayed in green color. • Time List: Enter the Start/End Time and click [Add] to assign a new time period for the selected weekday.
Advanced Settings • Schedule Profile: From the pull-down menu, you can have motion detect trigger function enabled all the time by selecting [Always], or you can have it enabled only during the time period (the specific schedule profile) assigned previously. • Action: In “Event Server” step, we have configured FTP, emails, and network storage server. Here you can choose which destination to upload/send the captured images to.
CG-WLNCM4G User Manual NOTE: If the setting value of the “Network Storage Recording Time Per Event” option in General Setting is longer than the interval time for Network Storage Schedule, the recorded file will be a continuous video clip. For example, if you set the Network Storage Recording Time Per Event as ten seconds and the interval time as five seconds, the recorded file will be a non-stop video clip because the camera will record a 10-second video clip every 5 seconds. 3.
Advanced Settings • Factory Reset: Click [Reset] to reset the camera back to factory default settings • System Reboot: Click [Reboot] to restart the camera. The camera configurations will be retained after rebooting. • Configuration: You can save your camera configurations as a backup file on your computer. Click [Get the Backup File] to create a backup file with all the current settings or click [Browse] to retrieve a saved backup file and then click [Restore].
CG-WLNCM4G User Manual of the device. • USB Setting: You can choose [Stop Recording] or [Recycle – Delete Oldest Folder] when the USB device’s storage space is full. However, if you only have one folder left, the system will not delete that folder. Click [Apply] to accept your settings. NOTE: Only still images can be captured when an external USB device is used. 3.9 Information The Information section shows the current system configurations and event log of the camera.
Advanced Settings 3.10 Advanced Configuration When the Camera Is behind a NAT Router If your camera is connected to a NAT router, you need to open a “Virtual Server” port for the camera in the router to allow remote network access. Here we use corega WLBARGMO wireless router as an example: (as the image below)-. Step 1: Select the IP address and name of the camera Step 2: Select a service, for example, HTTP. Step 3: Enter the port range. The recommended port range is 80~80.
CG-WLNCM4G User Manual When you need to access the camera from a remote site, you may simply type http://Router’s WAN IP: http port/ in your web browser’s URL bar to get the live view page, for example, http://x.x.x.
CG-WLNCM4G NC Monitor
NC Monitor 4. About NC Monitor NC Monitor is a convenient and easy-to-use network camera management software. You can use this integrated application to access and control up to 16 cameras all at once, which allows you to monitor multiple places and record events effectively. In this chapter, we will explain the basic functions of this software, particularly those for CG-WLNCM4G. Some advanced functions may not be available while using CG-WLNCM4G. 4.
CG-WLNCM4G User Manual 4.2 Installation Please refer to chapter 2.2 for software installation. 4.3 Launching the Program On your computer, please go to “Start” --> “Programs” --> “corega” --> “NCMonitor” to start the program. Please make sure your computer screen’s resolution is at least 1024x768, otherwise the images shown on the live view screen may be distorted. 4.4 Adding a New Camera To add a new camera, please click “SETTING” button on the top left side of the screen, and click [Add Camera].
NC Monitor camera will now display in the camera list, and the live image of that camera will show on the main page. 4.5 Functions Overview 4.5.1 Control Panel SETTING: Click to enter the Setting section of NC Monitor. Click again to return to the main screen. PLAY: Click to play recorded video files using the media player on the computer (for example, Windows Media Player by default). LOCK: Click to lock the camera controls. Click again to resume controls of the camera.
CG-WLNCM4G User Manual 4.5.2 View Selection View Mode Buttons: NC Monitor provides multiple view options, including 1/4/9/16 windows and full screen mode. You can simply click on the button (1, 4, 9, 16 or Full) to switch to that mode. (To go back from full screen mode, please right click your mouse and click on “return”) SCAN: When you have multiple cameras connected, click this button to make each camera take turns displaying its live image.
NC Monitor 4.5.3 Camera Panel TRIGGER OUT: The function is not available for CG-WLNCM4G. SNAPSHOT: Click to capture a still image using the selected camera and save the file in the computer. (To set the recording file path, please go to “Setting” --> “Recording Configuration” --> “Recording File Path”) RECORD: Click to start recording a video clip using the selected camera. Click again to stop recording and save the file in the computer.
CG-WLNCM4G User Manual 4.5.4 System This section shows each camera’s time and date. 4.5.5 PAN-TILT CONTROL Panel (unavailable for CGWLNCM4G) 4.5.6 Live View Screen This screen displays all connected cameras’ live images.
NC Monitor 4.5.7 Camera List This section displays all connected cameras’ information (view mode is based on the selected viewing option). 4.6 NC Monitor Settings Click “SETTING” button on the top left side to access the setup page. Click here to access the setting section Make sure to have at least one camera connected before you start the setup. There are a few useful configuration options, including: 4.6.1 Camera List As we have done previously, here we can add a new camera by clicking [Add Camera].
CG-WLNCM4G User Manual A brief camera list is displayed here. 4.6.2 Camera Configuration To view live images of one of the connected cameras on the web browser, please first select a camera and then click [Link web page] button. You may have to enter the user name and password of the camera to access the live view page and web configuration, 4.6.
NC Monitor triggered recording. Please first configure some basic recording settings here for each camera. • Recording File Path: Click [Browse] to indicate a destination folder for your future recording files. • Each Recording File Size: This option allows you to set a recording file size limit so the recording file will be divided into a new file automatically once the file reaches the specified size limit.
CG-WLNCM4G User Manual recording schedule to the list. Click [Apply] to save the setting. • Days: Click [Days] tab and assign a recording schedule. After selecting several time periods, you can click [Fetch Template] to copy the setting, and then click [Paste Template] to apply it to other weekdays. Click [Apply] to save the setting. Select a camera here 4.6.5 Motion Configuration One of the recording methods is triggered recording by motion detection function.
NC Monitor Besides, motion configuration also provides some useful motion triggered options, which includes: • Alarm: From the pull-down menu select Beep or Music to alert you for motions detected. When Music is selected, you can customize it by clicking [Browse] and then choosing your favorite music (*.wav or *.mp3 file) in the computer. • Send e-Mail: Select this option and the system will send an email to the specified receiver when a motion is detected.
CG-WLNCM4G User Manual 4.6.6 Email Configuration • Mail Server: Enter the mail server address, such as “hotmail.com”. • Mail From: Enter the email address of the user who will send the email, such as aloha@hotmail.com. • Mail To: Enter the email address of the user who will receive the email. • User Name: Enter the username to login to the mail server. • Password: Enter the password to login to the mail server. • Subject: Enter the title of the email. 4.6.
NC Monitor 4.6.8 Others You can specify the scanning interval time for the connected cameras. 4.6.9 About Here shows the information of the application.
CG-WLNCM4G User Manual 5. FAQ When the installation fails or the connection does not work normally, it is recommended to take the following actions first: (1) Find your problem in the FAQ section. (2) Go to corega official website at http://www.corega-asia.com for the latest information of this product. (3) Go to corega official website at http://www.corega-asia.com and click [Support] --> [Contact corega] and send your question via our customer service email.
(2) Please double check if your camera has properly connected to the Internet. (3) If your camera is behind a NAT router, you need to set up a vitural server for the camera on the router. Please refer to chapter 3.10 for the setting steps. Q2. Why is a password required for accessing the camera? A: To prevent unauthorized use, this produc t provides an authentication process which requires a user name and password set by the camera’s administrator.
CG-WLNCM4G User Manual A: (1) Please try cleaning the lens, and adjusting the focus ring. (2) Please make sure the camera’s lens is not too close to the target object. The camera may lose focus when it’s too close to the object. Q6. Why does it take so long for the live image to move/change? A: (1) This may happen when the network connection is busy, especially when there are many cameras connected to the same computer at the same time, or when many users are accessing the same camera.
6. Specifications Standard Wireless LAN IEEE802.11, IEEE802.11b, IEEE802.11g, Wi-Fi (WPA2-PSK) Frequency IEEE802.11b 2.412GHz~2.472GHz IEEE802.11g 2.412GHz~2.472GHz Roaming Supported Camera Sensor 1/4” Color CMOS sensor Video Sensor Resolution 640 x 480 (approximately 300,000 pixels) Video Compression MPEG4/Motion JPEG selectable Lens Fixed focus, 4G, F2.8, f=4.
CG-WLNCM4G User Manual Federal Communication Commission Interference Statement This equipment has been tested and found to comply with the limits for a Class B digital device, pursuant to Part 15 of the FCC Rules. These limits are designed to provide reasonable protection against harmful interference in a residential installation.
About corega corega K.K. designs, develops and markets professional networking products that address the specific needs of small and medium enterprises and home user’s easy-to-use, quality and reliable services of networking solutions requirements. Established in 1996, corega 100% founded by Allied Telesis Group in Yokohama, Japan. corega’s core products consists of 10/100/1000 Ethernet products, Wireless Networking Products (802.
PN: S30-UM4105-00 Rev.