
Datasheet


[ 10 ] Reviewer’s Guide
Enhanced! Customizing brushes: Corel Painter 12 makes it easier than ever
to create and save your own brush variants and categories. You can use the
many brush control panels to adjust numerous aspects of any brush variant.
When you find settings that you want to keep, you can easily save a custom
brush variant by clicking
Brushes menu ` Save Variant.
You can also save the variant as a look. When you save a look, variant settings,
paper texture, pattern, gradient, and nozzle data are included. In addition, you
can create a brush category to store your custom variants. This is especially
useful if you want to organize variants to reflect a specific workflow or project.
Enhanced! New Image dialog box: You can now create custom presets,
such as canvases, colors, and paper textures, for your artwork. The New Image
dialog box lets you title your image and choose canvas dimensions, resolution,
color, and paper texture before you start painting or drawing. When you find a
group of canvas settings that you like, just click the Add button to create your
own custom preset.
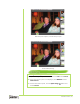
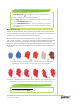
New! High Quality Display: The Grabber, Magnifier, and Rotate Page tools
now share a common property bar, which includes a new High Quality Display
option. When you are zoomed in on an image area at more than 100%, the
High Quality Display option smoothes the edges of your image so you can view
it as it will print.
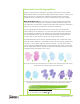
New! Computed Circular brush controls: With the new Computed
Circular brush control panel, you can specify the tip profile of certain brushes.
This lets you customize dab opacity and hardness, which controls the color
density at the outer edge of the dab.
Enhanced! Dynamic brush adjustments: While you’ve always been able to
adjust brush size and opacity dynamically, Corel Painter 12 now lets you change
brush angle and squeeze within the context of your image. This takes the
guesswork out of brush sizing by letting you make adjustments without leaving
the document window.
Using the High Quality Display option
1 In the toolbox, click the Magnifier tool.
The Magnifier cursor shows a plus sign (+), which indicates that you
are increasing the magnification (zooming in).
2 Drag in the document window to select and zoom in on a portion of
your image.
3 On the property bar, click the High Quality Display button.
Notice how the jagged, pixelated edges of the image area now
appear smoother.