
Installation Instructions
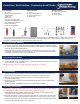


1. Using a shim, level up the marked areas that were made in step 2.
2. Apply a dime-sized dab of color-matched caulk every 24" along the front and back edge
of the cabinet run.
3. With help, slowly position countertop above the mounting surface.
4. Gradually tip the countertop to a horizontal position. Be aware of upper cabinets and
installed sinks (if applicable).
5.Onceinnalposition,rmlyapplydownwardpressuretoseatthetopinthecaulk.
(NOTE: This installation process will aslo be used for pieces such as islands)
1. Before placing large pieces of countertop, apply a dime-sized dab of color-matched caulk every 24" along the front and
back edge of the cabinet run.
2. With help, slowly position countertop above the mounting surface.
3. Gradually tip the countertop to a horizontal position. Be aware of upper cabinets and installed sinks (if applicable).
4.Onceinnalposition,rmlyapplydownwardpressuretoseatthetopinthecaulk.
5. For large countertop pieces it will be necessary to caulk along the outer seam between the underside of the countertop and
the cabinet face.
6) Install Single Countertop Pieces
7) Install Larger Countertop Pieces with Seam or Miter
2) Color Match Silicone
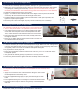
1.Setthecountertopinplacewiththeunnished,
underside facing up. Position the sink upside down,
centered over the sink cutout with equal amounts of
overhang or reveal visible on all sides of the sink. (Fig.B)
2.Withapencilorne-tippedmarker,tracetheouterrim
of the sink to the underside of the countertop. (Fig.C)
3. With denatured alcohol, wipe down the underside of
the countertop where the sink rim and anchoring posts
will be adhered to. (Fig.D)
4. With an epoxy, bond the undermount sink anchoring posts
to the underside of the countertop at the four corners
and central locations along the cutouts width and length
(Fig.E). Be sure the posts are next to your traced line, but
not inside the area where the sink rim will adhere to the
countertop. Mix the 2 part epoxy thoroughly, otherwise
the epoxy will not set. Apply epoxy to cleaned mounting
locations and press the mounting posts into the epoxy
in the anchoring locations. Smooth the epoxy around the
anchoring posts and let the epoxy dry for a minimum of 20
minutes.
(NOTE: Do not place anchoring posts in front of sink. (Fig.F)
5. Run a quarter-inch bead of silicone caulk inside the traced
sink rim area on the underside of the countertop. (Fig.G)
6. Position the undermount sink within the traced area and
buttinguptotheanchoringposts,pressdownrmly.
7. Attach undermount sink to the anchoring posts with
supplied brackets and wing nuts. Wait approximately one
hour for caulk to set before moving the countertop section
fornalplacement.(Fig.H)
Fig. D
Fig. G
Fig. B
Fig. C
Fig. E
Fig. H
5) Undermount Sink Installation (If Applicable)
6 & 7) Sink Clips and Epoxy
6 & 7) Undermount Sink Clips
and Epoxy
2) Color Match Silicone
Fig. F
(NOTE: If you do not have access, it may be necessary to assemble the seam before moving pieces into nal position on the
cabinets.)