
Service manual


© 2013-2015, Cornelius Inc. - 4 - Publication Number: 620058442
Quest Elite QLT 2000
INSTALLATION INSTRUCTIONS
RECEIVING
Each unit is completely tested and inspected before shipment. At time of shipment, the carrier accepts the unit and
any claim for damage must be made with the carrier.
Upon receiving from the carrier, please, inspect the carton for visible damage. If damage exists, have the carrier make
a
note on the bill of lading and file a claim with the carrier.
UNPACKING
• Remove staples securing carton to pallet.
• Lift carton up and off of unit.
• Remove top insert and shipping bag.
• Open upper cabinet door and remove installation kit.
• Remove bolts securing unit to pallet.
• Lift unit off of pallet.
• Open the package, take the legs and secure them to the bottom of the unit.
NOTE: Do not lay the unit on sides or on the back. This may cause vital oils to drain from the compressor
resulting in damage during start-up and consequently voiding the warranty.
Tilt the unit only when securing legs.If the unit is to be t
ransported from the place where it was unpacked, do not
remove the unit from the pallet. Transport it on the pallet to the installation site.
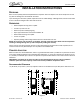
COUNTER LOCATION
Select a location in a well ventilated area, close to a grounded electrical outlet. If possible do not place the unit close
to hot and/or steaming machines. The minimum Airflow clearance is: 4" (10.16 cm) in back and 12" (30.48 cm) on top,
4” (10.16cm) on sides and open to the front is required. The space between bottom of the unit and counter cannot be
obstructed.
IMPORTANT: Condenser air is drawn from the rear and discharged out the top. Failure to maintain
c
learance space will reduce capacity of the unit and cause premature compressor failure.
Recommended Clearance
12” (30.48 cm) on top and 4” (10.16 cm) required in back for air circulation and 4”(10.16cm) at the sides of the unit.
4”
4”
4”
12”
Figure 2.