
Service manual


560001279SER
80
APPENDIX A
VALVE TORQUE AND STAKING
IMI Cornelius provided Service Bulletin number TSB–06–3 concerning the proper torquing and staking of FCB
equipment using the Delta stainless steel dispensing valve. The procedures in the Service Bulletin ensured that
the shank nut used to retain the Delta dispensing valve to the faceplate was tightened to the correct torque and
then staked so that the shank nut could not be dislodged. All newly manufactured equipment utilizing the Delta
dispense valve, beginning with serial numbers 62B0620FC001, has been staked in the factory. Consequently,
all Delta valves should now be torqued and staked. A procedure for properly attaching and torquing a Motorman
Valve is also included.
This dispensing valve shank nut torque procedure must be followed (a) if a Delta valve has not previously been
torqued and staked, (b) if the shank nut on a Delta stainless steel valve that has been staked is later removed
and then reinstalled, or (c) the FCB equipment has a Motorman valve. The processes for checking the torque of
the shank nut for both the Delta and Motorman valve configurations and for staking the shank nut (Delta valve
configuration ONLY) are detailed in this Procedure. The Cornelius tool (part number 620711709) to be used to
torque the shank nut can be purchased by contacting BEVCORe at 763–488–3000.
NOTE: When reinstalling a shank nut that has been removed from a staked Delta valve, the shank nut
must be FLUSH with the faceplate before applying the torque setting. If the thread or shank nut have
been damaged during removal and/or the shank nut cannot be installed flush with the faceplate, the
valve should be replaced.
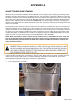
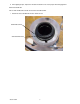
The following procedure details the proper method to apply torque to the shank nut on V–Series dispensing
valves Both Delta and Motorman configurations. This procedure begins with the faceplate assembly removed
from the barrel and the inside surface of faceplate wiped dry, especially around shank nut. (See section
Servicing Dispensing Valves Page 50 for instructions to drain barrels).
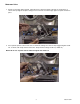
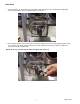
1. Loosen splash panel, as shown.