
Installation manual


Viper Installation Manual
© 2008-2009, IMI Cornelius Inc. - 15 - Publication Number: 621260373INS
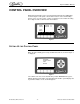
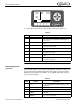
Figure 10
Use the up and down arrows on the right side of the control panel to move
between the various choices on the display. When the OPTION SETUP
selection is highlighted, press the GO button to access the menu. The Option
Setup menu (Figure 11) is displayed.
Figure 11
Setting the Clock
Highlight the CLOCK SETUP field from the Select menu, shown in Figure 11.
This displays the Clock Setup menu, shown in Figure 12. To set the time,
perform the procedure in Table 4.
SELECT
12:51P
MAR 04
UNIT DATA
ERROR STATUS
ERROR LOG
BACK MAIN SETUP MAINT GO
SELECT
12:51P
MAR 04
CLOCK SETUP
EVENTS SETUP
VISC SETUP
BACK MAIN SETUP MAINT GO
OPTION SETUP
Table 4
Step Action Procedure
1 Set clock time Use the up and down arrows on the right side of
the control panel to highlight the TIME display on
the screen.
2 Select hour field Use the left and right arrows to select the hour
field
3 Set correct hour Use the + or - buttons at the bottom of the display
to set the proper hour.
4 Select minute field Use the left and right arrows to select the minute
field.
5 Set correct minute Use the + or - buttons at the bottom of the display
to set the proper minute.
6 Select AM/PM field If the 12 hour clock option is selected, use the left
and right arrows to select the AM/PM field.
7 Set AM/PM Use the + button at the bottom of the display to
set the AM/PM setting, if using 12 hour format.