
Installation manual


Viper Installation Manual
Publication Number: 621260373INS - 16 - © 2008-2009, IMI Cornelius Inc.
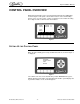
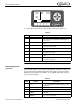
Figure 12
To set the date, perform the procedure in Table 5 and refer to Figure 12.
Setting Daylight Sav-
ings Time
Once the date and time are set properly, the daylight savings time settings can
be done. Display the Daylight Savings Time menu (Figure 13) by pressing the
DST button at the bottom of the display. To set daylight savings time, perform
the procedure in Table 6.
Table 5
Step Action Procedure
1 Set date Use the up and down arrows on the right side of
the control panel to highlight the DATE display on
the screen.
2 Select month field Use the left and right arrows to select the month
field
3 Set correct month Use the + or - buttons at the bottom of the display
to set the correct month.
4 Select day field Use the left and right arrows to select the day
field.
5 Set correct day Use the + or - buttons at the bottom of the display
to set the correct day.
6 Select year field Use the left and right arrows to select the year
field.
7 Set correct year Use the + or - buttons at the bottom of the display
to set the correct year.
CLOCK
SETUP
12:51P
MAR 04
TIME: 11:00 AM
DATE: 01/01/00
BACK CLOCK DST - +
Table 6
Step Action Procedure
1 Set daylight savings
time
Press the DST button at the bottom of the display
to open the daylight savings time display, shown
in Figure 13.
2 Select DST Use the up and down arrows to select DST.
3 Set DST on Use the + button to turn on daylight savings time.
4 Select SPRING
MONTH
Use the up and down arrows to select SPRING
MONTH.
5 Set SPRING
MONTH
Use the + or - buttons at the bottom of the display
to set the correct month.