QUEST JUICE 2 and 4 Flavor Training Manual Release Date: April 12, 2004 Publication Number: TP00968 Revision Date: November 23, 2004 Revision: C Visit the IMI Cornelius web site at www.cornelius.com for all your Literature needs.
Quest Juice Training Manual The products, technical information, and instructions contained in this manual are subject to change without notice. These instructions are not intended to cover all details or variations of the equipment, nor to provide for every possible contingency in the installation, operation or maintenance of this equipment.
Quest Juice Training Manual TABLE OF CONTENTS Overview . . . . . . . . . . . . . . . . . . . . . . . . . . . . . . . . . . . . . . . . . . . . . . . . . . . . . . . . . . . . .1 Product Description . . . . . . . . . . . . . . . . . . . . . . . . . . . . . . . . . . . . . . . . . . . . . . . . . . .1 Dimensions & Capacities . . . . . . . . . . . . . . . . . . . . . . . . . . . . . . . . . . . . . . . . . . . . . .2 Quest . . . . . . . . . . . . . . . . . . . . . . . . . . . . . . . . . . . . . . . . . . . .
Quest Juice Training Manual Removal of Merchandiser . . . . . . . . . . . . . . . . . . . . . . . . . . . . . . . . . . . . . . . . . . . .13 Removal of the Switch Panel . . . . . . . . . . . . . . . . . . . . . . . . . . . . . . . . . . . . . . . . . . 14 Removal of the Pump Platforms . . . . . . . . . . . . . . . . . . . . . . . . . . . . . . . . . . . . . . . . 15 Removal of the Cooling Fan . . . . . . . . . . . . . . . . . . . . . . . . . . . . . . . . . . . . . . . . . . . 17 Removal of Panels . . . .
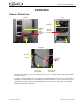
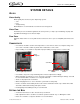
Quest Juice Training Manual OVERVIEW PRODUCT DESCRIPTION Left Side Rear Compressor Pump deck harness 1 and 2 Dispensing nozzles Door harness Condenser fan motor and bracket Ice bath Transformer Right Side Door latch Key lock Pump deck harness 3 and 4 Concentrate cooling cabinet Water solenoid and strainer The Quest Juice Dispenser uses an ice/water bath system to cool both the potable water supply and the concentrate cabinet.
Quest Juice Training Manual DIMENSIONS & CAPACITIES Quest Dispense Rate ........................................1.0 – 2.2 oz./sec. Electrical rating .......................................115 VAC, 60 Hz, 15 amp dedicated circuit ................................................................220 VAC, 50Hz Dimensions .............................................29.3” H, 24.3” D Condenser clearance..............................4” back, 12” top Water Connection...................................
Quest Juice Training Manual SYSTEM DETAILS WATER Water Quality Water quality has an affect on juice dispensing systems. • odor • taste • clarity/foaming Water filtration is recommended to assure the best beverage taste. Water Flow Inlet water pressure should be regulated to 45 to 50 psi max. (3.1 bar) to prevent damage to pump tubing. Minimum flowing pressure must be 20psi. Flow Rates Adequate water flow is necessary and must be at least 3.0 ounces per second (89ml) at the inlet to the unit.
Quest Juice Training Manual INTRODUCTION PREVIEW QUESTIONS Check your current knowledge by taking a few minutes to answer the following questions: 1. 2. 3. 4. The ice bank control is adjustable? _____ True _____ False The transformer does NOT control the cooling system? _____ True _____ False Condenser airflow passes over the compressor first? _____ True _____ False ”Ratio” refers to the amount of water required to dilute one part of concentrate? _____ True _____ False 5.
Quest Juice Training Manual INSTALLATION COUNTER LOCATION The minimum airflow clearance is: 4” (10.16 cm) in back and 12” (30.48 cm) on top and open to the front. IMPORTANT: Condenser air is drawn in from the bottom of the rear panel and discharged out the top of the rear panel. Failure to maintain clearance space will reduce capacity of the unit and cause premature compressor failure. FILLING THE ICE B ATH The fill tube is located behind the splash panel.
Quest Juice Training Manual CONCENTRATE HANDLING & LOADING It is recommended that the concentrate be thawed in a refrigerated 35°F-40°F (1.6°C-4.4°C) compartment for a minimum of 48 hours prior to loading into the Quest Juice Dispenser. WARNING: Concentrate must be completely thawed and within the temperature range of 35°F40°F (1.6°C-4.4°C) prior to loading. Failing to supply concentrate inside the recommended temperature range, especially below 35°F (1.
Quest Juice Training Manual BRIXING PROCEDURE NOTE: If concentrate is not properly thawed, it will adversely affect the amount of concentrate dispensed. Thawed product should be between 35°F/1.6°C to 40°F/4.4°C. NOTE: You can not dispense drinks with the door open. SUPPLIES • 1-Small 12 oz. cup (354.8 ml) • 1-Large 21 oz. cup (621.
Quest Juice Training Manual Pump Speed Switch The pump speed switch has two settings, low and high. For most dispensing situations high speed will be the preferred speed. Most concentrates use this setting. Low speed is only used when the water pressure is at the low end of the range (25 PSI or less) and the concentrate is a very thin viscosity such as apple or cranberry. Low speed cuts the output voltage to 18VDC.
Quest Juice Training Manual PLANNED MAINTENANCE SCHEDULE DAILY Flush System: 1. 2. 3. 4. Move Dispense/Flush levers located on the platform assembly in the refrigerated cabinet to the “Flush” position. Place an empty cup on the drip tray below each dispense nozzle. Close the door and depress each dispense button for 2-3 seconds or until clear water flows from each dispense nozzle. Return the Dispense/Flush levers to the “Dispense” position.
Quest Juice Training Manual Step 2 - Sanitize Pump System 1. Fill a clean concentrate container with 2 quarts (1.9L) of fresh sanitizing solution. 2. Place handles in the “dispense” position and close the door. 3. Press and hold the dispense button for 90 seconds then stop. Allow sanitizing solution to remain in the lines for 5 minutes. 4. After 5 minutes, dispense the remaining sanitizing solution. Step 3 - Prepare Dispenser for Use 1.
Quest Juice Training Manual ANNUALLY Replace Pump Tubing: A replacement pump tubing kit, part#45098, is available. The kit consists of one pre-cut length of pump tubing, two white plastic hose clamps, and instructions. Removing Pump Platform(s): 1. 2. 3. 4. 5. 6. Remove the concentrate containers from the dispenser and place them in a refrigerator. Remove the cabinet shelf that the concentrate containers sit on.
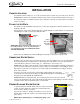
Quest Juice Training Manual 8. 9. While holding the pump halves together with your hand, reinsert the four screws and tighten using a crisscross pattern as shown. The screws should be tightened about 1/4 turn beyond snug. Insert the two concentrate delivery tubes into the pump tubing ends and secure them using the new hose clamps supplied in the kit. Be sure to use pliers to squeeze and tighten the hose clamps. Fig. 3 Publication Number: TP00968 - 12 - © 2004, IMI Cornelius Inc.
Quest Juice Training Manual MECHANICAL SECTION REMOVAL OF MERCHANDISER 1. Remove (6) screws from the top, the front, and the side of the door (as shown). 1 2 3 4 5 6 NOTE: You now have access to the ballast and light panel. NOTE: Remember the door switch is used to reset the refill light. Ballast Assembly NOTE: The pumps can not be operated with the door in the open position.
Quest Juice Training Manual REMOVAL OF THE S WITCH PANEL 1. Remove (2) screws from behind the right and left flavor tabs and the (2) screws from the front underside of the switch panel assembly. 2 3 1 4 NOTE: The switch harness is marked 1-4 and the connectors are indexed. 2. Remove (3) screws to replace a dispensing switch, if necessary. NOTE: If a change of dispensing venue is required (push to portion) Cornelius makes available a complete lower door assembly to expedite this change.
Quest Juice Training Manual REMOVAL OF THE PUMP PLATFORMS 1. Remove the cabinet shelf by lifting it up and pulling it forward. 2. Pull the front flap out and up. 3. Remove the dispensing nozzles by turning them 1/4 turn clockwise and pulling down. 4. Pull the locking latch forward and lift the platform up and pull it forward slightly. © 2004, IMI Cornelius Inc.
Quest Juice Training Manual 5. Press the release button on the water connector to release the platform. 6. Disconnect the platform electrical connector by squeezing the release tabs on either side of the connector and pulling straight back. The platform can now be removed from the cabinet. Publication Number: TP00968 - 16 - © 2004, IMI Cornelius Inc.
Quest Juice Training Manual REMOVAL OF THE COOLING FAN 1. Remove (4) screws from the cabinet rear panel. 2. Turn the panel so the fan is facing you. To do this you will have to pull the wire leads gently through the back of the cabinet. 3. Disconnect the wire leads and remove the ground wire (as shown). 4. Remove (4) screws from the fan mounting bracket. NOTE: When installing a new fan always make sure the label is facing the front of the cabinet.
Quest Juice Training Manual REMOVAL OF PANELS 1. Loosen the 2 screws from the top panel. 2. Open the front door. 3. Lift the rear of the top panel and slide forward and remove. 4. Slide the drip tray forward and remove. 5. Remove the 2 screws on the front panel and remove the front panel. 6. Slide the panel up and pull out to remove. On the 2 flavor unit it will be necessary to remove 2 screws from the back panel. Publication Number: TP00968 - 18 - © 2004, IMI Cornelius Inc.
Quest Juice Training Manual 7. Remove the side panels. A. Right Panel: The 2 screws and switch backing plate must be removed before the right panel can be removed. B. Left Panel: The door must be open while removing the left panel. Once the screws are removed, pull the panel clear off the frame and tip forward. Slide panel forward and up until it clears the mounting tab (insert). Move the panel down and back. Once it is clear of the door the panel will release. REMOVAL OF ELECTRICAL BOX 1.
Quest Juice Training Manual REMOVAL OF THE VRB B OARDS 1. Remove the cover. 2. Remove the connectors. 3. Loosen and remove the nut and insulation. 4. Turn the box over and locate the standoffs on the VRB board to be removed. Gently squeeze with a needle nose pliers. This will release the standoff and allow it to be pushed back through the hole in the bracket. 5. The VRB board can now be removed from the electrical box itself. 6.
Quest Juice Training Manual REMOVAL OF THE ICE BANK CONTROL 1. Slide the ice control toward the center of the deck to release and lift up while gently pulling forward. The box will come forward only as far as the cables will allow. NOTE:The electrical box and nozzles must be removed to remove the ice bank control. 2. The connectors are very tight. To successfully remove use a crescent wrench to grip the outside of the connector rocking gently up and down while pulling up to release.
Quest Juice Training Manual REMOVAL OF THE C OOLING CABINET 1. Remove (4) 7/16” nuts from the under side of the cabinet frame. Current productions uses (2) nuts only. 2. Cut the wire tie from the wire bundle in the rear of the unit, just above the condenser. 3. Disconnect the cooling cabinet wire harness. 4. Remove the insulation from around the inlet and outlet fittings of the heat exchange. Remove the locking clips from the inlet and outlet fittings. 5.
Quest Juice Training Manual 6. Remove the inlet water line from the cabinet manifold. 7. Remove (4) screws that secure the cooling to the frame. NOTE: For best results use a screw driver that has at least an 8” blade. 2 1 3 4 8. After you lift the cabinet off the frame you can service the agitator motor. © 2004, IMI Cornelius Inc.
Quest Juice Training Manual REMOVAL OF THE A GITATOR MOTOR 1. Remove the thumbscrew located at the rear of the motor before removing the agitator motor. 2. Lift the motor out of the ice bath. Disconnect the wire lead from the ice bank control. Note: You will have to feed the water tubes through the refrigeration frame to completely remove. REMOVAL OF THE R EFRIGERATION CHASSIS 1.
Quest Juice Training Manual 3. Disconnect the following connectors and leads: • Remove the top ground wire from the post. • Red/White - from transformer #1 • Blue - from transformer #2 Ground Wire/Post • Lead from inlet solenoid #3. Blue Red/White Lead 4. Slide the refrigeration chassis out from the frame. 5. Remove (4) screws from the base of the refrigeration chassis and lift off of the water bath. © 2004, IMI Cornelius Inc.
Quest Juice Training Manual REMOVAL OF THE ICE CONTROL P ROBE 1. Carefully turn the chassis over to gain access to the probe assembly. Cut the wire tie holding the probe assembly only. Push up and slide the probe assembly off the bracket. DO NOT REMOVE THE BRACKET. 2. The connector must be disassembled to pass the wire leads through the water bath cover. 3. Carefully remove the grommet from the water bath cover. 4.
Quest Juice Training Manual MAJOR COMPONENT REVIEW ELECTRICAL BOX The electrical box houses the Voltage Regulator Boards (VRB) that is used to convert AC voltage from the transformer to DC voltage that powers the pumping system. It also incorporates the sold out logic. Each flavor has its own VRB.
Quest Juice Training Manual PUMP S PEED SWITCH The pump speed switch has two settings, low and high. For most dispensing situations high speed will be the preferred speed. Most concentrates use this setting. Low speed is only used when the water pressure is at the low end of the range (25 PSI or less) and the concentrate is a very thin viscosity such as apple or cranberry. Low speed cuts the output voltage to 18VDC.
Quest Juice Training Manual TRANSFORMER This is a dual stage transformer with 2 outputs. The purpose of the transformer is to step the line voltage to 26 VAC primary to the electrical box and the VRB and 24 VAC secondary is to light the merchandiser. Current production transformers are equipped with a thermal overload protection device that will cut out when high temperature or high amperage is detected.
Quest Juice Training Manual DOOR S WITCH - 72 E S ERIAL NUMBER On or before April 1, 2004 the door switch configuration will be changed to separate the reset switch from the catch. The serial number for this will have a prefix of 72 D for Quest 4 flavor and 72C for Quest 2 flavor. Reset Switch in Top of Door Kit #720911146 is available to convert field units to this configuration. The sold-out feature however will be inoperable with the use of this kit.
Quest Juice Training Manual Tip: When re-assembling the large o-ring may be pinched if not installed properly. Place the slide valve into the bottom of the adaptor keeping straight across. Press evenly to seat the o-ring. It is not advisable to rotate the valve back and forth in and attempt to seat the o-ring. Do the same when installing the top. When securing the screws do it in the X pattern tightening the opposites across from each other. Be sure the are fully tighten to prevent leaking.
Quest Juice Training Manual Bottle Adaptor - Flush Mode THE FLUSH MODE IS FOR FLUSHING THE PUMP SYSTEM OF CONCENTRATE ONLY. Dispensing water in the flush mode over long periods can cause the pump tubing to split at the inlet of the pump. Static Mixers Standard The Quest dispenser has static mixer option. DN Mixer The DN MIXER (part number 720703202) is used for high viscosity concentrates. It helps promote proper mixing. The cone top mixer is the standard. Both are interchangeable with each other.
Quest Juice Training Manual WIRING DIAGRAM © 2004, IMI Cornelius Inc.
Quest Juice Training Manual Publication Number: TP00968 - 34 - © 2004, IMI Cornelius Inc.
Quest Juice Training Manual TROUBLESHOOTING GUIDE The following pages contain troubleshooting information intended to aid an experienced service person in diagnosing operational problems that may occur. For further assistance, contact the IMI Cornelius Technical Services department at 1-888-248-5568 (630-539-6850 outside the United States) between the hours of 7:30A.M. and 5:00P.M. Central Standard Time.
Quest Juice Training Manual PROBLEM PROBABLE CAUSE No water and no concentrate, refrigeration is working No concentrate dispensed, water only REMEDY • Freeze-up of water coil in ice bath • Unplug dispenser and allow 2-4 hours to thaw. Check operation of agitator motor and ice bank control. • • Refrigeration system may be low on charge resulting in a deformed ice bank and freeze-up of the water coil in the ice bath.
Quest Juice Training Manual PROBLEM Brix Problem Pump Inoperative Machine continues to dispense after dispense button is released or dispenses without operator input © 2004, IMI Cornelius Inc. PROBABLE CAUSE REMEDY • Water supply pressure too low, less than 20 psi (1.4 bar) flowing water pressure fluctuates sharply • Correct water supply problem to ensure a constant 50 psi (3.
Quest Juice Training Manual NOTES _______________________________________________________________________ _______________________________________________________________________ _______________________________________________________________________ _______________________________________________________________________ _______________________________________________________________________ _______________________________________________________________________ _____________________________________________
www.cornelius.