
Installation manual


Viper Installation Manual
© 2010-2012, IMI Cornelius Inc. - 11 - Publication Number: 621360041TBINS
CO2 Connections
Use a dedicated secondary regulator, fittings and clamps to connect the CO2
line to the unit. Set the regulator for 75 +/- 1 psig at the unit. Run the tubing for
the CO
2 from the secondary regulator to the unit and make all appropriate
connections. Do not turn on the CO
2 supply to the unit.
Syrup Requirements
NOTE: Syrup connections require 3/8” I.D. tubing. All hoses must
reach the back of the unit plus an adequate amount of extra tubing
to allow the unit to be pulled out for servicing.
Syrup Connections
Use the appropriate fittings and clamps to connect the syrup line to the unit. Run
the tubing for the syrup (3/8 in. ID, Min.) from the backroom to the unit and make
all appropriate connections. Do not turn on the syrup supply to the unit.
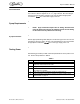
Testing Power
The following procedure provides a minimal operational test of the power to the
unit. Perform the procedure in Table 3.
Table 3.
Step Action
1 Verify the voltage being supplied to the unit. It should be between 215 and
245 Volts, measured at the wall outlet.
2 Plug in the unit power cord and turn on power to the unit.
3 The barrels are off when the unit is initially powered up and the unit displays
the “Water Out” message.
4 Unit powers up with Do Not Drink and Out of Product lights on.
5 If the unit displays normal startup operation, proceed to “Setting Up the
Control Panel” on page 13.