
Installation manual


Viper Installation Manual
Publication Number: 621360041TBINS - 26 - © 2010-2012, IMI Cornelius Inc.
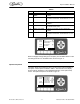
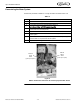
Figure 20.
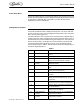
Table 16.
Step Action
1 Remove the drip tray by sliding it forward off the mounting brackets.
2 Remove the splash panel behind the drip tray (if not removed).
3
Turn product supply valve to the Down (BRIX) position for the barrel you are
going to test. (See Figure 20.)
4
From the Maintenance menu (Figure 19.), open the BRIX Setup menu.
NOTE: Entering the BRIX Setup menu turns off all the barrels in the sys-
tem.
5
Use the up and down arrows to highlight BRIX SETUP. Press the GO button
at the bottom of the display.
6
Again use the up and down arrows to select the barrel you wish to perform
BRIX on. NOTE: Pressing CANCEL will stop the process.
7 Locate the appropriate barrel sample tube and hold a cup under it.
8
Open the valve at the end of the sample tube. Press the BRIX button. The
product pump will pump product for approximately 3 seconds. After the
sample is dispensed Press the BRIX button twice more to dispense product
two more times. Discard all three of these samples.
9 Press the BRIX button again. Collect a sample from the cup.
10
Place adequate amount of the sample on a refractometer and read the
BRIX value. A target BRIX reading of 13.0 (+/- 1.0) is normally desired for
sugar-based syrups. Lower values for some diet syrups can be specified.
Check with the syrup manufacturer if you are not sure.
11
If BRIX level needs to be adjusted, perform the Adjusting BRIX Level proce-
dure in Table 17.
12 Repeat this procedure for each barrel in the system.
13 Replace splash panel on unit.
Product
Supply
Valve
Barrel1
Product
Supply
Valve
Barrel3
ValvesshowninProductpositionw/SplashPanelRemoved
Product
Supply
Valve
Barrel2