
Installation manual


Viper Installation Manual
© 2010-2012, IMI Cornelius Inc. - 27 - Publication Number: 621360041TBINS
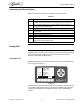
Adjusting BRIX Level
If the BRIX reading is out of its proper range, the syrup level should be adjusted
to bring BRIX into the proper range. NEVER change the WATER FLOW
CONTROL setting to adjust BRIX. The syrup flow control adjustment valve is
shown in Figure 21. Perform the procedure in Table 17.
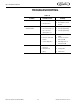
Table 17.
Step Action
1 Remove the drip tray and the access panel behind it, if not already removed.
2 To increase the BRIX reading, turn the syrup flow control knob clockwise.
Turn it counter-clockwise to decrease the BRIX reading. Never adjust the
flow control more than 1/2-turn at a time.
3 Repeat steps 7 through 10 of Table 16. for each adjustment until the proper
BRIX setting is achieved.
4 Manually press the water valve at the front of the unit (Figure 18.) in the mid-
dle of the water flow regulator to clean out the sample tube and close the
valve at end of the sample tube.
5 Once the BRIX is properly set, turn the product supply valve to the upright
(Product) position for the barrel you are testing. (See Figure 20.)
6 From the Barrel Maintenance menu, press the PURGE button to fill the bar-
rel with CO
2.
7 Bleed the air from the face plate relief valves for 30 seconds each to remove
air from the barrels.
8 Go to the Barrel Maintenance menu and press FILL to fill the barrel.
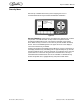
9 Fill the barrel by opening up the barrel faceplate relief valve for the barrel
(See Figure 22.). Fill the barrel to the level shown in Figure 22. (approx. half
way between the relief valve and the top of the barrel) for 100-110% over-
run.
10 After finishing BRIX testing and adjustment for the first barrel, repeat this
procedure for each of the other barrels, as required.
11 When BRIX adjustments are complete and all the air is purged from the sys-
tem, replace the splash panel. NOTE: If any of the valve covers were
removed during the process, make sure to replace them.