
User's Manual

Specification #8810502 Original 5/14/98
ABS<Comtrak
1700-1702
Installation & Start-up Procedure
2 Revision, 1/5/99
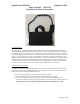
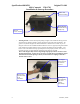
Figure 1. Battery Charger Assembly
Battery Charging Procedure:
Note: This process assumes charger installation has been complete.
The model 1700 operates for a minimum of 24 full hours . The 24 hour schedule includes a minimum of 7
hours on-line charging plus a minimum of 17 hours independent operation off of two fully charged main
batteries. The charging process is as follows:
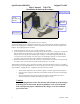
1. Verify the charger has been set up per “Charger Installation” procedure.
2. Connect the PTU power connector to the battery charger power connector ; “Charge “B” red lamp will
light and remain lit until “B” battery pack is fully charged; “A” will continue blinking until “B” is
charged. The “Full Chg. B” lamp will then light. “Charge A” red lamp will light and remain lit until
“A” battery pack is fully charged. The “Full Chg. A” lamp will light. Both the “A” and “B” battery
“Full Chg.” lamps will remain lit as long as the PTU is connected to the charger.
3. The PTU should be left connected to the charger for a minimum three hours (a full 7 hours) after both
“Full Chg. Lamps are lit to allow for top-off of both battery pack “A” and “B”.
If both lights on the battery charger flash when the PTU is connected the batteries may be in a condition
where the charge cannot begin immediately. Leave the charger connected. After a period of time, depending
upon conditions, charging will start. Conditions where this could occur include:
•
when the PTU temperature, due to outdoor exposure is less than approximately 50 degrees.
•
when the battery voltage has fallen below the minimum voltage but not into a deep discharge
condition.
•
when the time between charge start is greater than 24 hours and the batteries have been
allowed to discharge beyond the deep discharge voltage, 9.5 Volts.
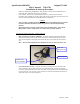
Caution
While charging batteries assure that all four sides and the top of the charger
main body are not obstructed. Do not lay blankets, coats or any materials,
that would prevent proper ventilation of the charger, over the ventilation
ports on the unit.
LED Indicators
8 pin DIN
connector
To RJ11 wall jack
Noise/Surge
suppressor
assembly
3 Prong
grounded plug
110 VAC