
Owners manual

3/14/2016
INS5286
CORSA Performance · 140 Blaze Industrial Pkwy · Berea, OH 44017 · P: (440) 891.0999 · F: (440) 891-1868
6
E - M a i l : s a l e s @ c o r s a p e r f o r m a n c e . c o m · w w w . c o r s a p e r f o r m a n c e . c o m
Exhaust System Installation
Cat Back Exhaust System
Dual Rear Exit w/ 4.5” Pro-Series Tips
2011-2016 Dodge Durango 5.7L V8
PN 14459 and 14459BLK
Installation of CORSA Exhaust System:
NOTE: Apply the anti-seize lubricant (supplied) to the threads ONLY of all the clamps and flange bolts. Failure to
follow this procedure can cause nuts to seize on clamps and potentially destroy threads. After applying anti-seize
lubricant, be sure to thoroughly clean your hands, as lubricant will tarnish stainless steel. All clamps should be
tightened using a properly calibrated Torque Wrench. Using an air impact gun will
damage the clamp and reduce its ability to effectively seal the joint. It may also
cause the joint to separate, thereby causing damage to your exhaust system and
to your vehicle.
NOTE: Align all clamps so that the center of the clamp bolt is 90 degrees from the
notch in the pipe. (See Fig. CLAMP)
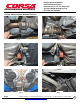
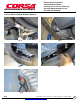
1. Remove all exhaust system components from the shipping boxes, including clamps and hardware.
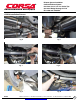
2. Locate the four bolts that were removed during step #3 of the removal process, and the two rubber grommets
retained during step #8 of the removal process. Using a ratchet and 13mm deep socket, install the driver side
hanger assembly with the two bolts. (Fig. L) Repeat on the passenger side.
3. Locate the passenger tunnel muffler assembly and one of the 2.50” clamps. Insert the tunnel muffler hanger
into the rubber grommet. (Fig. M) Install the clamp on the tunnel muffler so that the bolt is vertical with the nut
towards the ground and bolt is towards the inside of the vehicle. Slide the tunnel muffler inlet over the factory
outlet, and tighten the clamp using the ratchet and 15mm deep socket, until the tunnel muffler inlet pipe is snug
on the factory exhaust pipe. (Fig N) Ensure the tunnel muffler hanger is horizontal while tightening the clamp.
NOTE: The use of a soap and water solution may make it easier to install the hangers.
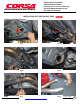
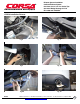
4. Locate the driver side tunnel muffler, the two M10-1.25X50mm bolts and nuts included in the hardware kit.
Insert the tunnel muffler hanger into the rubber grommet. Inspect the donut gasket at the flange to insure it is
seated properly. (Fig. O) Align the muffler inlet pipe with the stock outlet while positioning the flanges together.
Insert the bolts from the rear through the tunnel muffler flange first, then into the stock flange. Start threading
the nuts onto the bolts by hand. Snug the bolts using a 14MM socket, ratchet and 14mm wrench. Do not fully
tighten time at this time. (Fig. P)
NOTE: The use of a soap and water solution may make it easier to install the hangers.
5. Locate the x-pipe assembly and two of the 2.5” clamps. The x-pipe is installed with the reinforcement brace
towards the ground and favoring the rear of the vehicle. Install the clamps on the x-pipe so that the bolts are
vertical, with the nut towards the ground and the bolts are towards the inside of the car. (Fig. Q) Insert the x-
pipe inlets onto both tunnel muffler outlet pipes before tightening the clamps. (Fig. R) Tighten the clamps using
the ratchet and 15mm deep socket until the x-pipe is snug on the tunnel muffler outlets. (Fig. S)