
Owners manual

3/14/2016
INS5286
CORSA Performance · 140 Blaze Industrial Pkwy · Berea, OH 44017 · P: (440) 891.0999 · F: (440) 891-1868
7
E - M a i l : s a l e s @ c o r s a p e r f o r m a n c e . c o m · w w w . c o r s a p e r f o r m a n c e . c o m
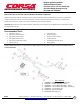
Exhaust System Installation
Cat Back Exhaust System
Dual Rear Exit w/ 4.5” Pro-Series Tips
2011-2016 Dodge Durango 5.7L V8
PN 14459 and 14459BLK
INSTALLATION INSTRUCTIONS CONTINUED ON NEXT PAGE
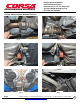
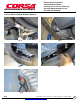
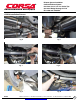
6. Locate the passenger side axle pipe along with one 2.5” clamp. Install the clamp on the axle pipe so the bolts
are vertical with the nut towards the ground and the bolts are towards the inside of the car. (Fig. T) Tighten the
clamp using the ratchet and 15mm deep socket until the axel pipe is snug on the x-pipe. (Fig. U)
7. Repeat step #6 on the driver side of the vehicle.
8. Check that the clearance to the suspension mounts are the same on both sides. Adjust the position of the x-pipe
and tunnel mufflers as needed to create equal and adequate clearance of the axle pipes and the spare tire
plastic guard. Make sure that the x-pipe is level and not rotated to one side. The reinforcement brace should be
parallel to the ground.
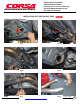
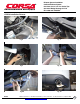
9. Locate the passenger rear muffler assembly and one 2.5” clamp. Insert the rear hanger into the rear rubber
grommet. (Fig. V) Install the clamp on the rear muffler inlet pipe so the bolt is vertical with the nut towards the
ground and bolt towards the outside of the vehicle. Slide the muffler inlet pipe over the axle pipe. (Fig. W)
Next, insert the front muffler hanger into the front grommet. (Fig. X) Tighten the clamp until the muffler inlet
pipe is snug against the axle pipe. (Fig. Y)
Note: The use of a soap and water solution may make it easier to install hangers.
10. Repeat Step #8 on the driver side of the vehicle. When installing the rear muffler hanger into the grommet,
reinstall the ground wire onto the rear hanger. (Fig. Z)
Note: You may need to lightly pinch the ground wire clamp to ensure it will be snug on the hanger.
11. Locate the rear tip assembly and one 2.5” clamp. Install the clamp on the tip inlet pipe so that the bolt is vertical
with the nut towards the ground and the bolt is towards the outside of the vehicle. Slide the tip assembly over
the muffler outlet pipe and tighten the clamp until snug. (Fig. AA & BB)
12. Adjust the system accordingly, including the rear muffler depth and rotation, so that the tips are
centered in the bumper valence. (Fig. CC) Check clearance between the system components and
chassis. At this time, tighten all clamps to 45ft-lbs using the torque wrench and 15mm socket and all
flange bolts to 28 ft-lbs using the torque wrench and 14mm wrench.
NOTE: During cold weather start-ups, you may experience an exhaust sound that is deeper and
louder in tone than usual. This is temporary and will diminish to normal levels once your engine
has reached its normal operating temperature.
NOTE: Immediately following the installation of your exhaust system, you may experience a trace
of smoke after initial start-up. DO NOT be alarmed. The smoke is caused by the burning of a small
amount of forming oil residue used in the manufacturing process.