
Specifications

supply to accommodate the more powerful processor (130W) and graphics card.
Purchasing Components and Assembly
If the arcane nature of the previous section is too off-putting, then it is possible to hire a local
technician or computer retail/repair shop to build the computer using the guidelines listed above.
However, assembling it yourself is not that difficult once you have a good understanding of what
goes where and what to look out for. Rest assured, the process will become less confusing the
more time spent with it and once you have selected and purchased suitable components, the
assembly process is really quite straightforward. As mentioned, a major benefit of building the
computer yourself is that you will increase your understanding of computer hardware and
software, and will be better able to upgrade and repair it yourself.
Depending upon where you live, online retailers might offer the most selection, and those
that provide reference materials and forums or user comments/reviews also provide very useful
information. Check to make sure they have good return policies in case you receive a defective
component. If you can access specialty bricks-and-mortar stores in your area, it is always nice to
have face-to-face contact with knowledgeable sales staff.
The assembly of the components can be a lengthy process. Expect to spend four to five
hours in total with the assembly and set-up (more if you have not done it before). It might be
advisable to break up the entire process into separate stages; that is, if you can leave the pile of
parts set up overnight. Leaning over a computer case for a couple of hours can be tedious and
you might have to spend some time consulting the various manuals so that you are completely
sure about what you are doing during the assembly. Consequently, you might want to devote the
first stage to familiarizing yourself with the various parts, preparing the case, and installing the
optical and hard drives (steps 1 and 2 as listed below). For the second stage, you can assemble
the computer in its entirety (steps 3 through 9) and you might even want to leave powering it up,
BIOS set-up, troubleshooting, and OS installation (steps 10 through 14) as a third and final stage.
To begin, you should ensure you have proper tools and that you have a clean place to work.
You should be working at a table or work bench on a bare (linoleum or tile) floor as carpets tend to
produce static electricity, which can be harmful to electronics. You should also take care not to
wear clothes made of synthetic materials that may also generate static electricity.
During the assembly process, it is a very good idea to discharge any static electricity by
touching the metal of the computer case with your bare hand, or touching the screw on the
faceplate of an electrical light switch. You should discharge static electricity in such ways often
and throughout the assembly process.
Finally, two points to remember are: 1) plan ahead, and 2) take your time. Always try to
think ahead as to how the current step in the process might affect later steps in the assembly
process (i.e. so that you don't install a graphics card in one slot without noticing that it will block
SATA ports that you might need to access later).
The Assembly Process
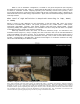
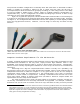
1. Look over the components and prepare the case: You should unpack and inspect all the
parts, paying attention to the kinds of data and power connections required and imagining how
components will fit into the case. (Put the CPU and its heat sink back in the packaging until you
need it to keep it safe.)
5
Take a quick glance at the manuals for the motherboard, CPU, graphics
(or other cards), and the power supply to familiarize yourself with assembly. Visualize the airflow
from the configuration of the fans. (For tower cases, cool air generally enters from the front and
bottom and warm air will exit from the back (and, with some cases, the side and/or top).
5 Be careful with the heat sink and fan assembly. The bottom of the heat sink will have thermal
paste applied to its bottom (usually a greyish substance) so be careful not to disturb it until it is
placed on top of the installed processor.
8