
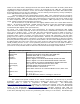
Specifications
2. Install the hard drive(s), optical drive(s) and power supply: Consult the manual for the
case and drives for the proper procedure. Likewise with the power supply. If you are using a
regular power supply with fixed cables, you may want to temporarily bundle and tie the cables so
they don't get in the way.
3. Install the motherboard: If the case has a generic back panel input/output plate, remove it
and install the back panel plate that came with the motherboard. The case may have pre-installed
standoffs or you may have to install them yourself (small brackets with holes onto which the
motherboard is affixed). If there are extra standoffs that do not fit the holes on the motherboard,
remove them so as not to damage the motherboard or to conduct electricity. Lay the motherboard
on top of the standoffs and gently tighten screws so the motherboard is firmly seated.
4. Install the CPU (processor) and its fan/heat-sink assembly: Open the CPU socket clamp
and remove any shield that may be present to protect the socket during shipping. Gently insert
the CPU into the socket (make sure it is aligned correctly), and firmly secure it with the clamp.
Attach the heat-sink and fan assembly and plug the fan's power cable into the provided port on
the motherboard.
5. Install the memory modules: There should be four memory slots in alternating colours on
the motherboard. Push open the white locking clips at the end of each slot and insert the memory
module; the white clips should snap back into place. If you are installing two memory modules or
sticks, consult the manual for the motherboard as it may be best to insert them into specific and,
often, similarly coloured slots.
6. Install the graphics and sound: Look over the motherboard at the various slots into which
expansion cards are installed. Cards will require a certain type of slot and sometimes (especially
larger video cards) may block access to data or power ports. So keep that in mind if you have to
choose between two of the same kind of slot. Once you have decided on the placement of the
cards, remove the slot shields from the back of the computer. Install the cards into their proper
slots and connect any power or data cables that may be present. I would recommend only
installing the graphics and any sound card at this time. Wait to install the video capture card until
the OS has been installed.
7. Connect remaining power and data cables to the motherboard: The hard drives, optical
drives, and front panel connections (usually USB and audio inputs located on the front of the case),
and any other components like memory card readers, should be connected. You will probably have
to consult the manual for the case and motherboard since these connectors are tiny and you will
need to know what goes where, and you also might have to make decisions as to which type of
audio to enable, etc. Finally, make sure the main power between the power supply and
motherboard are connected (there might be two separate cables).
8. Bundle cables and final inspection: Bundle loose cables together and try to tuck them
away so that they do not impede airflow and interfere with other components (especially the
motherboard and fans). Use all-plastic ties that usually come with the components (don't use
common twist ties as the metal core can conduct electricity). Look over everything to make sure
that all components are indeed connected properly. If possible, do not close the case or attach the
case cover until the very end. That way, you can visually inspect the computer as it is running to
ensure fans are spinning properly and cables or ties are not interfering with other components.
9. Attach input devices, monitor(s) and connect power cable to electrical outlet: Attach
keyboard/mouse and the monitor. Make sure the the on/off switch on the back of the power supply
is on. If your monitor has multiple inputs, make sure the input you are using is selected or that
automatic detection is enabled.
9