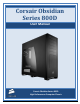
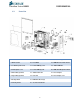
Corsair Obsidian Series 800D User Manual Corsair Obsidian Series 800D High Performance Computer Chassis
Obsidian Series 800D USER MANUAL Congratulations on the purchase of your new Corsair Obsidian Series 800D high-performance PC chassis. The Obsidian 800D has been designed to offer high-end features and performance, such as an innovative cooling design and support for liquid cooling systems. We hope it serves you well in your quest to build your ultimate Dream PC! CONTENTS OF USER MANUAL Contents 1.0. Product Overview .......................................................................................
Obsidian Series 800D USER MANUAL 2.4. How to install a hard drive into the lower 3.5” drive bays ......................................................... 14 2.5. How to use the CPU heatsink backplate door ............................................................................ 16 2.6. How to install an optical drive .................................................................................................... 17 2.7. How to install the motherboard ........................................
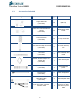
Obsidian Series 800D 1.0. Product Overview 1.1. Specifications USER MANUAL Dimensions 24" (H) x 24" (L) x 9" (W) - (609mm x 609mm x 229mm) Material Aluminum Faceplate, Steel Structure Color Black Model 800D (x5) 5.25" Drive Bays (x4) 3.5" SATA Hot Swappable (x2) 3.5" Internal Cooling (x3) 140mm Fans Up to 4x 120mm Fans (not included) Expansion Slots 7 (+1 vent) Motherboard ATX, mATX, EATX (x4) USB 2.
Obsidian Series 800D 1.2.
Obsidian Series 800D 1.3.
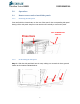
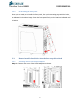
Obsidian Series 800D USER MANUAL 2.0. Operation 2.1. How to remove and re-install side panels 2.1.1. Removing the side panel Press and hold the release button on the rear of the case for the corresponding side panel. Gently pull the side panel away from case and then lift vertically to remove the panel. PULL TOWARDS YOU THEN LIFT 2.1.2. Re-installing the side panel Step 1 – Slide the side panel back into the case, making sure to catch the three grooved latches at the locations indicated above.
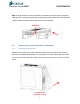
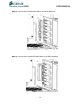
Obsidian Series 800D USER MANUAL Step 2 - Once the panel is securely latched to the bottom of the case, tilt the side panel back up into the case while holding the corresponding release button. When the side panel is flush, release the button and the side panel will lock into place. 2.2. How to remove and re-install the front panel 2.2.1. Removing the front panel Standing in front of the case, reach under the bottom of the front panel and, using firm pressure, pull upwards and forwards.
Obsidian Series 800D 2.2.2. USER MANUAL Re-installing the front panel Once you are ready to re-install the front panel, line up the mounting pegs with the holes, as indicated in the above image. Press the front panel firmly on the locations indicated until it latches. 2.3. How to install a hard drive into the hot-swap drive dock 2.3.1. Attaching cables to the SATA backplane Step 1 – Remove the cover of the SATA backplane as shown.
Obsidian Series 800D USER MANUAL Step 2 – Connect the included power cable to the SATA backplane. Step 3 – Connect the included SATA data cables to the SATA backplane.
Obsidian Series 800D USER MANUAL Step 4 – Re-attach cover. 2.3.2. Installing a SATA drive Step 1 – Open the door Gently press on the side of the front door and it will pop open.
Obsidian Series 800D USER MANUAL Step 2 – Remove the drive carrier Press the release switch and pull the drive carrier out of the drive bay using the pull tab. Step 3 – Install the SATA hard drive into the drive carrier Use the four provided screws (two per side).
Obsidian Series 800D USER MANUAL Step 4 – Re-install the drive carrier into the drive bay. Gently slide the drive carrier back into the drive bay, leaving the pull handle open. Once the carrier is secure in the bay, close the handle until it latches shut. 2.3.3. Reversing the front door (optional) Step 1 – Open front door and press in carefully on the two latches highlighted above.
Obsidian Series 800D USER MANUAL Step 2 – Relocate the door as seen here, holding both latches until lined up with the appropriate holes. 2.4. How to install a hard drive into the lower 3.5” drive bays Step 1 - With the front panel of the case removed (see 2.2.1), simultaneously press the top and bottom tabs of the lower hard drive bay cover plate.
Obsidian Series 800D USER MANUAL Step 2 - Use the included drive rails, one per side, as pictured above. Step 3 - Once the drive rails are installed on the drive, slide it into the bay until it clicks in place and is secure. Step 4 - Re-attach the drive bay cover plate as shown.
Obsidian Series 800D 2.5. USER MANUAL How to use the CPU heatsink backplate door Step 1 – Gently press on the tab and pull the CPU heatsink backplate door downwards. Step 2 – Once you have successfully installed your heatsink, simply lift the door up and press until it latches shut.
Obsidian Series 800D 2.6. USER MANUAL How to install an optical drive Step 1 – Remove the front panel from the case (see 2.2.1). Step 2 – Decide which bay you will use and remove the corresponding front drive bay cover from the front panel. Step 3 – Slide your optical drive into the appropriate bay.
Obsidian Series 800D USER MANUAL Step 4 – When the screw hole lines up as shown below, push the latch forward until it locks, then re-install the case front panel as in 2.2.2. 2.7. How to install the motherboard Step 1 – Determine what type of motherboard you have and install the black colored copper standoffs appropriately.
Obsidian Series 800D USER MANUAL Step 2 – Place the I/O plate in the rear of the case. (This is provided by the motherboard manufacturer). Step 3 – Line up the motherboard with the I/O shield and the mounting holes, and use the screws provided to secure the motherboard into the case.
Obsidian Series 800D 2.8. USER MANUAL How to install the power supply Place the power supply in the bottom power supply bay and install the screws as shown. 2.9. How to remove or add case fans 2.9.1. 140mm HDD Bay fan Step 1 - Remove the plastic cover from the side of the hot-swap drive bay.
Obsidian Series 800D USER MANUAL Step 2 - You now have access to the four screws that hold the 140mm fan in place. Remove these screws to remove or replace this fan. Step 3 – Replace the hot-swap drive bay fan cover.
Obsidian Series 800D 2.9.2. USER MANUAL 120mm lower HDD Bay fan See instructions above for 140mm fan installation for hot-swap drive bay. Use the included screws and rubber fan grommet to install a 120mm fan in the space provided (see below). 2.9.3. Top case exhaust fans Use the provided case fan screws to screw the fans into the top of the case. 2.9.4. Rear case fan Remove screws from rear of case as shown above.
Obsidian Series 800D USER MANUAL 2.9.5. Bottom intake fan – Remove screws from case separator, as shown. 2.10. How to remove the dust filter for maintenance Remove the dust filter – pull the tab from the bottom rear of the case to remove dust filter. Clean using a clean, damp cloth or canned air. Once the filter is dry, replace it by sliding it back in between the rails.
Obsidian Series 800D 2.11. USER MANUAL How to install add-in cards Step 1 – Remove the corresponding thumbscrew from the slot cover. Step 2 – Remove the slot bracket cover. Step 3 – Install the card, and secure with thumbscrew from step 2.
Obsidian Series 800D USER MANUAL 2.12. How to connect the front panel connectors 2.12.1. Audio, USB, 1394A, etc. Connectors are indicated with the pin-outs as shown. 2.12.2. Power, Reset, HDD LED, PWR LED Pin 1 is indicated by a small arrow on the connector. For more information, see your motherboard manual.
Obsidian Series 800D USER MANUAL 3.0. Support and Warranty Info 3.1. Contacting Technical Support Corsair Technical support can be reached by using any of the methods listed below. Online: http://www.corsair.com/helpdesk Forum: http://www.asktheramguy.com Phone: 1 (888) 222-4346 3.2. Warranty Information Limited Warranty And Limitation of Liability The Product is guaranteed for twenty four (24) months from the date of delivery to the end-user against defects in materials or workmanship.
Obsidian Series 800D USER MANUAL applications or other financial loss arising out of or in connection with the ability or inability to use the products or accessories to the full extent these damages may be disclaimed by law. Corsair Memory’s total liability, whether for breach of contract, warranty, tort (including negligence), indemnification or otherwise, is limited to the price of the Product sold under these terms with respect to which losses or damages are claimed.