4-Line Multi-User Capable Telephone System John Smith 972-555-2233 1
Table of Contents Introduction Button Descriptions and Functions ........................................................ 4 Installation What’s Included With Your 4-Line Speakerphone ................................... 6 Site Planning ........................................................................................... 6 Select a Location For Your Telephone .................................................... 6 Install the Batteries .....................................................................
Hold Holding a Call ................................................................................... 18 Retrieving a Held Call ...................................................................... 18 Hold Reminder Enable / Disable .............................................................. 18 Intercom ................................................................................................... 18 Predefined Station Select Buttons ..................................................
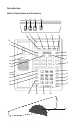
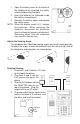
Introduction Button Descriptions and Functions 31 1 32 2 33 34 3 4 5 6 16 17 7 8 18 9 19 10 20 21 11 22 12 23 13 24 14 25 15 26 27 28 29 30 35 4
1. Caller ID Scroll - Displays and scrolls through the most recent to the oldest Caller ID. Also, allows the user to scroll left in the program menu after the program button is pressed. 2. LCD Display - The LCD Display shows the calendar when the telephone is idle. The display will also show Caller ID data, numbers dialed, and is used to guide you through system programming. 3. Caller ID Scroll - Displays and scrolls through the oldest to the most recent Caller ID.
Installation What’s Included With Your 4-Line Speakerphone (1) Base Telephone (1) Handset (1) Handset Coil Cord (1) 12VDC, 400mA AC Adapter (2) 2 Pair (4 Conductor) Line Cords (1) 2 Pair (4 Conductor) Short Cord for Wall Mounting (1) User Guide Site Planning This telephone can be connected to 4 separate telephone lines. You may connect directly to (2) 2-Line RJ14C telephone jacks.
1. Open the battery cover on the back of the telephone by removing the safety screw and pressing the tab in. 2. Insert the batteries as indicated inside the battery compartment. 3. Reinstall the battery cover and replace the safety screw. NOTE: When the display reads BATT, replace the batteries. When replacing the batteries, disconnect the telephone lines, but keep the power cord attached. Removing power from the telephone may result in memory loss.
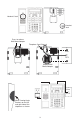
Wall Mounting When wall mounting your telephone, be aware of the following: • The location where the telephone will be mounted should be away from electrical cables, pipes, or other items which may be punctured when screws are inserted into the wall • The wall surface should be capable of supporting the telephone weight. • Use a standard wall phone plate or two screws with anchors. A Wall Mount Template is provided in the back of this manual for marking the screw locations. 1.
Handset Catch Handset Jack Press to release Wall Mount Adapter Telephone Cord Channel Lines 1&2 Replace Wall Mount Adapter Lines 3&4 Move Viewing Angle Brackets on the left and right side of the telephone as shown.
Using Your Telephone Line Use Indications Each Line Button has an indicator to show you the status of the telephone line, as shown below: No Light Blinks once every 2 seconds Quickly blinks on and off repeatedly Slowly blinks on and off repeatedly Fast Flash Constantly lit Line is available, if connected Line is in use by this phone Line is on hold by this phone Line is on hold by another phone Line is ringing Line is in use by another phone Handset Operation Placing a Telephone Call 1. Lift the handset.
Placing a Telephone Call 1. Press the button. NOTE: The first available line will automatically be selected. You may press a line button to dial out from a specific line. Pressing the line button while the telephone is idle will activate the speakerphone. 2. Dial the telephone number you wish to call. The number will appear on the display window. 3. After the conversation has finished, press the disconnect. button to Answering a Telephone Call (CO Line or Intercom) 1.
Features and Operation Caller ID Your 4-Line telephone is equipped with Caller ID for all four outside lines. To use the Caller ID feature, you must subscribe to Caller ID service for each line through your local telephone service provider. You may review, redial, or store in speed dial any of the numbers stored in Caller ID. Area Codes Prior to using the Caller ID feature of the telephone, your home area code and any local area codes should be programmed.
Receiving Caller ID on an Idle Telephone 1. When a call is received on an idle telephone, the display will show the name, telephone number, and line that the call is received on. 2 a. If you answer the call, the Caller ID data will remain on your display for the duration of the call. b. If the call goes unanswered, or if answered by another extension, the display will return to idle after approximately 5 seconds. Receiving Caller ID on a Telephone In Use 1.
3. To view the date and time, press #, or wait approximately 10 seconds. 01:19715551234 OCT 08 14:22 4. The display will return to idle after 20 seconds. Pressing any button and other than will also terminate Caller ID viewing. Dial a Telephone Number from the Caller ID Database 1. Locate the number you wish to call (from Viewing Caller ID Database section). 2. Pick up the handset or press the line. button to access an outside 3. Press the and then the buttons to dial.
Erasing All Caller ID Information from the Caller ID Database NOTE: Caller ID information is stored at each phone independently. 1. Press either the screen. or button to display the call summary TOTAL:26 NEW CALLS:01 2. Press . You will be asked to confirm the deletion. TOTAL:26 : confirm 3. Press to confirm deletion.
Date and Time Date Programming 1. Press the PROGRAM key. 2. Press the up or down arrow key to scroll to the “Date” item. 3. Press the right arrow key to choose this item. 4. Press the up or down arrow key to select the month. 5. Press the right arrow key to confirm your selection. 6. Press the up or down arrow key to select the day. 7. Press the right arrow key to confirm your selection. 8. Press the up or down arrow key to select the week. 9. Press the right arrow key to confirm your selection.
Extension Numbers When using multiple phones, each phone must be set as a unique extension number. The phones are factory set as Extension 11, and can be programmed from 11 to 22. 1. 2. 3. 4. 5. Press the PROGRAM key. Press the up or down arrow key to scroll to the “Extension NO” item. Press the right arrow key to select this item. Press the up or down arrow key to select an Extension ID. Press the right arrow key to confirm your selection.
Operation • • Use the button to pick up and hang up. This is true for headset and handset operation when in headset mode. Pressing Speed Dial buttons or Line buttons will cause the telephone to go off hook. Use the button to hang up. NOTE: It is important to remember that the hook switch is inoperative when in headset mode. If you use the handset and then hang up the handset, the phone will not disconnect from the telephone line. You must use the button.
Placing an Intercom Call 1. a. If using the handset, pick up the handset and press . b. If using speakerphone or a headset, press . 2. Dial the extension number you wish to call, or press a Station Select button. 3. After the conversation has finished, hang up or press the button to disconnect. NOTE: If the called party disconnects first, both phones are disconnected. Pressing the button to end an intercom call that has already been ended may cause your station to access an outside line.
Line Status Indication Each line has a light to show its status: No Light Blinks once every 2 seconds Quickly blinks on and off repeatedly Slowly blinks on and off repeatedly Fast Flash Constantly lit Line is available, if connected Line is in use by this phone Line is on hold by this phone Line is on hold by another phone Line is currently ringing Line is in use by another phone The phone also has Line In Use indication for non-system telephones (fax, modem, etc.).
Paging an Individual Extension 1. a. If using the handset, pick up the handset and press . b. If using speakerphone or a headset, press 2. Dial the extension number you wish to page. 3. Speak your message. After you have finished, hang up or press the button to disconnect. Answering a Page to an Individual Extension 1. If you receive a page, and wish to speak to the calling party, pick up the handset or press the button. 2. After the conversation has finished, hang up or press the button to disconnect.
Prime Line Programming This feature allows you to program which line will be selected first when you lift the handset or press the speaker key. 1. 2. 3. 4. 5. Press the PROGRAM key. Press the up or down arrow key to scroll to the “Prime Line” item. Press the right arrow key to select this item. Press the up or down arrow key to select a line. Press the right arrow key to confirm your selection.
3. Press a line button to dial out on. 4. Press . The system will redial the last number dialed, and wait 30 seconds. NOTE: If the called party answers, you may pick up the handset, or press the button to stop the auto redial. 5. If the you do not pick up the handset or press the button, the telephone will hang up, wait 60 seconds, and dial again. This process will repeat for up to 10 times. NOTE: You may stop the process any time by pressing the button.
13. 14. 15. 16. 17. 18. Area Code: Empty for H.A.C. and all L.A.C. Speed Dial: Empty for all locations Ring Volume: Middle Speaker Volume: Level 4 Handset Volume: Minimum Headset Volume: Minimum Ringer Enable / Disable You may enable or disable any individual line or lines on the 4-line telephone. Ringer Disable/Ringer Enable 1. Press the PROGRAM key. 2. Press the up or down arrow key to scroll to the “Line Ring” item. 3. Press the right arrow key to select this item. 4.
Press * any time during your call to change to tone dialing mode. The telephone is returned to pulse mode when you disconnect. Tone/Pulse Mode Depending on the phone service available in your area, you may need to adjust the dialing mode. NOTE: All 4 lines will be set to the same dialing mode. Pulse Mode/Tone Mode 1. Press the PROGRAM key. 2. Press the up or down arrow key to scroll to the “Tone/Pulse” item. 3. Press the right arrow key to select this item. 4.
IMPORTANT SAFETY INSTRUCTIONS Always follow basic safety precautions when using your telephone equipment to reduce the risk of fire, electrical shock, and injury. 1. 2. 3. 4. 5. 6. 7. 8. 9. 10. 11. 12. 13. 14. Read and understand all instructions in the Owner’s Instruction Manual. Read all warnings and follow all instructions marked on the product. Unplug this product from the wall outlet before cleaning. Use a damp cloth for cleaning. Do not use liquid or aerosol cleaners.
Repair Of Your Telephone DO NOT ATTEMPT TO REPAIR THIS PRODUCT YOURSELF. 4-Line Telephones manufactured by CORTELCO must be returned to us for repair. You can return your telephone to CORTELCO for repair or replacement in accordance with our LIMITED WARRANTY. DATE-OF-PURCHASE: CORTELCO warrants THIS PRODUCT against defects in material and workmanship in accordance with our LIMITED WARRANTY. If your telephone is returned for repair, include a copy of your sales receipt containing the date-of-purchase.
The FCC Wants You To Know This telephone is registered with the Federal Communications Commission and it complies with Part 15J and Part 68 of the FCC Rules and Regulations. Modifying or tampering with the telephone’s internal components can cause a malfunction and might invalidate the telephone’s warranty and void your FCC authorization to operate it. The FCC requires us to provide you with the following information: 1.
PLACE THIS TEMPLATE ON THE WALL. THE LOCATION OF THE SCREWS IS INDICATED BY THE CENTERS OF THE CROSSED LINES. FASTEN THE SCREWS WITH ANCHORS, LEAVING 3/16” OF THE SCREW EXTENDING FROM THE WALL.
Limited Warranty If this product was purchased by you new in the U.S. or Puerto Rico, CORTELCO warrants it against defects in material and workmanship for a period of one (1) year from the date of original purchase. This warranty is in lieu of all other express warranties. During the warranty period, CORTELCO agrees to repair or, at its option, replace the defective product, or any part of it without charge for parts or labor. This is your exclusive remedy.