OWNER’S INSTRUCTION MANUAL CALLER ID TYPE II Four Line TELEPHONE SYSTEM MODEL 2740 1
Table of Contents IMPORTANT SAFETY INSTRUCTIONS ................................. 5 Unpacking and Installation .......................................................... 6 Box Contents ................................................................................. 6 Telephone Part Identification .............................................................................................................. 7 Installation .......................................................................................
Hold .................................................................................................................................................... 25 Conference ......................................................................................................................................... 26 Transfer .............................................................................................................................................. 26 Caller ID ......................................
THANK YOU FOR PURCHASING THE 2740 CALLER ID TYPE II FOUR LINE TELEPHONE SYSTEM We want you to know all about your new Telephone, how to install it, the features it provides, and the services you can expect from its use. We have included this information in your Owner’s Instruction Manual. PLEASE READ BEFORE INSTALLING AND USING YOUR NEW TELEPHONE EQUIPMENT.
IMPORTANT SAFETY INSTRUCTIONS Always follow basic safety precautions when using your telephone equipment to reduce the risk of fire, electrical shock, and injury. 1. Read and understand all instructions in the Owner’s Instruction Manual. 2. Read all warnings and follow all instructions marked on the product. 3. Unplug this product from the wall outlet before cleaning. Use a damp cloth for cleaning. Do not use liquid or aerosol cleaners. 4. Do not use the telephone near water.
1.0 Unpacking and Installation 1.1 Box Contents The following items should be packed with your 2740. Please contact your delaer if any of them is missing.
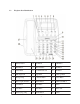
1.2 Telephone Part Identification 1 Memory Buttons 10 Line Buttons 19 Redial Button 2 Menu Button 11 Intercom Button 20 Hold Button 3 Delete Button 12 2.
1.3 Installation 1.3.1 Identify Your Existing Wiring System For you to properly connect your 2740 4-Line Telephone System to an existing wiring system, it is important that you understand its configuration. The following are the most common multiple line situations. They consist of either one or both types of standard telephone jacks: The RJ11 Single Line Jack and the RJ14 Double Line Jack. Your system should match one of them. 1.3.
3. Rotate the handset hook into the wall mount position. 4. Plug the coiled cord into the handset, and then plug the other end of the cord into the base. 5. Place the handset on the base. 1.3.7 Assign a Station Number Refer to Section 2.1 for detailed instructions on assigning a station number. 1.3.8 Install Batteries (Optional) While it is not necessary for you to install batteries in your 2740 telephone for it to function normally, we do recommend that they be installed.
1.3.9 Connect Cords to Telephone If the wall jack is labeled Lines 1 & 2, connect the short telephone line cord to the jack on the telephone labeled L1/L2. If the wall jack is labeled Lines 3 & 4, connect the short cord to the jack on the telephone labeled L3/L4.
2.2 Station Name Assignment If you wish, you may give a name to each of your 2740 telephones, so that people can see the names along with the station numbers when they place intercom calls. For example, you might name station #02 “Mary” and station #05 “Conference Room.” To assign a number to a station: At Station #01: a. Press MENU. The display will read “Phone Setting” b. Press ENTER. c. Press the Down Arrow repeatedly until the display reads “Station Naming” d. Press ENTER.
2.3 Line Configuration While you must share the same Line 1 telephone number at all the stations, you may choose to leave some lines unconnected at particular stations or to connect private or auxiliary lines to Lines 2, 3 or 4 at particular stations. 2.3.1 COMMON This is the factory setting for all lines. This setting assumes that the line is connected to the same telephone number at all stations. 2.3.
Your 2740 telephone will light up its line status indicators when a non-2740 telephone such as a fax machine, modem, or standard telephone is using a line. Note: If the line status indicators of your 2740 telephones do not function properly, either failing to light up when a standard telephone uses a line, or staying lit even though no telephone is using a line, the loop voltage detector setting needs to be adjusted. The factory setting of 48 volts is appropriate for most installations.
d. e. f. Press the soft key under CHANGE repeatedly, until the desired distinctive ring setting for Line 1 is displayed. There are eight choices. Press the DOWN ARROW to see the current setting for Line 2, and repeat steps c and d to change the settings for Lines 2-4. Press MENU to exit. Note: At any time when you have a particular distinctive ring setting displayed, you may press the soft key under CHANGE to hear an example of that distinctive ring. This feature is usually used in one of four ways: 1.
3. INTERCOM VOICE: When someone makes an intercom call to you, your telephone will ring once, then give you an alert tone, followed by the caller’s voice. You may respond to the call by lifting the handset or pressing the SPEAKER button. Note: When someone makes an intercom call to you while you are on an outside line, you will hear a single intercom ring regardless of your intercom ringer setting 2.6.1 a. b. c. d. e. f. To choose how your phone will respond to intercom calls: Press MENU.
2.8 Toll Restriction The Toll Restriction feature enables you to control outgoing calls and helps you prevent unauthorized long distance calls. The toll restriction access code must be set at station #01. This code is needed when you wish to change any toll restriction settings or when you wish to change the toll restriction setting at a particular phone. 2.8.1 To set the system’s toll restriction access code: At Station #01: a. Press MENU. The display will read “Phone Setting” b.
Note: Restrictions are usually just a few digits, since they prevent the dialing of all numbers starting with those digits. 2.8.2.2 To completely restrict specific lines at a telephone: a. Press MENU. The display will read “Phone Setting” b. Press the DOWN ARROW repeatedly until “Toll Restriction” appears in the display. c. Press ENTER. The display will read “Enter Code:”[all stations other than #01] d. Enter the 4 digit toll restriction access code which was set at Station #01.
2.9 System Privacy The Call Privacy feature is set at Station #01. This setting governs the entire system. There are two possible settings: CALL PRIVACY ON: When this is set, no one can pick up their station and join or listen to your conversation. This can be released by pressing the CONFERENCE button. This helps prevent eavesdropping and the disturbance of people accidentally interrupting your telephone conversations. This is the initial factory setting.
3. Memory Settings 3.1 Area Codes Home Area Code: You may also enter area codes into your 2740 telephone so that telephone numbers are displayed properly. This enables you to dial numbers in the caller list without pressing the “#” button first. You may enter one HOME area code. Use this feature if you only need to dial the seven digits of the telephone numbers for calls in your own area code.
3.2.4 Storing temporary tone dialing into memory If your system is set to pulse dialing mode, you can store a temporary switch to tone dialing in a memory location. You may, for example, wish to dial a number in pulse followed by an access code in tone dialing. To insert “switch to tone” into a sequence you are storing, press the * (TONE) button. All the following numbers in the sequence will automatically be dialed in tone mode. 3.2.
3.5 a. b. c. d. e. To Store Caller ID Calls Press MENU. The display will read “Phone Setting” Press ENTER Press DOWN ARROW repeatedly until “Caller ID Store” appears in the display, and then press ENTER. Press CHANGE if you wish to change the setting for Line 1. Then press DOWN ARROW to view and change the settings for Lines 2-4. 3.6 To Store the Centrex prefix The Centrex prefix is the part of the telephone that you DO NOT dial when you wish to reach another Centrex number in your system.
4. Miscellaneous Settings 4.1 a. b. c. d. e. f. g. h. i. j. k. Time and Date Press MENU. The display will read “Phone Setting.” Press the DOWN ARROW repeatedly until “Time/Date Set” appears in the display Press ENTER. The display will show the currently set time Press the soft key under CHANGE Enter the time as instructed in the display Press DOWN ARROW Press CHANGE to choose between AM or PM Press DOWN ARROW. The display will show the currently set date.
4.3 Caller ID on Call Waiting (CIDCW) Sensitivity If your 2740 does not respond correctly to CIDCW signals, it may be necessary to adjust the sensitivity. a. Press MENU, b. Press ENTER c. Press DOWN ARROW repeatedly. “CIDCW: High Sens” or “CIDCW: Low Sens” appears in the display d. Press CHANGE to change sensitivity e. Press MENU to exit. 4.4 Held Call Reminder Your 2740 is factory-set to automatically alert you at 2 minutes, and then every 2 minutes thereafter, if a caller is still on hold.
4.7 Erase Numbers Stored in Memory To erase all memory dial numbers and personal directory numbers stored in your telephone. a. Press MENU b. Press DOWN ARROW repeatedly until “Advanced Setting” appears in the display c. Press ENTER. “Erase Memory” will appear in the display. d. Press ENTER. “Memory Dials” will appear in the display. e. Press the soft key under ERASE. After a brief pause, the display will read “Erasing Done!” 4.8 Erase Toll Restrictions At station #01 a. Press MENU b.
5.2 Redial 5.2.1 a. To redial the last phone number dialed Go off-hook, either by lifting the handset, pressing SPEAKER, pressing HEADSET, or by pressing the desired LINE button. Press REDIAL. b. 5.2.2 To redial any of the last five phone numbers dialed The Redial feature enables you to redial or simply view any of the last five telephone numbers you dialed, along with the time, date and duration of each call.
You may answer the call by pressing the flashing LINE button. Remember to put the first call on hold before answering the incoming call, or the first call will be disconnected. 5.4 Conference Your 2740 allows you to make conference calls with two other parties. You may conference either two outside lines or one outside line and one intercom station. 5.4.1 a. b. c. d. e. Outside Calls Make or answer a call. Press HOLD. Make or answer a call on another line.
5.5.3 Transfer Ring You may transfer an outside call to all stations by using the transfer ring. If you answer a call that is not for you, and you do not know where to direct it, press TRANSFER twice. All of the other phones will ring in the transfer ring and the call will be transferred to the next answering station. The call will remain on hold at your station until another station picks up the call. 5.5.4 Personal Ring The 2740 telephone also features eight unique personal transfer rings.
5.6.3.3 Deleting Numbers To delete a single number, press the DELETE button twice when the desired number is displayed. To delete all the numbers in the caller list press the DELETE button and keep it depressed for 5 seconds while reviewing the caller list. Note: If you do not wish to store incoming calls in the Caller List, see Section 3.5 to disable this feature. 5.
5.8.2 Resetting MSG Lamp If your MSG lamp continues to flash after you have retrieved your messages, you may turn it off manually by following the following instructions: a. b. c. Press MENU. The display will read “Phone Setting” Press the DOWN ARROW until “Message Lamp” appears in the display. Press the soft key under RESET. For this feature to operate correctly, several items must be set correctly. You must be subscribed to Voice Mail from the telephone company.
c. d. Press the soft key under CHANGE. The display will now read “Do not Disturb:Y”. Press MENU to exit. The DND indicator in the display will now be on, and the display will read “Do Not Disturb.” To cancel DND press the soft key under RESET 5.12 Line Reserve The Line Reserve feature enables you to reserve a line that is currently in use. As soon as that line becomes free, your phone will alert you with a triple ring and that line will be reserved for your station.
a. b. c. Press HOLD. Enter “*” or “#”. i. * ... to turn Toll Restriction ON. ii. # ... to turn Toll Restriction OFF Enter the 4 digit toll restriction access code which was set at Station #01. If no code was set, the access code is the initial number set at the factory, which is “1234”. Note: Turning Toll Restriction ON at a telephone will have no effect unless restrictions have been stored at that telephone. 5.15 Timer 5.15.
5.19 a. b. c. Personal Directory While the phone is on-hook and idle, press the “#” button. The display will read “Directory.” Use the up and down arrow buttons below the display to view the personal directory entries. When the desired entry is displayed, you may dial it simply by lifting your handset, or by pressing SPEAKER or HEADSET, or by pressing a desired LINE button. Note: The directory is organized alphabetically. You may jump to your desired entry by pressing the corresponding dial pad number.
5.21.3.2 Intercom Voice You will hear one ring, then an alert tone followed by the caller’s voice. Press SPEAKER or HEADSET or lift the handset and begin talking. 5.21.3.3 Intercom Handsfree You will hear one ring, then a triple alert tone to let you know that your phone has automatically answered an intercom call on speakerphone. At any time you may respond to the call by speaking towards your telephone. 5.21.3.4 Answering an Intercom Call while on an Outside Call Press the flashing INTERCOM button.
Place an intercom call to telephone you wish to monitor. Press MUTE if you want to prevent sounds in your room from being heard at the monitored phone. To end monitoring, hang up the handset or press SPEAKER. The remote station will disconnect immediately. Note: The remote phone must be set to Intercom HANDSFREE. 6. Using standard telephones You may also use standard (non-2740) telephones in conjunction with your 2740 telephones. All features of the non-2740 telephones will operate normally.
7. Batteries 7.1 a. b. c. d. Battery Replacement Make sure the AC cord is attached to the telephone and to a working electrical outlet. Turn the telephone over. Remove desk pedestal/wall mount bracket if attached. Remove battery door cover by using the tip of a ball-point pen, or paper clip, or similar object to release the battery door tab. Remove the old battery. Insert 3 new AAA size alkaline batteries. Note that we recommend ONLY alkaline batteries. Close the battery cover. e. f. g. 7.
Appendex A Menu Tree Top Level Phone Setting Memory Setting Time/Date Set Advanced Setting Phone Setting Menu M ENU OPTION SUB M ENU DEFAULT AVAILABLE OPTIONS/COM M ENT Station # None Do Not Disturb N Y(Yes)/N(No) L1 Ringer ON On/Delay/Off L2 Ringer ON On/Delay/Off L3 Ringer ON On/Delay/Off L4 Ringer ON On/Delay/Off Y Y(Yes)/N(No) Intcm Handsfree Ring/Voice/Handsfree Pages Allowed Allowed/Blocked L2 Common Common/Private/Unconnected L3 Common Common/Private/Unconnected L4
Phone Setting Menu Continued M ENU OPTION Area Codes Telco VMWI Caller ID Store Toll Restriction SUB M ENU D EFAULT AVAILABLE OPTIONS/COM M ENT Home Code None Three Digits Local Code 1 None Three Digits Local Code 2 None Three Digits Local Code 3 None Three Digits Local Code 4 None Three Digits Local Code 5 None Three Digits Local Code 6 None Three Digits 1 Plus 7 Code 1 None Three Digits 1 Plus 7 Code 2 None Three Digits 1 Plus 7 Code 3 None Three Digits 1 Plus 7 Code 4
Phone Setting Menu Continued M EN U OPTION Toll Restriction SUB M EN U D EFAULT Line Restriction L1 N ormal Restricted Line Restriction L2 N ormal Restricted Line Restriction L3 N ormal Restricted Line Restriction L4 N ormal Restricted Station N aming Set at Station 01 for each of 16 stations Hold Remind O ff Centrex Prefix Prefix Message Lamp RESET O ff/30 s/1 min/2 min Up to 7 digits CIDCW End of List AVAILABLEOPTION S/COM M EN T High Sens High Sens/O ff/Low Sens EXIT Memory Setti
Advanced Setting Option M ENU OPTION Erase Memory SUB M ENU D EFAULT AVAILABLE OPTION/COM M ENT Memory Dials Erase Settings Erase Toll Restriction Enter Code: Headset Type Hst: 2.
FCC Information This equipment complies with Part 68 of the FCC rules. On the base of this equipment is a label that contains, among other information, the FCC registration number and ringer equivalence number (REN) for this equipment. If requested, this information must be provided to the telephone company. The FCC requires that you connect your telephone to the telephone network through a modular telephone outlet or jack, which must comply with FCC part 68 rules.
TELEPHONE REPAIR DO NOT ATTEMPT TO REPAIR THIS PRODUCT YOURSELF. Telephones manufactured by CORTELCO must be returned to us for repair. You can return your telephone to CORTELCO for repair or replacement in accordance with our LIMITED WARRANTY. CORTELCO warrants THIS PRODUCT against defects in material and workmanship in accordance with our LIMITED WARRANTY. If your telephone is returned for repair, include a copy of your sales receipt containing the date-of-purchase.
L IMITED W ARRANTY If you purchased this product new in the U.S. or Puerto Rico, CORTELCO warrants it against defects in material and workmanship for a period of one (1) year from the date of original purchase. This warranty is in lieu of all other express warranties. During the warranty period, CORTELCO agrees to repair or, at its option, replace the defective product, or any part of it without charge for parts or labor. This is your exclusive remedy.