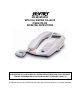
SENTRY SPEAKERPHONE WITH CALL WAITING CALLER ID 879015-TP2-27S OPERATING INSTRUCTIONS SUBSCRIPTION TO CALLER ID WITH CALL WAITING SERVICE FROM YOUR LOCAL TELEPHONE COMPANY IS REQUIRED FOR ALL CALLER ID FEATURES TO OPERATE CORRECTLY PLEASE READ AND FOLLOW THIS MANUAL BEFORE USING YOUR TELEPHONE AND KEEP IT FOR FUTURE REFERENCE
IMPORTANT SAFETY INSTRUCTIONS This symbol is to alert you the important operating or servicing instructions that may appear in your owner’s manual. Always follow basic safety precautions when using this product to reduce the risk of injury, fire or electric shock. When using your telephone equipment, basic safety precautions should always be followed to reduce the risk of fire or electric shock including the following: 1. Read and understand all instructions. 2.
FCC INFORMATION This equipment complies with Part 68 of the FCC Rules. The label affixed to this equipment contains, among other information, the FCC Registration Number and Ringer Equivalence Number (REN) for this equipment. We suggest that you review the following information provided by the FCC. NOTIFICATION TO THE TELEPHONE COMPANY Notification to the telephone company is no longer required prior connecting the registered equipment.
CHANGES IN TELEPHONE COMPANY EQUIPMENT OR FACILITIES The telephone company may make changes in its communications facilities, equipment, operations or procedures, where such action is reasonably required and proper in its business. Should any such changes render the customer’s terminal equipment incompatible with the telephone company facilities, the customer shall be given adequate notice to make modifications to maintain uninterrupted service.
BATTERIES CAUTIONARY INSTRUCTIONS CAUTION – To Reduce the Risk of Fire or injury to Persons, Read and Follow these instructions. 1. Use only the following type and size of battery: 3 ‘AAA’ (UM-4) alkaline batteries. 2. Do not dispose of the battery in a fire. The cell may explode. Check with local codes for possible special disposal instructions. 3. Do not open or mutilate the battery. Released electrolyte is corrosive and may cause damage to the eyes and skin. It may be toxic if swallowed. 4.
INTRODUCTION TO CALLER ID INSTRUCTIONS Read this manual carefully before using this product. Congratulations on your purchase of this product! The unit allows you to take advantage of the Caller Identification service that may be offered by your local telephone company. Not all local telephone companies provide Caller Identification service; therefore you must make sure the service is available.
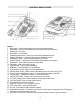
CONTROLS AND FEATURES Controls 1. Menu Button – Set time, date, language, area code and long distance code. 2. Delete Button – Erase an individual record or all records from the Caller ID Memory 3. Dialing Keys (1 to 9 and 0) 4. Flash Button - For call waiting 5. Speakerphone Microphone – Picks up your voice during speakerphone mode 6. Speaker LED Indicator – Lights when unit operates in speakerphone mode 7. Speakerphone Button - Used for handsfree dialing and answering 8.
26. Handset Hanger - Holds the handset in place when the telephone is mounted on a wall 27. To Handset – Insert coiled cord from handset here 28. Battery Compartment – Optional - 3 size ‘AAA’ (UM-4) alkaline batteries 29. Speaker – For speakerphone mode 30.
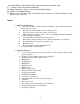
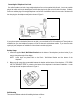
INSTALLATION Power Supplies This unit is designed to operate from an AC-DC adaptor with a 9VDC 100mA output. This may be supplemented with 3 x 1.5V ‘AAA’ (UM-4) batteries for backup to maintain the caller ID memory during line power interruption. A. Operating from the AC-DC Adaptor This unit should always be used with the included AC-DC adaptor. 1. Insert the adaptor’s plug into the DC Power Jack at the back of the base. 2. Plug the AC-DC adaptor into a 120V AC 60Hz electrical outlet as shown in Figure 1.
Connecting the Telephone Line Cords One coiled handset cord and a long straight telephone line cord are packed with this unit. Insert one modular plug of the coiled cord into the handset jack and the other plug into the jack on the left side of the base. Similarly, insert one modular plug of the straight telephone cord into the Line Modular Jack at the rear end of the base and the other plug into the telephone wall jack as shown in Figure 3.
A. 1. 2. 3. If your house is equipped with a modular wall plate: Insert the plug of the longer end of the telephone line cord into the Line Modular Jack on the rear of the base. Insert the other modular plug into the telephone jack in the modular wall plate. Wrap up excess length of straight telephone line cord and place in Wall Mount Bracket as shown in Figure 5. Figure 5 4. 5. 6. Insert the wall mount bracket at the bottom of the base.
CUSTOMIZING YOUR PHONE **Make sure 3 ‘AAA’ (UM-4) alkaline batteries are installed. Setting the Contrast In idle state, press # to adjust the LCD contrast. There are 8 levels of contrast setting. Level 1 is the lowest and level 8 is the highest. Default is at level 3. Each press will increase the display contrast by one level. The contrast will return to level 1 when # pressed at the highest contrast setting. Setting the Language 1. In idle state, press Menu. 2.
Setting the Area Code 1. When you enter an area code or prefix using this feature, the phone will remove that code or prefix from incoming numbers if a complete match of the prefix with the area code setting occurs when you dial from the Callers List. This option allows you to enter only one area code of 1, 2, or 3 digits to be stripped off from the incoming calls.
Reset your phone If you cannot set up your phone or if the display is blank or erratic or the New Call Indicator stays on continuously, your phone may have received a pulse of abnormal voltage from the phone line. To reset the product, simply uninstall all batteries and unplug the AC adaptor from this product. Wait for at least 5 minutes before reinstalling the batteries and then the AC adaptor. NOTE: All stored data will be lost when the unit is reset.
TELEPHONE OPERATION Ringer On/Off Switch (#21) ON - Ringer sounds to alert you to incoming calls. OFF - Ringer does not sound to avoid being disturbed by incoming calls. Tone/Pulse Switch (#22) The PULSE position is used if your local telephone system only offers Pulse (rotary dial) service or if Tone service is available but you do not subscribe to it. The TONE position is used if you subscribe to Tone Dialing (DTMF) service.
Flash Button (#4) For residential phone systems with “Call Waiting Service”, instead of pressing the Hookswitch to pick up the other call, press the Flash Button. This will automatically send the correct signal to the telephone company to switch calls. The amount of time you hold the Flash Button down is not critical. Hold Button (#10) If you want to temporarily suspend your conversation with the other party or take the call on a different extension phone, press the Hold Button once.
Predialed Call Press Redial/Pause to view the last dialed number. If more than 15 digits, display the first 14 digits and –. If there is no number in the Redial list, display will shows NO NUMBER for 2 sec and exits to idle state. Lift the handset or Press Speaker or Dial (activate Handsfree when the handset is on cradle). Dialed digits will be displayed one by one from left to right and then shifted to left one by one when the number of digits exceeds 15.
MEMORY OPERATION Using the Memory Keys When the phone is in on hook state, you can save up to 13 speed dial numbers (3 one-touch and 10 two-touch of 24 digits each without name). To save a number to the one-touch memory key (M1 – M3) In idle state, press “PROG”. Display shows ENTER NUMBER. Enter the number using the dial pad. If you require a pause, press Redial where you want the pause. Press “MEM” and display shows SAVED TO? Press one of the memory keys. And the phone will exits to idle state.
out. If the memory is empty. Display shows KEY IS EMPTY for 2 sec and exits to off hook state. To predial from a memory key Press the one-touch Memory key (M1-M3) or “MEM” + digit key (0-9) which contains the number you want to dial out. Display shows the number. If the memory is empty, display shows KEY IS EMPTY for 2 sec and exits to idle state. Lift the handset or press “SPEAKERPHONE” or Dial (Note: activate hands-free when the handset is on cradle).
Find the item you would like to call in the Callers List. Lift the handset or press “SPEAKERPHONE” or Dial (Note: activate hands free when the handset is on cradle). To change a number in the Callers List before dialing Tip: If you have to frequently remove area code to return local calls, you should use the Area Code option and add your local area code. Note: The Callers List does not save changes. If you plan to dial the number again, edit the number in Callers List and save it to Memory.
To leave the Callers List at any time, press Menu or wait 12 sec (5 sec if at END OF LIST) to exit to idle state. To delete all items in the Callers List By pressing ▼▲ key to enter the Callers List. Press Delete for 5 sec. Display shows DELETE ALL? Press Delete again to confirm deletion of the entire Callers List. Display shows NO CALLS. To leave the Callers List at any time, press Menu or wait 12 sec (2 sec if at NO CALLS) to exit to idle state.
PROBLEMS CHECK No dial tone Is the line cord disconnected from the wall jack or telephone? Is jack improperly wired? Phone does not work Are all cords connected properly? Phone does not ring Ringer Switch may be set to OFF? Slide switch to ON position. Cannot dial Check the Tone/Pulse Switch setting. You may only have PULSE service. Switch the Tone/Pulse switch to PULSE position Other party cannot hear you Ensure Handset cord is connected properly.
The Caller ID display does not show the caller's The Caller ID unit will not function until you have Caller information ID service from your local telephone company. Call your local telephone company to have Caller ID installed on your phone line. Check your phone line connections. Make sure all connections are secure and connected. If it is a private call or a blocked call, the caller's name and/or phone number will not appear on the display.
Message Waiting does not work Check with your telephone company if this service is available or if you have subscribed to it. Pressing a Memory button does not display number Your Memory button has no stored number. Please store the number again by pressing the PROG Button, dialing the number and pressing the Memory Button you want. CARE AND MAINTENANCE 1. Clean your phone with a damp (never wet) cloth. Solvent or detergent should never be used. 2.
LIMITED WARRANTY If you purchased this product new in the U.S. or Puerto Rico, CORTELCO warrants it against defects in material and workmanship for a period of one (1) year from the date of original purchase. This warranty is in lieu of all other express warranties. During the warranty period, CORTELCO agrees to repair or, at its option, replace the defective product, or any part of it without charge for parts or labor. This is your exclusive remedy.