About This Guide This Expansion Module EXP39 has a 4.5-inch LCD, the resolution is 320*160pi.It has 20 hard key, and you can set up switch function to set 38 programmable keys which are able to set up to 28 functions per key. And you can daisy-chain 6 modules for 228 programmable keys. It applies to IP Phone SIP-T28P and SIP-T26P, expansion module(≤2) is power by the host phone, but the EXP39 does not support plug and play. It also has dual color(red or green) LEDs for line status information.
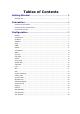
Tables of Contents Getting Started.......................................................................... - 1 Packing List ............................................................................................................................ - 1 - Connection ................................................................................... - 2 Connect to the Phone ........................................................................................................
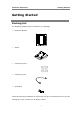
IP Phone Expansion Getting Started Getting Started Packing List The following components are included in your package: Expansion Module Stand Connecting sheet Connecting cord Spiral shell Check this list before installation to ensure that you have received each item. If you are missing any items, contact your IP phone reseller.
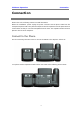
IP Phone Expansion Connection Connection Please refer to the following sections to install the EXP39. Before the installation,please unplug the power connector and the phone stand from the enterprise IP phone T28P. Then place the telephone and the expansion module upside down on a soft surface so that you can read nameplates from the front. The expansion module must be placed to the left of the telephone. Connect to the Phone Use the connecting sheet and screw to connect the EXP39 to the IP phone.
IP Phone Expansion Connection Connect to the next module Follow the same step to connect the next expansion module: After the installation, it will be shown as: Note: Our IP phone T28P can support six expansion modules at most. But if you use more than three expansion modules, you need to connect an additional power adapter to anyone of the expansion modules.
IP Phone Expansion Connection Connect the cords Plug the connecting cord into the Ext jack of the IP phone, the next port to the Ext in jack of the first module; If you want to connect more than one module, then go on to plug another cord into the Ext out jack, and the other port to the Ext in jack of the second module. Shown as the following picture: Note: Users can connect six modules at most.
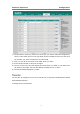
IP Phone Expansion Configuration Configuration The expansion module EXP39 has 38 programmable keys which are able to set up to 28 functions per key and it has a large LCD. You can use the web interface or the IP phone user interface to configure key functions. Pressing the special key of the EXP39 you want to set for about 5 seconds, the IP phone will turn to the user setting interface of this key, then you can make desired configuration to this key by the IP phone interface.
IP Phone Expansion Hot Desking URL Record Configuration Note: Quick access features like Intercom and Voicemail must first be configured on your PBX in order to work on your phone. See your system administrator for more information. Switch If you set key1 as Switch(default label is List1), you can enjoy the function of switch, and the EXP39 can offer you 38 DSS key, and also you should set key21 as Switch(default label is List2).
IP Phone Expansion Configuration Conference You are allowed to configure the programmable key to be used as a conference key. This key allows a user on a call to conference another party at a pre-defined number while remaining in the current call. To assign the key as Conference: 1) Choose Phone->EXT Key, choose one of the key you want to make the assignment, there is a pull-down menu in the Type field, choose Conference from the list. 2) Then you can fill in the name to the label which you want.
IP Phone Expansion Configuration 1) Choose Phone->EXT Key, choose one of the key you want to make the assignment, there is a pull-down menu in the Type field, choose Forward from the list, and enter the number you want to forward in the value field. 2) Then you can fill in the name to the label which you want. 3) Press Confirm button to save the changes.
IP Phone Expansion Configuration 1) Choose Phone->EXT Key, choose one of the key you want to make the assignment, there is a pull-down menu in the Type field, choose Transfer from the list. 2) Then you can fill in the name to the label which you want. 3) Press Confirm button to save the changes. 4) The key on the LCD, they will display the name which you made, if you didn’t fill in the name to the label, the LCD will display the default icon or name. 5) The Transfer default display is “TRAN”.
IP Phone Expansion Configuration 1) Choose Phone->EXT Key, choose one of the key you want to make the assignment, there is a pull-down menu in the Type field, choose Hold from the list. 2) Then you can fill in the name to the label which you want. 3) Press Confirm button to save the changes. 4) The key on the LCD, they will display the name which you made, if you didn’t fill in the name to the label, the LCD will display the default icon or name. 5) The Hold default display is “Hold”.
IP Phone Expansion Configuration 1) Choose Phone->EXT Key, choose one of the key you want to make the assignment, there is a pull-down menu in the Type field, choose DND from the list. 2) Then you can fill in the name to the label which you want. 3) Press Confirm button to save the changes. 4) The key on the LCD, they will display the name which you made, if you didn’t fill in the name to the label, the LCD will display the default icon or name. 5) The DND default display is “DND”.
IP Phone Expansion Configuration 1) Choose Phone->EXT Key, choose one of the key you want to make the assignment, there is a pull-down menu in the Type field, choose Redial from the list. 2) Then you can fill in the name to the label which you want. 3) Press Confirm button to save the changes. 4) The key on the LCD, they will display the name which you made, if you didn’t fill in the name to the label, the LCD will display the default icon or name. 5) The Redial default display is “Redial”.
IP Phone Expansion Configuration 1) Choose Phone->EXT Key, choose one of the key you want to make the assignment, there is a pull-down menu in the Type field, choose Call Return from the list. 2) Then you can fill in the name to the label which you want. 3) Press Confirm button to save the changes. 4) The key on the LCD, they will display the name which you made, if you didn’t fill in the name to the label, the LCD will display the default icon or name. 5) The Call Return default display is “Call Return”.
IP Phone Expansion Configuration 1) Choose Phone->EXT Key, choose one of the key you want to make the assignment, there is a pull-down menu in the Type field, choose SMS from the list. 2) Then you can fill in the name to the label which you want. 3) Press Confirm button to save the changes. 4) The key on the LCD, they will display the name which you made, if you didn’t fill in the name to the label, the LCD will display the default icon or name. 5) The SMS default display is “SMS”.
IP Phone Expansion Configuration 1) Choose Phone->EXT Key, choose one of the key you want to make the assignment, there is a pull-down menu in the Type field, choose Pick Up from the list, and enter the number you want to pick up in the value field. 2) Then you can fill in the name to the label which you want. 3) In the "Line" field, select a line for which to apply this key. 4) Press Confirm button to save the changes.
IP Phone Expansion 1) Configuration Choose Phone->EXT Key, choose one of the key you want to make the assignment, there is a pull-down menu in the Type field, choose Call Park from the list, and enter the number you want to park in the value field. 2) Then you can fill in the name to the label which you want. 3) In the "Line" field, select a line for which to apply this key. 4) Press Confirm button to save the changes.
IP Phone Expansion 1) Configuration Choose Phone->EXT Key, choose one of the key you want to make the assignment, there is a pull-down menu in the Type field, choose DTMF from the list, and enter the character you want to send out during the conversation in the value field. 2) Then you can fill in the name to the label which you want. 3) Press Confirm button to save the changes.
IP Phone Expansion 1) Configuration Choose Phone->EXT Key, choose one of the key you want to make the assignment, there is a pull-down menu in the Type field, choose Voice Mail from the list, and enter the number you want to set as the voice mail box in the value field 2) Then you can fill in the name to the label which you want. 3) In the "Line" field, select a line for which to apply this key 4) Press Confirm button to save the changes.
IP Phone Expansion 1) Configuration Choose Phone->EXT Key, choose one of the key you want to make the assignment, there is a pull-down menu in the Type field, choose Speed Dial from the list, and enter the number you want to dial out directly in the value field 2) Then you can fill in the name to the label which you want. 3) In the "Line" field, select a line for which to apply this key. 4) Press Confirm button to save the changes.
IP Phone Expansion 1) Configuration Choose Phone->EXT Key, choose one of the key you want to make the assignment, there is a pull-down menu in the Type field, choose Intercom from the list, then enter the feature code and number in the value field you want to set as intercom. 2) Then you can fill in the name to the label which you want. 3) In the "Line" field, select a line for which to apply this key. 4) Press Confirm button to save the changes.
IP Phone Expansion 1) Configuration Choose Phone->EXT Key, choose one of the key you want to make the assignment, there is a pull-down menu in the Type field, choose Line from the list, and choose the correspondent line. 2) Press Confirm button to save the changes. 3) The key on the LCD default display is a icon “ ” and the account which one you choose. BLF You can configure the key for Busy Lamp Field (BLF) use which allows you to monitor the status (idle, ringing, or busy) of other SIP accounts.
IP Phone Expansion 1) Configuration Choose Phone->EXT Key, choose one of the key you want to make the assignment, there is a pull-down menu in the Type field, choose BLF from the list, and enter the number in the value field you want to monitor. 2) Then you can fill in the name to the label which you want. 3) In the "Line" field, select a line for which to apply this key. 4) And then enter the feature codes in the extension field. 5) Press Confirm button to save the changes.
IP Phone Expansion 1) Configuration Choose Phone->EXT Key, choose one of the key you want to make the assignment, there is a pull-down menu in the Type field, choose URL from the list, and enter the url you want to set as URL in the Value field. 2) Then you can fill in the name to the label which you want. 3) Press Confirm button to save the changes.
IP Phone Expansion Configuration 1) Choose Phone->EXT Key, choose one of the key you want to make the assignment, there is a pull-down menu in the Type field, choose Group Listening from the list. 2) Then you can fill in the name to the label which you want. 3) Press Confirm button to save the changes. 4) The key on the LCD, they will display the name which you made, if you didn’t fill in the name to the label, the LCD will display the default icon or name.
IP Phone Expansion Configuration 1) Choose Phone->EXT Key, choose one of the key you want to make the assignment, there is a pull-down menu in the Type field, choose Public Hold from the list. 6) Then you can fill in the name to the label which you want. 7) Press Confirm button to save the changes. 8) The key on the LCD, they will display the name which you made, if you didn’t fill in the name to the label, the LCD will display the default icon or name.
IP Phone Expansion Configuration 1) Choose Phone->EXT Key, choose one of the key you want to make the assignment, there is a pull-down menu in the Type field, choose Private Hold from the list. 10) Then you can fill in the name to the label which you want. 11) Press Confirm button to save the changes. 12) The key on the LCD, they will display the name which you made, if you didn’t fill in the name to the label, the LCD will display the default icon or name.
IP Phone Expansion 1) Configuration Choose Phone->EXT Key, choose one of the key you want to make the assignment, there is a pull-down menu in the Type field, choose Shared Line from the list, and enter number in the value field you want to set as shared line. 2) Then you can fill in the name to the label which you want. 3) In the "Line" field, select a line for which to apply this key. 4) Press Confirm button to save the changes.
IP Phone Expansion 1) Configuration Choose Phone->EXT Key, choose one of the key you want to make the assignment, there is a pull-down menu in the Type field, choose XML PhoneBook from the list. 2) Then you can fill in the name to the label which you want. 3) In the "Line" field, select a PhoneBook for which to apply this key. 4) Press Confirm button to save the changes.
IP Phone Expansion 1) Configuration Choose Phone->EXT Key, choose one of the key you want to make the assignment, there is a pull-down menu in the Type field, choose Group Pickup from the list, and enter the number you want to set as Group Pickup in the value filed. 2) Then you can fill in the name to the label which you want. 3) In the "Line" field, select a line for which to apply this key. 4) Press Confirm button to save the changes.
IP Phone Expansion 1) Configuration Choose Phone->EXT Key, choose one of the key you want to make the assignment, there is a pull-down menu in the Type field, choose Paging from the list, and enter the number you want to dial out directly in the Value field 2) Then you can fill in the name to the label which you want. 3) In the "Line" field, select a line for which to apply this key. 4) Press Confirm button to save the changes.
IP Phone Expansion 1) Configuration Choose Phone->EXT Key, choose one of the key you want to make the assignment, there is a pull-down menu in the Type field, choose Record from the list. 2) Then you can fill in the name to the label which you want. 3) Press Confirm button to save the changes. 4) The key on the LCD, they will display the name which you made, if you didn’t fill in the name to the label, the LCD will display the default icon or name. 5) The Record default display is “Record”.
IP Phone Expansion 1) Configuration Choose Phone->EXT Key, choose one of the key you want to make the assignment, there is a pull-down menu in the Type field, choose XML Browser from the list, and enter the url you want to set as XML Browser in the Value field 2) Then you can fill in the name to the label which you want. 3) Press Confirm button to save the changes.
IP Phone Expansion 1) Configuration Choose Phone->EXT Key, choose one of the key you want to make the assignment, there is a pull-down menu in the Type field, choose Hot Desking from the list. 2) In the "value" field, enter the URL address in the input frame to active the advanced mode. Or you can leave it black to active the base mode. 3) Then you can fill in the name to the label which you want. 4) Press Confirm button to save the changes.
IP Phone Expansion 1) Configuration Choose Phone->EXT Key, choose one of the key you want to make the assignment, there is a pull-down menu in the Type field, choose URL Record from the list, and enter the URL you want to set as URL in the Value field. 2) Then you can fill in the name to the label which you want. 3) Press Confirm button to save the changes.