
User manual


STEP ONE
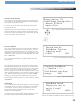
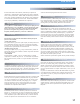
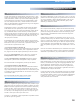
Connect the AC adapter to the DC Inlet, found on the rear of the unit.
Fasten the Security Clamp (found directly below the DC Inlet jack) on top
of the cable, so that it is not possible for the cable to become dislodged.
STEP TWO
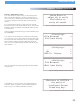
Connect the RCA Audio Outputs on both sides of the unit to a suitable
audio mixer. When connecting the unit, make sure you note that the Side
1 outputs carry audio from the left side deck, and Side 2 outputs carry
audio from the right side of the deck.
STEP THREE
Connect your primary USB device to the port found in the center of the
rear panel. You may choose any driverless device that follows FAT32,
NTFS, or HFS+ file systems. You may also connect a powered (active)
USB hub to augment the amount of available ports. If required, you
may also connect a device to the front USB port.
STEP FOUR
Press AND HOLD the Power button located in the center of the front
panel for roughly one second. If you do not hold down the power button
this will not enable the unit to boot up properly. The unit will take about
5 seconds to boot up as well as detect any USB devices that are current-
ly connected.
Quick Start Guide
Preparing for Use
Fig 1.1 - Connect Power
Fig 1.2 - Connect Audio
Fig 1.3 - Connect USB
Fig 1.4 - Turn Power ON
9