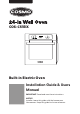
COS-C51EIX Built-in Electric Oven Installation Guide & Users Manual IMPORTANT: Read and save these instructions.
THANK YOU FOR YOUR PURCHASE Thank you for your purchase. We know that you have many brands and products to choose from and we are honored to know that you have decided to take one of our products into your home and hope that you enjoy it. COSMO appliances are designed according to the strictest safety and performance standard for the North American market. We follow the most advanced manufacturing philosophy. Each appliance leaves the factory after thorough quality inspection and testing.
TABLE OF CONTENTS Acknowledgment ........................................................................................................................... 3 Safety & Warnings ........................................................................................................................ 3-6 Fitting the Oven Into Kitchen Cabinet ........................................................................................... 7 Important ....................................................................
ACKNOWLEDGMENT Thank you for purchasing our product. We hope you enjoy using the many features and benefits it provides. Before using this product, please read through this Install & User Manual carefully. Keep this user manual in a safe place for future reference. Please ensure that other persons using this product are familiar with these instructions as well. SAFETY & WARNINGS • When the oven is switched ON for the first time, it may give off an unpleasant odor/smell.
SAFETY & WARNINGS • If the oven is cracked or damaged, immediately switch it off to avoid possible electrical shock. • Ensure the oven is switched off before replacing the oven bulb to avoid possible electric shock. • The means for disconnection must be incorporated in the fixed wiring, in accordance with local code. • Please follow all local codes and requirements when installing and wiring your unit.
SAFETY & WARNINGS • The appliance must be properly installed and grounded by a qualified technician. • Do not use the appliance for warming or heating a room. • Wear proper attire when the using the appliance; loose or hanging garments should never be worn while the appliance is in use. • Flammable materials should NOT be stored in the appliance or near surface units. • DO NOT USE WATER ON GREASE FIRES; smother flames, or use dry chemical or foam-type fire extinguisher.
SAFETY & WARNINGS • Do NOT touch heating elements or interior surfaces of the oven. Heating elements may be hot, even when they appear dark in color. Interior oven surfaces become hot enough to cause burns. During oven use, do NOT touch or allow clothing or any flammable materials contact heating elements or interior surfaces of oven until there has been enough time to cool.
FITTING THE OVEN INTO KITCHEN UNIT Fit the oven into the space provided in the kitchen unit; it may be fitted underneath a work top or into an upright cupboard. Fix the oven into position by screwing into place, using the two fixing holes in the frame. To locate the fixing holes, open the oven door and look inside. To allow adequate ventilation, the required measurements and distances must be adhered to during oven installation.
OVEN CONTROLS & FUNCTIONS Cooking Functions Increase Control Decrease Control Symbol Temperature Control Time Function Function Oven Lamp: Observe cooking progress in the oven through the oven window without opening over door. Oven Lamp can be used with all cooking functions. Defrost: The circulation of air at room temperature enables quicker thawing of frozen food, without the use of any heat.
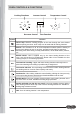
OVEN CONTROLS & FUNCTIONS Releasing and Recessing the Control Knobs The control knobs for Cooking Functions and Temperature Control can be recessed into the panel. When you need to use them, press the control knob inward and release (See below diagram). To recess the control knob, press inward again.
OPERATING INSTRUCTIONS When the oven is first connected to the electrical supply, wait for the display to automatically show “ 12 · 30 “; there will be a single audible beeping sound, and the “ 12 “ and “ · “ will flash on the LCD display. Input the current time before using the oven. NOTE: There are two types of clocks: 12-hour clock and 24-hour clock, depending on the actual machine. Example, A 24-hour clock, 2 P.M. is shown as “ 14 · 00 “. CLOCK SETUP 1.
OPERATING INSTRUCTIONS Audible Warning Time Adjustment This function can be used to receive audible alerts at the end of the adjusted time period. 1.) Press “ will flash. “ Button to select the Minute Minder function. The Symbols “ ““ · “ 2.) Use “ + “ “ – “ Button the adjust the Minute Minder (Refer to the CLOCK SETUP on Page 10). Press “ “ Button to confirm, the “ “ symbol will light on the digital display. When the “ “ Symbol lights continuously, the audible warning time adjust ment is done.
OPERATION INSTRUCTIONS Full-Automatic Programming This function is used to cook after a certain period of time, for a set amount of time. Food is placed into the oven, and a Cooking Function and Oven Temperature is selected. 1.) Press “ “ button until you see “ dur “ on the digital display. Use “ + “ “ – “ Buttons to select the cook time. Press “ “ Button to confirm, the time will appear on the digital display, and the “ A “ Symbol will light on the display. 2.
ACCESSORIES Wire Shelf For broiler, dishes, cake pan with items for roasting and broiling. Slider Bracket For cooking larger portions of food, these shelf support rails on the right and left sides of the oven can be removed, dishes and tray can be put on the oven floor, using functions as Radiant Broiling, Double Broiler, Double Grill with Fan. NOTE: When placing dishes on the oven floor, DO NOT USE the oven’s bottom heating elements to prevent heat gathering at the bottom (only for specific models).
ACCESSORIES Shelf Placement Warning To ensure the oven shelves operate safely, correct placement of the shelves between the side rail is important. Shelves and the pan can only be used between the first and fifth layers. The shelves must be installed on the rails in the correct direction, as this will ensure that during careful removal of the shelf or tray, hot food items will maintain proper balance. Shelves and oven racks must be installed in the same layer on each side.
INSTALLATION Securing the Oven to the Cabinet 1.) Fit oven into cabinet recess. 2.) Open the oven door. 3.) Secure the oven to the kitchen cabinet with two distance holders “ A “, which fit holes in the oven frame and fit the two screws, “ B “. Ventilating Openings 9HQWLODWLQJ RSHQLQJV Connection of the Oven Ensure your appliance is properly installed and grounded by a qualified technician. Ask your dealer to recommend a qualified technician or an authorized repair service.
INSTALLATION Wire Branch Circuit Refer to Figure 1: Ungrounded Neutral • Disconnect ground from neutral at free end of conduit. • Connect the green GROUND wire from the oven to the GROUND wire in the junction box (bare or green colored wire). • Connect the red and black leads from the oven to the corresponding HOT Wires in the junction box. • Connect the white wire from the oven to the NEUTRAL (gray or white) wire in the junction box.
INSTALLATION DIMENSION DIAGRAM 22.04" 23.42" 21.85" 0.78" OVEN 23.42" 3.14" CUTOUT 9.84" 3.93" 22.44" min. 23.62" 22.04" 23.85" NOTES • Only plus deviations are admissible for all dimensions. • The cabinet does not include the power switch or socket. • The number of accessories included depends on the appliance model purchased.
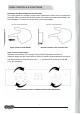
INSTALLATION Removing the Door from Oven Removable door allows full access to entire interior of the oven for easier and quicker maintenance. 1.) To remove the door, open the door to the maximum angle. Then pull the buckle at the door hinge backward (Figure 1). Figure 1 2.) Close the door to an angle approximately 15 degrees. Lift up and slowly pull the door out from the oven (Figure 2). 5Ň Figure 2 3.
CLEANING & MAINTENANCE To maintain the appliance's appearance and reliability, keep the unit clean. The modern design of the unit allows for simple cleaning and maintenance. The parts of the unit which come into contact with food must be cleaned regularly. • Before any maintenance and cleaning, disconnect the power. • Set all unit controls to the OFF position. • Before cleaning the oven interior, wait until it has cooled. Cleaning is both easier and safer when the unit has cooled.
PRODUCT SPECIFICATIONS Model: C51EIX Rated Voltage: 120 / 240 V & 120 / 208 V Rated Frequency: 50 - 60 Hz Rated Output Power: 3250 W & 2450 W Oven Lamp: 25 Watt Temperature Range: 122 - 482 °F / 50 - 250 °C Product Dimensions (WxDxH): 23.4 (W) x 22.6 (D) x 23.4 (H) Product Capacity: 2.5 cu. ft. / 70 liters Net Weight: 78.71 lbs.
WARRANTY AND SERVICE For full warranty details on this product please visit: http://www.cosmoappliances.com/warranty TO RECEIVE WARRANTY SERVICE, YOUR PRODUCT MUST BE REGISTERED. TO REGISTER, VISIT: WWW.COSMOAPPLIANCES.
IMPORTANT Do Not Return This Product To The Store If you have a problem with this product, please contact Cosmo Customer Support at +1(888)784-3108 DATED PROOF OF PURCHASE, MODEL #, AND SERIAL # REQUIRED FOR WARRANTY SERVICE IMPORTANT Ne pas Réexpédier ce Produit au Magasin Pour tout problème concernant ce produit, veuillez contacter le service des consommateurs Cosmo Customer Support au +1(888) 784-3108 UNE PREUVE D’ACHAT DATEE EST REQUISE POUR BENEFICIER DE LA GARANTIE.
NOTE:
Cosmo is constantly making efforts to improve the quality and performance of our products, so we may make changes to our appliances without updating this manual. Electronic version of this manual is available at: www.cosmoappliances.