
Use and Care Guide


IMPORTANT:
The setting must be carried out in 5 seconds.
If electricity fails suddenly, all the set procedure and the proper clock time (hour, minute) will
disappear.
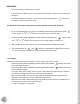
After electrical power is on again, “12:00” and the square symbol above “ ” will show on
the display, you will need to set it again.
Full Automatic Timer Setting (Set the time for full automatic starting and finishing)
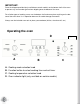
1. Press the function button (See Figure 6) repeatedly until the square symbol above the “ ”
flashes, and press “+” or “-” button to set how long oven needs to cook.
2. Press the function button repeatedly until the square symbol above the “ ” flashes, and
press “+” or “-” button to set the time for oven to stop cooking and switch off.
3. Adjust Knob B and C (See Figure 6) to select cooking mode and temperature mode.
4. The symbols above the “ ” and “ ” will flash, it indicates the cooking timer has been
set. The cooking will start and finish as per programmed into the timer.
For example:
If the food is required to bake for 45 minutes, and it is supposed to stop at 14:00
Press the function button repeatedly until the square symbol above “ ” flashes, and set the
time of baking to 45 minutes.
Press the function button repeatedly until the square symbol above “ ” flashed, and set the
finish of baking at 14:00.
The proper clock (hour/ minute) and the square symbol will show on the display, it indicates
the setting of cooking timer has been remembered automatically.
When the clock shows13:15, the oven will switch on automatically and cooking will start.
During the cooking time, the square symbol will keep flashing.
When the clock shows14:00, cooking will stop and the oven will switch off automatically, the
alarm will ring, and the square symbol will flash.
To stop the ringing press any button.
15