UNDER CABINET RANGE HOOD This manual is made with 100 % recycled paper. Electronic version of this manual is available at: www.cosmoappliances.
Thank You Thank you for your purchase. We know that you have many brands and products to choose from and we are honored to know that you have decided to take one of our products into your home and hope that you enjoy it. Serial Number Location Remove the aluminum filters. The serial number is located on the right inside of the range hood. Our appliances are designed according to the strictest safety and performance standard for the North American market.
IMPORTANT SAFETY INSTRUCTIONS Read all instructions before using this appliance. Save these instructions for future references Approved for residential appliances For residential use only IMPORTANT SAFETY INSTRUCTIONS CAUTION FOR GENERAL VENTILATING USE ONLY. DO NOT USE TO EXHAUST HAZARDOUS OR EXPLOSIVE MATERIALS OR VAPORS. CAUTION To reduce risk of fire and to properly exhaust air, do not vent exhaust air into spaces within walls, ceilings, attics, crawl spaces, or garages.
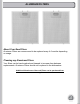
ALUMINUM FILTERS About Your New Filters Aluminum Filters are recommened to be replaced every 4-6 months depending on usage. Cleaning my Aluminum Filters Your filters can be hand washed and cleaned to increase time between replacements. Aluminum Filters should not be placed in the dishwasher. Additional Aluminum or Charcoal Filters can be purchased from www.cosmoappliances.
TABLE OF CONTENTS PARTS DIAGRAM 05 INSTALLATION REQUIREMENTS 07 INSTALLATION PROCEDURES 11 OPERATING INSTRUCTIONS 14 MAINTENANCE 15 TROUBLESHOOTING 16 17 WARRANTY AND SERVICE 4
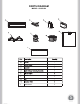
PARTS DIAGRAM MODEL: COS-5U30 I Motor I Metal Cover 5
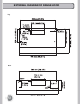
EXTERNAL DIAGRAM OF RANGE HOOD Top Rear 6
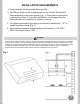
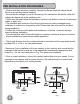
INSTALLATION REQUIREMENTS 1. Please read the following instructions carefully. 2. This Range Hood can be vented through the top or back. Remove the Panel according to the option chosen (Fig. 1). Panel can be removed by removing the screws. For ductless installation, remove panel from the back and make sure that there is a panel on the top. 3. For optimal performance the Range Hood must be installed 24" - 36" in height from the cooktop. (Fig. 2) 4.
PRE INSTALLATION PROCEDURES • Please read the instructions carefully. Unpack the Range Hood and check that all functions are working before installing. • Ensure that the voltage (V) and the frequency (Hz) indicated on the sticker match the voltage and frequency at the installation site. • Check that the area behind the installation surface to be drilled is clear of any electrical cables or pipes, etc.
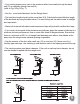
• Your venting system must vent to the outdoors either horizontally through the back wall(13) or vertically through the roof(14). (refer to Fig. 5/Fig. 6/Fig. 7). • Use 6 in. round metal ductwork for this Range Hood. • The total duct length should not be more than 35 ft. Calculate the total effective length of the ductwork by using the table below. For each fitting use the table to see its straight duct equivalent. • Fasten all ductwork with sheet metal screws and tape all joints with certified duct tape.
WIRING DIAGRAM CAUTION: Shut-off power supply before installing. Installation work and electrical wiring must be done by Qualified Person(s) In accordance with all applicable codes & standards, including fire-rated construction. Green Black White Brown Light ELECTRICAL HOLE • Choose the appropriate electrical knockout hole to remove for your installation type.
INSTALLATION PROCEDURES CAUTION: HOOD MAY HAVE VERY SHARP EDGES; PLEASE WEAR PROTECTIVE GLOVES WHENEVER IT IS NECESSARY TO REMOVE ANY PARTS FOR INSTALLING, CLEANING OR SERVICING. Cabinet Installation Method 1. For Ducted installation cut a 9.8" x 3.23" rectangle into the cabinet. (this will be for the ductwork) and four 3.5mm diameter holes as pictured below picture. 1.Make sure the metal cover is installed on the vent hole that will not be venting the air. Put four wall anchors into the drilled holes.
INSTALLATION PROCEDURES CAUTION: HOOD MAY HAVE VERY SHARP EDGES; PLEASE WEAR PROTECTIVE GLOVES WHENEVER IT IS NECESSARY TO REMOVE ANY PARTS FOR INSTALLING, CLEANING OR SERVICING. Wall Mount Installation Method 1. For Ducted Installation A. Find the 4 mounting holes in the back of the range hood. Mark their locations at the installation location with a pencil or marker. B. Drill 5/16 (8mm) holes at each of the marked locations. C. Insert anchors along with screws into each drilled hole.
RECIRCULATING CHARCOAL FILTERS Skip this page if you are installing a Ducted Range Hood. Charcoal Filters are only included with Ductless Models Fig. 1 Installing Recirculating Filters (For Ductless Model Only) 1. Remove the Aluminum Filters from the Range Hood 2. Locate Fig. 1 , unscrew the 6 screws along the Motor Ring (metal circle). Set motor ring to the side. 3. Take your charcoal filter and align the holes on the motor housing to the holes of the filter. 4.
OPERATING INSTRUCTIONS Light Button. Press on this button to turn on the lights, and press again to turn them off. Low Speed Button: Press this button to run the motor at low speed. Medium Speed Button: Press this button to run the motor at medium speed. High Speed Button: Press this button to run the motor at high speed. Motor Off Switch: Press this button to stop the motor while it is running on any given speed.
MAINTENANCE CAUTION: NEVER PUT YOUR HAND INSIDE OF THE UNIT WHILE ITS OPERATING. FOR THE BEST PERFORMANCE CLEAN YOUR RANGE HOOD REGULARLY. CLEANING 1. Use only mild soap or cleaning solutions to clean the hoods' outer surface. Dry surfaces using a soft cloth. 2. Stainless Steel cleaner may be used on the external surface. 3. Clean the Range Hood assembly 1 to 3 months depending on use. 4. DO NOT clean the motor or electrical components with water or any other liquid.
TROUBLESHOOTING CAUTION: ALWAYS UNPLUG UNIT FROM POWER BEFORE SERVICING PROBLEM SOLUTION TOOLS My range hood is noisy. A. Check inside the range hood for any loose debris and remove. A. The range hood and cooktop are too far away from each other. Optimal distance is 24” to 36” Phillips Screwdriver My range hood has poor performance.. Phillips Screwdriver B. There are too many open windows or doors in the area. Close some doors or windows. C. The motor performance has decreased due to wear.
WARRANTY AND SERVICE Limited Warranty This unit comes with 5 Year Manufacturer’s Part Warranty. Within 5 years after date of receiving the product, Cosmo will replace any functional parts that are defective. The customer must contact Cosmo and provide a description of the defective part, including digital pictures if requested, along with original proof of purchase. Defective components must be returned to Cosmo shipping prepaid.